Archive for July, 2010

Welcome Kathleen!

Saturday, July 10th, 2010

I’d like to take the opportunity to welcome my dear friend Kathleen to Domestic Pursuits. A close college-friend of Lisa’s, Kathleen and I were co-matrons of honor in Lisa’s wedding. Kathleen will be a regular contributor to the blog, sharing her experiences with gardening, house projects, cooking, baking and other domestic endeavors.

Kathleen has quite a green thumb; her yard hosts a wide variety of annuals, perennials, as well as a raised-bed garden (so jealous!).  She’s also an excellent, creative cook and a home brewer.  I’m looking forward to hearing more about her garden and trying out her recipes!

Coffee Chip Ice Cream

Friday, July 9th, 2010

My neighbors must think I’m crazy.  I recently discovered that the late-afternoon light in my backyard is just perfect for food photography.  I regularly scamper into the backyard with a white resin table, place-mat, dish of food and my camera and proceed to crawl around on the ground snapping pictures.  Taking this picture was a race against time, as ice cream doesn’t really appreciate 90 degree temperatures.

Onto the ice cream:  I simply love this coffee ice cream!  While I have enjoyed all of my homemade frozen confections, this is one of my favorites.  It’s smooth and creamy with the perfect punch of coffee flavor.  Mini chocolate chips  add a nice crunch and burst of chocolate.

Most coffee ice cream recipes I found involved steeping whole beans for an hour or so.  This seemed like a time-consuming and relatively expensive way to make coffee ice cream.  Homemade ice cream is certainly not a money-saving endeavor, but I figured that there had to be an easier, less pricey way to do this.  I decided to experiment with my favorite vanilla ice cream recipe and some instant coffee.  By reducing the sugar, eliminating the vanilla extract and adding 2 tablespoons of instant coffee, I was able to easily whip up the coffee ice cream I had been dreaming of.

Coffee Chip Ice Cream

1/4 cup Egg Beaters
7 oz. fat free sweetened condensed milk (1/2 can)
4 tbsp white sugar
8 oz heavy whipping cream
2 tbsp instant coffee
8 oz fat free half and half
8 oz skim milk
1/2 cup semi-sweet mini chocolate chips

1. Pour half and half into small saucepan and heat, stirring occasionally, until steam rises. Remove from heat.
2. In a separate bowl, use a whisk or electric mixer to beat Egg Beaters, sweetened condensed milk and sugar together. Beat in 1/2 cup of hot half and half and then stir this mixture into the saucepan with the remaining half and half.
3. Cook over medium-low heat, stirring almost constantly. Continue until the mixture reached 170-180 degrees or is slightly thickened. Do not bring the mixture to a boil.
4. Pour the mixture into a separate bowl and stir in the cream, milk, vanilla extract and salt.
5. Chill the mixture for several hours (overnight is even better). You can speed up the process by placing the bowl containing the mixture in a large bowl filled with ice and water.
6. Freeze in ice cream maker according to manufacturer’s directions.
7. Once the ice cream is done, gently fold in the cookie dough chunks and chocolate chips.

Raspberry Ripple Ice Cream

Tuesday, July 6th, 2010

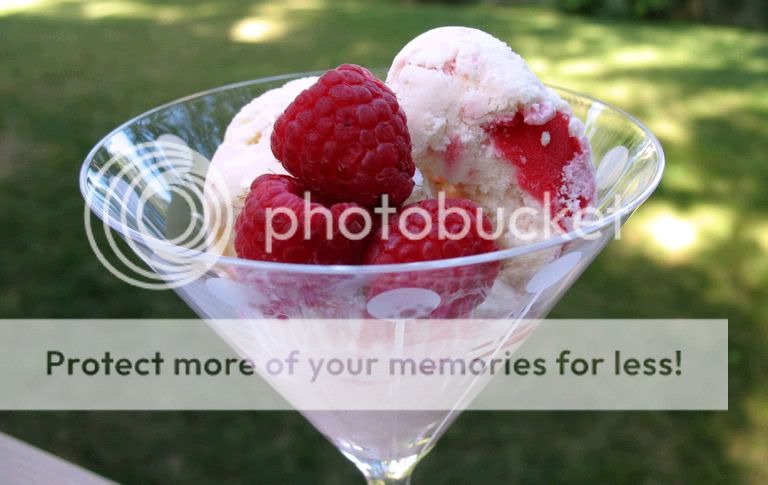
It’s that time of year when there’s an abundance of beautiful fresh berries on sale at grocery stores across the country! Having already tackeled Strawberry Ice Cream this summer, I decided to snag a package of raspberries.

In The Perfect Scoop, David Lebovitz details a recipe for Raspberry Swirl ice cream. Using that as inspiration, I made my go-to vanilla base and layered it with a smooth, bright raspberry sauce. David’s recipe simply calls for mashing the whole berries with a fork, but I opted to puree the raspberries and strain out the seeds.

The final product is even better than I had imagined. The tangy, fresh raspberry sauce pairs beautifully with the mellow vanilla ice cream. While certainly delicious on its own, a generous helping of hot fudge takes this ice cream to another level.

Raspberry Ripple Ice Cream

1/4 cup Egg Beaters
7 oz. fat free sweetened condensed milk (1/2 can)
3 tbsp white sugar
3 tbsp brown sugar, not packed
8 oz heavy whipping cream
8 oz fat free half and half
8 oz skim milk
1/8 tsp salt
1 1/2 tbsp vanilla extract
1/4-1/2 cup raspberry sauce (see recipe below)

1. Pour half and half into small saucepan and heat, stirring occasionally, until steam rises. Remove from heat.
2. In a separate bowl, use a whisk or electric mixer to beat Egg Beaters, sweetened condensed milk and sugar together. Beat in 1/2 cup of hot half and half and then stir this mixture into the saucepan with the remaining half and half.
3. Cook over medium-low heat, stirring almost constantly. Continue until the mixture reached 170-180 degrees or is slightly thickened. Do not bring the mixture to a boil.
4. Pour the mixture into a separate bowl and stir in the cream, milk, vanilla extract and salt.
5. Chill the mixture for several hours (overnight is even better). You can speed up the process by placing the bowl containing the mixture in a large bowl filled with ice and water.
6. Freeze in ice cream maker according to manufacturer’s directions.
7. Transfer the ice cream to a storage container, alternating layers of ice cream with generous drizzle of raspberry sauce. Do not mix the ice cream and the sauce, as it will become muddied.

Raspberry Sauce
adapted from David Lebovitz’s Raspberry Swirl
The Perfect Scoop, p.92-93

1.5 cups (160 grams) raspberries, fresh or frozen
3 tbsp sugar
1 tbsp vodka

1. Puree the raspberries in a food processor or blender.
2. Using a rubber spatula, press the puree through a mesh strainer to remove the seeds.
3. Whisk the sugar and vodka into the strained sauce.
4. Cover and store in the refrigerator until needed.

Cuban Lime Grilled Tuna Steak

Monday, July 5th, 2010

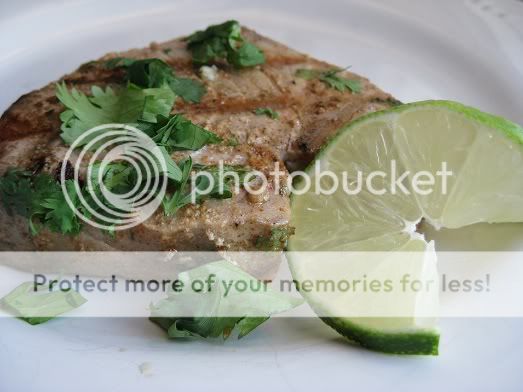
I love tuna.  It’s one of my favorite restaurant picks when out for a dinner on the town – but I recently I was thinking I could not remember the last time I tried preparing it myself.  Partly, this is because recently I’ve started liking tuna rare, which seemed a bit intimidating as I’ve never really made any rare foods besides steak.  But, I did some research on rare tuna safety and figured – no time like the present to try it myself.  So, I picked up some tuna steaks at my local favorite seafood source.  The night we broke out this recipe, I had a simultaneous craving for mojitos and figured I would look for some variety of cuban flavor to add to the tuna.  I modified the recipe slightly – mostly, I swapped out the lemon juice for lime juice, because I wanted it to go well with my mojito!  It was incredible – obviously any rare food has some risks, but we lived on the edge – left ours rare and the tuna steak remained juicy and delicious.   The recipe has just enough bite without overwhelming the tuna - and the mojito was perfect for putting out the fire.


Cuban Lime Grilled Tuna Steak - adapted from foodnetwork.com

Ingredients

  • 1/3 cup olive oil
  • 1 teaspoon salt
  • 2 teaspoons cayenne pepper
  • 1/3 cup lime juice
  • 3 large cloves garlic, minced
  • 1/2 medium onion, minced
  • 2 teaspoons ground cumin
  • 1/2 cup fresh cilantro (lightly packed, leaves only) finely chopped
  • 4 (6 ounce) pieces of tuna fillet

Mix together olive oil, salt, pepper, lime juice, garlic, onion and cumin.  Stir in about 3/4 of the cilantro (reserve the remainder for garnishing later) to the mix.  Place the tuna steaks into a glass baking dish, and coat both sides of each steak well with the marinade.  Marinate covered in the fridge for about 30 minutes.  Preheat grill to high heat.  Grill the tuna steaks for 4-5 minutes on each side – or more if you prefer well-done tuna.  Garnish with the remaining cilantro, and lime if you wish – and enjoy!

Happy 4th!

Sunday, July 4th, 2010

It’s a time for backyard barbeques,  fireworks and trips to the beach.  Hope everyone has a happy 4th!

As a former piccolo player, I particularly appreciate Beaker’s rendition of the pic part in the final stanza. :)

Blackberry Ice Cream

Saturday, July 3rd, 2010

I don’t know if you’ve had this sense recently, but I’m getting the feeling it’s a good year for blackberries!  Our favorite produce store has had blackberry sales pretty much every time we’re there – so I’ve been searching for recipes to use them in.  Naturally, as July was appointed National Ice Cream Month, I figured heading into July it was time to break out the old ice cream maker again.  I’ve always loved the smooth sweet taste of black raspberry ice cream, so I figured giving blackberry ice cream a try would be my next logical step!  I adapted this recipe, adapted by the blog ’Salt and Chocolate’ for blackberries from a recipe originally for raspberry ice cream in David Lebowitz’s “The Perfect Scoop.”  My main changes related to using all half and half, as I was trying to cut the fat just a little…it came out great, perhaps a little firmer out of the freezer than it’s full-fat counterpart would be.  The flavor was perfectly sweet, and the lemon juice definitely helps emphasize the blackberries!  Perfect treat at the end of a long July day.

Blackberry Ice Cream

  • 4 cups fresh blackberries
  • 3 cups half-and-half
  • 1 cup sugar
  • 4 egg yolks
  • 1 tbsp fresh squeezed lemon juice

Before you start, puree blackberries in a food processor and pass the puree through a fine mesh strainer to get all the seeds out.  Place 1 and 1/2 cups half-and-half in a saucepan with the sugar and heat over low-medium heat until the sugar dissolves.  In a separate bowl, beat together the egg yolks until smooth.  Add about 1/4 cup of the heated half-and-half/sugar mixture to the egg yolks, stirring constantly so that the eggs don’t scramble on you!  Then add the egg yolk mixture back to the saucepan and continue stirring constantly while heating until the mixture reaches 163-168 degrees farenheit – keep it in this range for 5 minutes in order to pasteurize the custard.  Remove custard from the heat.  Pour through mesh strainer into a bowl.  Stir in the remaining half and half, blackberry puree and the lemon juice.  Chill completely.  Freeze in your ice cream maker according to manufacturers instructions.  Enjoy!

Chocolate Chip Cookie Dough Ice Cream

Friday, July 2nd, 2010

I’m a bit of a late bloomer when it comes to chocolate chip cookie dough. While others grew up stealing tastes or outright devouring raw dough, I shunned it in fear of raw eggs. In fact, I still won’t consume uncooked cookie dough. But homemade eggless cookie dough – that’s another matter entirely.

This ice cream falls into the “where have you been all my life?” category. It’s amazing. The cookie dough bits, courtesy of David Lebovitz, are perfectly buttery and sweet – I could (and did!) eat them like candy. Regular readers of this blog may recognize the vanilla ice cream recipe, as it’s the same one used for Cookies and Cream, as well as Moose Tracks. It’s rich, creamy and oh-so-easy to make.

Cookie Dough Ice Cream

1/4 cup Egg Beaters
7 oz. fat free sweetened condensed milk (1/2 can)
3 tbsp white sugar
3 tbsp brown sugar, not packed
8 oz heavy whipping cream
8 oz fat free half and half
8 oz skim milk
1/8 tsp salt
1 1/2 tbsp vanilla extract
1 batch of eggless cookie dough chunks (see recipe below)
1/4-1/2 cup semi-sweet chocolate chips

1. Pour half and half into small saucepan and heat, stirring occasionally, until steam rises. Remove from heat.
2. In a separate bowl, use a whisk or electric mixer to beat Egg Beaters, sweetened condensed milk and sugar together. Beat in 1/2 cup of hot half and half and then stir this mixture into the saucepan with the remaining half and half.
3. Cook over medium-low heat, stirring almost constantly. Continue until the mixture reached 170-180 degrees or is slightly thickened. Do not bring the mixture to a boil.
4. Pour the mixture into a separate bowl and stir in the cream, milk, vanilla extract and salt.
5. Chill the mixture for several hours (overnight is even better). You can speed up the process by placing the bowl containing the mixture in a large bowl filled with ice and water.
6. Freeze in ice cream maker according to manufacturer?s directions.
7. Once the ice cream is done, gently fold in the cookie dough chunks and chocolate chips.

Cookie Dough
The Perfect Scoop, p. 209

5 tbsp salted butter, melted
1/3 cup packed light brown sugar
1/4 cup flour
1/2 tsp vanilla extract
3/4 cup semisweet or bittersweet chocolate chips

1. In a medium-sized mixing bowl, stir together the butter and sugar until smooth.
2. Stir in the flour (I needed to add an extra tablespoon), followed by the vanilla and chocolate chips.
3. Form the dough into a 1/2 inch disk. Wrap in plastic and chill in freezer for 30 minutes.
4. Unwrap the dough, chop into bite-sized pieces. (using a chef’s knife works well)
5. Store the pieces in the freezer, covered, until you’re ready to use them.

Grilled Margherita Pizza

Thursday, July 1st, 2010

There is something so pure about a margherita pizza – nothing like a little basil and tomato with cheese on grilled flatbread to make dinner special.  I am a big fan of grilling pizzas, and also a big fan of the Food Network show “Good Eats” with Alton Brown - so when I saw the most recent Alton Brown pizza recipe (from “Flat is Beautiful V”) happened to be a grilled margherita pizza, I couldn’t help but give it a try.  Now, I had never made a quality margherita pizza at home.  The flavors never seem quite right when I tried putting it together myself; I now realize it’s probably because I did not marinate or cook the tomatoes first.  I used my usual go-to pizza dough rather than the variety Alton made because…well, who keeps barley malt syrup on hand?  (Actually, we do have it on hand, but it’s specially designated for our upcoming home-brewing adventure, as we’re planning on brewing an apricot IPA in the next few days and my husband would not be happy with me if I used it!)  The recipe is not yet posted on foodnetwork.com, however I was able to find it on a fellow Alton Brown fan’s website.  The key here is the marinating and grilling the tomatoes - the depth of the flavors is much better if you follow this step.  Plus, it would probably be messy if you tried to crush uncooked tomatoes on a grilled pizza crust. 


Grilled Margherita Pizza - adapted from Alton Brown, via Lisa from ‘All About Alton’ 

  • 1/2 recipe pizza dough
  • olive oil
  • 1 large tomato, thickly sliced
  • 2 cloves garlic
  • 1/4 tsp red pepper flakes
  • 1 tsp kosher salt
  • 4-5 basil leaves, julienned
  • 1/2 – 3/4 cup shredded mozzarella cheese
  • 1/4 cup asiago cheese

Place tomato, garlic, 1-2 tablespoons of olive oil, salt and red pepper flakes into a bowl and stir to coat the tomatoes.  Let sit for 20 minutes or so as you prepare your crust.  For the crust – first, make sure your pizza dough is at room temperature before you use it!  Place pizza dough on a floured surface and roll to 1/4 inch thickness using a rolling pin.  Make sure to rotate your dough after each pass with the rolling pin so that it does not stick to your surface!  After dough has reached desired thickness, place it onto a floured pizza peel.  Brush with 1-2 tablespoons of olive oil.  Preheat your trusty grill – no pizza stone this time folks!  When your grill has finished preheating, take the pizza peel with dough on it and flip it directly onto the grill – if it sticks a little just give it a nudge with a spatula and it will come off.  At the same time, place the slices of marinated tomato directly onto the grill.  Grill the crust until it starts to form little bubbles as the dough bakes.  Brush with another 1-2 tsp of olive oil, then using the pizza peel, lift it off the grill and flip over.  At this point, the tomatoes should be pretty well cooked through – lift them off the grate and place directly onto the pizza crust, mashing them with the back of your spatula into the crust.  Sprinkle the pizza with the basil, mozarella, and asiago cheeses.  Cook until the cheese melts.