Authors
Beth
Kathleen
Lisa
Contact
domesticpursuits [at] gmail.com
Categories

Archive for the ‘Appetizers’ Category

Tuna Ceviche

Saturday, August 20th, 2011

I will warn first off that this recipe contains uncooked Tuna.  Ceviche is basically, for lack of a better description, pickled raw fish.  I personally a not weirded out by raw fish – sushi is one of my favorite foods – but nonetheless, if you are weirded out by raw fish, you may want to give this one a pass.  I would buy your fish on the same day you plan to make the ceviche.  Make sure you’re careful to use extremely fresh fish from a reliable fish source.  Also be very careful to handle the tuna properly – keep it refrigerated, wash your hands, and make sure your kitchen is clean! 

 I used tuna as I have plenty of experience eating it and working with it.  The recipe I found on the website for Every Day with Rachel Ray - and it really came out pretty darn awesome, if I don’t say so myself.  I made it as part of a fancy celebratory dinner we had and frankly it made me feel like I was at some kind of swanky restaurant.  I didn’t make may modifications to this one – first, I didn’t make nearly as much of it, as we were using this as an appetizer sized portion.  Also, I don’t particularly like coconut milk, so I omitted that entirely.  As that was the bulk of the sauce, I decided to leave the remaining ingredients in the original amounts so that I would have enough sauce to coat the fish.  The important part is the acidity, so make sure you don’t tone that down, as that’s the part that ‘pickles’ the ceviche. 

Tuna Ceviche

from Every Day with Rachel Ray

  • 1/2 pound sushi-grade tuna, cut into 1/2-inch cubes
  • 1 tablespoon soy sauce
  • 1/3 cup cilantro leaves, roughly chopped, plus a few leaves for garnish
  • 1 tablespoon finely chopped ginger
  • 1/2 jalapeƱo, finely chopped
  • 4 scallions, green part only, thinly sliced
  • 1 tablespoon fresh lime juice
  • 1/2 teaspoon fish sauce
  • Salt
  • Combine all ingredients (except for the garnish!) in a bowl and refrigerate for at least 30 minutes.  Tada!  You’ve made ceviche!  Enjoy.

Soft Pretzels

Sunday, April 3rd, 2011

Soft pretzels are seriously one of God’s gifts to carb lovers like me.  (Literally! Legend has it, these were invented by a monk as a treat for children who said their prayers.)  The key to getting the proper texture, with the smooth firm outside, is to submerge them into an alkaline bath, such as water and baking soda.  They always seemed easy enough…but we had tried making soft pretzels once upon a time, but I recall it becoming a sticky, gooey mess when in the water bath.  (As an aside, they still tasted good that time, but anyway.)  When I decided to give them another shot, my husband was a bit skeptical, but the promise of freshly baked pretzels won him over, and I gave it a try today.

I recalled that Alton Brown made a tasty looking pretzel on Food TV’s Good Eats, and figured that I would give his version a try.  Sure enough, they were simple and easy – if you have a stand mixer, you barely have to touch the dough – and came out amazing.  I personally don’t keep pretzel salt hanging out in my pantry, so I used a slightly finer Kosher salt, and it came out just fine.  It was a lovely treat to enjoy these with some nice cold beer and a spicy mustard this afternoon.

Homemade Soft Pretzels

From Alton Brown, via Food TV

  • 1.5 cups of Warm Water
  • 1 packet (or 2 and 1/4 tsp) Dry active yeast
  • 1 Tablespoon Sugar
  • 2 tsp Kosher salt
  • 22oz Flour
  • 2oz Butter, melted
  • Vegetable oil
  • 10 Cups of Water
  • 2/3 cup Baking Soda
  • 1 Egg Yolk
  • 1 Tablespoon Water
  • Kosher salt for sprinkling

In the bowl of your stand mixer, combine warm water, dry active yeast, sugar and salt.  Let stand for about 5 minutes, or until mixture begins to appear foamy.  Add flour and butter to the bowl.  Using your dough hook attachment, mix on low speed until all ingredients are incorporated, then increase to medium speed and continue to mix until dough forms a ball, pulls away from the side of the bowl, and appears smooth.  Grease the bowl of your stand mixer lightly with vegetable oil, and place the dough back in the bowl.  Cover with saran wrap loosely, and place in a warm area of your kitchen for about an hour, or until the dough doubles.

After the dough has risen, bring the 10 cups of water and baking soda to a rolling boil.  Preheat your oven to 450 degrees.  As the water is heating, prepare 2 cookie sheets by lining them with parchment paper, and then coating lightly with vegetable oil.  On a lightly oiled surface, turn out the pretzel dough and divide into 8 equal portions.  Roll these portions into an approximately 2 foot long rope.  Shape into a pretzel by forming a U, crossing the arms of the U over each other once, and then folding them down and attaching them to the bottom of the U shape.  Gently lower the pretzel into the rapidly boiling water, one at a time, for 30 seconds each.  After boiling, place onto the prepared cookie sheets.  Beat together the egg yolk and the additional tablespoon of water, and brush this mixture over the pretzels.  Sprinkle with Kosher salt to taste.  Bake for 12-14 minutes, or until the pretzels appear golden brown on top.  Enjoy!

Black Bean Dip

Tuesday, February 8th, 2011

The last entry in my January (well, now early February) dip series is a Tex-Mex inspired black bean dip published (a few days late!)  in honor of that big football game, which as you all know was played in Dallas, Texas this year.  We are had a Superbowl party Sunday, and like many of you, we served up lots and lots of unhealthy (yet delicious) tidbits.  This dip, however, injects just a little bit of sense into our day of beer, fried cheese sticks, and mini pizza bagels, while bringing those favorite Tex-Mex spices to the party.  While it’s creamy and delicious, it is also low-fat as you will notice, and is also full of fiber and vegetables…although granted we ate it off of tortilla chips.  It made me feel just a little bit less gross at the end of the day.  This is another one of those recipes that you can throw together from things you have (or SHOULD have) in your pantry for a day such as Sunday, when the store ailes are clogged with confused single men looking for something to serve during the big game.  (My apologies if you are a single man – clearly if you are one who happens to be reading this blog, you are enlightened and do not fall into this category!) 

I modified the recipe from the original in several ways – first, I used a can of diced tomatoes with green chiles, as I wanted to have a spicier bean dip.  If you would rather something with less of a kick, you can certainly use plain tomatoes.  I also added some light cream cheese at the end to give it silky smoothness that I just love in mexican dips.

Spicy Black Bean Dip

Source: Ingrid, via allrecipes.com

Ingredients

  • 1 (15 ounce) can black beans, rinsed and drained
  • Olive oil cooking spray
  • 1/2 cup chopped onion
  • 2 cloves garlic, minced
  • 1/2 cup frozen corn
  • 1 can diced tomatoes with green chiles
  • 1 teaspoon ground cumin
  • 1 teaspoon chili powder
  • 2oz (1/4 of an 8oz block) light cream cheese
  • 1/4 cup sharp cheddar cheese
  • 2-3 tbsp chopped fresh cilantro

Directions

Place black beans into a sturdy bowl, and mash! ( This takes a bit of elbow grease – don’t worry about getting the beans too smooth, the texture gives the dip character!)  In a skillet over medium heat coated with cooking spray, saute the onion and minced garlic together until the onions start to turn translucent.  Add mashed beans, frozen corn, tomatoes and chiles, and spices, stirring well, and cook until the mixture starts to thicken.  Add in the cream cheese cut into 2 or 3 chunks for ease of mixing, and the cheddar cheese.  Stir well.  Top with chopped cilantro.  Serve warm with your favorite chips!

As an aside – the leftovers made an AMAZING quesadilla filling.

Hummus

Saturday, January 29th, 2011

New Englanders tend to swarm the grocery store anytime there’s snow in the forecast, clearing the shelves of bread, milk and other staples.  I guess memories of the Blizzard of ’78 die hard.  If there’s an approaching storm, I typically try to avoid the grocery store at all costs.  As a recent storm approached, I decided I wanted to take advantage of being snowed in the following day and make salsa, hummus and pita for our snacking enjoyment.   I was the crazy lady combing the aisles in search of tahini (found it with the olives!) and packing my basket with cilantro, jalapeƱos, garbanzo beans, canned tomato and a bag of flour…not exactly your typical snowstorm fare.

Alas, I was unable to carry out my culinary plans, as two downed telephone poles in the vicinity caused us to lose power for the better part of the day.   No internet or kitchen appliances…how unfortunate!  Tragic, even.

A few days later, I put my food processor through it’s paces and made all of the things that I had planned to enjoy on my snow day.  A dear friend described his wife’s stand mixer as something that “you put things in and food comes out.”  I have to say, this pretty much describes my sturdy 9-cup food processor too!  In mere minutes, I was able to throw together a tasty, custom batch of  hummus .  I used this recipe as a general basis for ingredients and quantities, but adjusted things quite a bit.

This really is the wonderful thing about making your own hummus – you can tweak the ingredients to your heart’s content.  Love garlic?  Throw in several cloves!  Prefer a tangier flavor?  Add some more lemon.   The options are endless.    Grab a can of garbanzo beans and tahini (try to avoid the snow storm crowds!) and get pureeing!

Hummus

1 14.5 oz can of garbanzo beans, drained (reserve the liquid)
2 tbsp tahini
1.5 tsp lemon juice
salt to taste
2 cloves garlic, chopped
1 tablespoon olive oil
1/2 tsp ground cumin

1. Place the garbanzo beans, tahini, lemon juice, salt, garlic, olive oil and cumin in a blender or food processor. Blend until smooth.
2. Add small amounts of water or liquid from the canned beans to the hummus, blending well to achieve desired consistency.

Guacamole

Thursday, January 27th, 2011

For some reason, I always found the idea of making guacamole intimidating until fairly recently.  I don’t know what it was, but the idea of peeling and mashing avocado just seemed too difficult.  But, for the 3rd recipe in my January dip series, I wanted to post my favorite guacamole recipe. 

Guacamole is one of those dishes that can be prepared in many ways to suit many tastes – I personally really enjoy the flavor of the avocado, so I try not to overwhelm it with many spices or other strong flavors, such as tomato.  Feel  free though to modify this however you see fit – I’ve tried it with the addition of diced tomato, with bacon, with cumin, and using lemon juice instead of lime.  You can make it spicy or tame.  No matter which modifications you make, it’s important to remember to make the guacamole shortly before you intend to eat it, or else it will develop a brown color like apples or bananas do when cut and then left out.  (Please note, though the color may be significantly less appetizing, it still tastes fine like this.)  Enjoy with chips or your favorite Mexican-inspired dish!

I think perhaps what intimidated me in the past about making guacamole was not knowing how to choose and prepare avocados – I find it nearly impossible to find a perfectly ripe avocado in the grocery store.  If your grocery store is like mine, the avocados are all firm as can be when you pick them up.  The trickiest part of making guacamole then is timing your avocado purchase accordingly.  If all you can find are firm, unripe avocados – place them into a paper bag and wait for a day or two.  Do not refrigerate them, or they stop ripening!  (On the other hand, if you happen to find ripe avocados and want to keep them from spoiling – put them in the fridge to halt the ripening process.)  To retrieve the flesh – slice the avocado in half lengthwise around the sizeable pit in the center.  Twist the halves of the avocado in different directions – this ought to loosen up the pit and allow you to pull one side away.  To remove the pit – there are a lot of different methods out there, but I would say that the safest is to pry it out with a spoon.  Scoop the flesh out of the tough, leathery peel using a tablespoon. 

Guacamole – original recipe by Lisa!

  • Flesh of 2 medium sized avocados
  • 1/2 small onion, minced
  • 1 clove of garlic, minced
  • 2-3 tablespoons of chopped fresh cilantro (1 tsp of dried cilantro can be substituted – but the flavor just isn’t the same!)
  • 2 tablespoons olive oil
  • Juice of 1/2 of a lime
  • Salt and pepper to taste

Mash the avocado in a bowl prior to adding any other ingredients.  It’s ok if it’s a little lumpy, that will make your avocado have body and character!  Stir in the minced onion and garlic.  Add olive oil and lime juice, stirring until the texture is even.  Add cilantro and stir well.  Add salt and pepper to taste.  Enjoy!

Buffalo Chicken Dip

Sunday, January 16th, 2011

Today in honor of week 2 of the football playoffs, I am adding another dip recipe to add to my January collection.   I personally love anything buffalo flavored these days – something about the spicy tomato-ey flavor combined with creamy cool cheese that has got me hooked.  I therefore obviously had to include a buffalo chicken dip in my dip montage.  I found this recipe which I ended up modifying from the original a bit  – first, I try not to buy canned chicken, as I find it too salty and too dry - instead, I used one leftover medium-sized cooked chicken breast made the day before.  Second, as with most of my recipes, I made some substitutions to reduce the fat content – namely, used light cream cheese and fat free ranch dressing.  Third, I don’t know about you – but 5 cups of dip as this recipe claims to make is a LOT of dip to make for one party, no matter how awesome the dip (or the party) – so I changed the proportions to make a much more reasonable 2.5 cups. Lastly, I made it at a friend’s house – so instead of dirtying a skillet, I used the microwave to heat it!  This version came out great – it has just the right amount of kick to be enjoyed by all.  For a different flavor, try add blue cheese dressing instead of ranch!

Buffalo Chicken Dip – adapted from allrecipes.com, Nunpunch

Ingredients

  • 1 medium-sized chicken breast, cooked and shredded
  • 8oz package light cream cheese, softened
  • 1/2 cup fat free Ranch dressing
  • 1/3 cup hot sauce (such as Frank’s)
  • 3/4 cup shredded cheese (I used a combination of swiss and cheddar)
  • 1 bunch of celery, cleaned and cut into 4 inch pieces
  • crackers

Directions:

Stir together chicken, cream cheese, ranch dressing, cheese, and pepper sauce in a microwave-safe container.  Place into microwave.  Microwave for 1 minute at a time, stirring in between, until the dip reaches your desired temperature and consistency.  Enjoy with celery and crackers.  And football, if you are so inclined.

Spinach Artichoke Dip

Tuesday, January 11th, 2011

New year, new house, new recipes!  My husband and I moved last month – as an aside, I now know why so few people opt to move in December – between the closing, the packing, the moving out and the moving in, and the holidays, I needed a few weeks to recover!  We’re now settled comfortably into our new home, and I finally have time to cook again. 

Now that football playoffs are upon us, it’s that time of year where one needs an arsenal of appetizer recipes to have on hand for the boys.  Frankly, even if you’re not going to be watching the playoffs (sorry to the Eagles, Colts, Saints & Chiefs fans out there), winter is a great season to find a warm afternoon snack to have around for entertaining.  My January series of posts will involve a number of tasty, easy & economical hot appetizer dips to prepare for your upcoming football festivities…or any other upcoming events you may have that are not related to sports. 

In my opinion, there are few appetizers more enjoyed than a nice warm Spinach & Artichoke dip, accompanied by some crispy crostini.  A few years ago, my co-blogger Beth posted a similar recipe as part of her homage to Superbowl Snacks - I made this slightly different recipe during the holidays this year, and it was both so easy and received such rave reviews that I promptly decided it is a definite keeper.  I served this with homemade crostini (really just a fancy word for toast) which I made myself by toasting thin slices of sourdough baguette.  It also is fantastic with tortilla chips or potato chips…and if you’re feeling especially healthy for your New Year’s resolution, it would also taste good with fresh vegetables too.  Like Beth’s, it has the distinct advantage that you can prepare it in advance – right through the final step of topping with mozarella and baking – which may make your Sunday afternoons more fun over the next few weeks if you are going to be watching the boys party for a few weeks, like me. 

PS – it also involves the ever useful frozen spinach

Hot Spinach & Artichoke Dip – from Tiffany Brennan via allrecipes.com

Ingredients

  • 1 (8 ounce) package light cream cheese, softened
  • 1/4 cup light mayonnaise
  • 1/2 cup grated Parmesan cheese
  • 1 clove garlic, peeled and minced
  • 1/2 teaspoon dried basil
  • 1/4 teaspoon garlic salt
  • salt and pepper to taste
  • 1 (14 ounce) can artichoke hearts, drained, rinsed, and chopped
  • 1/2 cup frozen chopped spinach, thawed and drained
  • 1/4 cup shredded mozzarella cheese

Directions

Preheat oven to 350. (Unless you are making it in advance – then no need right now!)  Blend together the cream cheese, mayo, parmesan cheese, garlic, basil and salt.  Stir until well combined.  Gently fold in the artichoke hearts and spinach.  (If preparing in advance – stop here!)  Place into an oven-safe small baking dish.  Top with mozarella cheese, and bake at 350 degrees for 30 minutes.

To make crostini:  Slice a baguette (I used a sourdough baguette) into 1/4 inch thick slices.  Place slices in a single layer on a cookie sheet.  Toast at 350 degrees for 12 minutes.  Call them crostini, and everyone will think you are about to win the next Iron Chef.

Say Cheese!

Saturday, July 31st, 2010

It’s happened to even the best of us.  After a long day of work, you come home exhausted and don’t feel like cooking. What you do feel like doing is putting your feet up and relaxing with a glass of wine. And maybe a little cheese and crackers. And another glass of wine.

That’s where I come in. I am an unapologetic lover of all things cheese (bacon as well, but that’s for another post…). Melted, cubed, sliced, you name it– I’ll eat it.  I love going to restaurants and ordering a cheese plate to share; it provides a wonderful opportunity to try out new cheese selections and often a fruit or nut pairing that works really well.  The downside is that those delicious looking plates often come with a hefty price tag and a microscopic wedge.  Here’s my budget solution to a gourmet cheese display that takes maybe 10 minutes max to put together pulling things you probably already have in your pantry and your fridge!

From L to R: jalapeno jack, pepperoni, colby jack, strawberries, fig jam, salami, olives, gorgonzola crumbles, berries, brie log

Let’s break the plate down into a few categories: meat, cheese, bread, fruit/veggies, and spreads.  While you don’t have to have everything on your plate, it’s the combination of them that really elevates a fairly lazy dinner.

Start with the cheese you can find in the fridge. Think about what you’d naturally pair with it. Got swiss cheese? How about add a few cut up slices of deli ham? Cheddar? Pull out that salami or pepperoni and add a bit.  For both of those, pickles would go really well– giving a nice, salty bite. Add a few gherkins from the jar, or better yet– call them cornichons and you’re already getting fancy! Look at you!

Next– the crackers or bread. I like to keep a big variety of crackers on hand, for just such occasions.  You could even add a few slices of crusty bread if you’ve got it on hand.

One “must have” for a cheese plate in my home is fruit. Slice up an apple and serve with colby, cheddar, or muenster. Gouda is fantastic with dried apricots. Blue cheese? Use some dried cranberries, or any fresh berry in season. Grapes are an easy go-to as well. Brie pairs well with pretty much any fruit.

Spreads– this is where your display really goes above and beyond the standard. I’ve seen and enjoyed many a cheese plate that came with a bit of honey comb, but who keeps that around? Add a tiny bit of honey to a prep bowl, add a spreading knife, and it’s pretty much the same thing. Similar with figs– I love them, but I never (emphasize NEVER) have fresh figs on hand. What I do keep in my fridge is fig jam.  Not only does it keep much longer, it goes amazingly well with brie and it’ll make a spread for the best turkey sandwich you’ve ever had! A bit of spicy mustard is also an always-welcome addition for that cheddar and salami.

Finally, the extras. I usually pile a few olives and mixed nuts into the fray just for snacking.  Put everything on to a big cutting board that you used to slice the cheese, and voila! No dishes! Depending on your wine/beer leanings, pair the whole deal with a glass of sparkling Italian wine (prosecco) or a lambic-style beer; a decent bottle of either will run you no more than $10. A final note on cheese– the biggest problem with the delectable dairy product is cost. I have never failed to find an amazing selection of affordable cheese at my local Trader Joe’s.  While I’ve found plenty of bargains, quality double-creme brie for less than $4 is something of value.

Now go out there and rummage through your pantry for your own wine and cheese night! Let us know about your favorite cheese and fruit/snack pairings!

Tomatillo Salsa

Wednesday, June 24th, 2009

I had been wanting to try my hand at tomatillo salsa for quite some time, but was unable to procure fresh or canned tomatillos at several local, suburban grocery stores. Last week while perusing the fresh produce, I excitedly spotted the small husked tomatillos alongside the vine-ripened tomatoes and assorted hot peppers. My purchase caused quite a stir at the front end, as it took awhile for several cashiers to come up with the correct produce code. Apparently my local Stop and Shop doesn’t move large volume of tomatillos.

Now that I had the produce in hand, I had to settle on a recipe. After looking over several recipes to get a general idea of standard ingredients and preparations, I settled on this recipe from on allrecipes.com. I was pleased with how quickly the salsa came together. While the tomatillos were cooking, I chopped and measured the rest of the ingredients into the food processor work bowl. Less than a minute after removing the tomatillos from the stove, the salsa was done.

I will definitely be making this again. The salsa had a tart fresh tang, with an aromatic hint of garlic. Just add chips and a frosty margarita and you have a perfect Mexican-inspired snack.

Tomatillo Salsa

1 pound tomatillos, husk and stem removed
1/2 cup chopped onion
1 clove garlic, roughly chopped
1 jalapeno pepper, seeded and roughly chopped
2 tbsp chopped cilantro
1 tsp dried oregano
1/2 teaspoon ground cumin
1 1/2 teaspoons salt, or to taste
1 tbsp lime juice (juice of 1/2 lime)

1. Place husked, washed tomatillos in a saucepan. Fill the pan with enough water to cover the tomatillos and bring to a boil over high heat.
2. Reduce heat to medium and simmer for 10-15 minutes, or until tomatillos are soft.
3. Transfer tomatillos to the work bowl of a food processor. Reserve cooking water in case additional water is needed to thin the salsa.
4. Add remaining ingredients onion, garlic, jalapeno, cilantro, oregano, cumin and salt) and process until smooth. If salsa is too thick, add small amounts of cooking water until desired consistency is reached.

Corn Salsa

Wednesday, June 10th, 2009

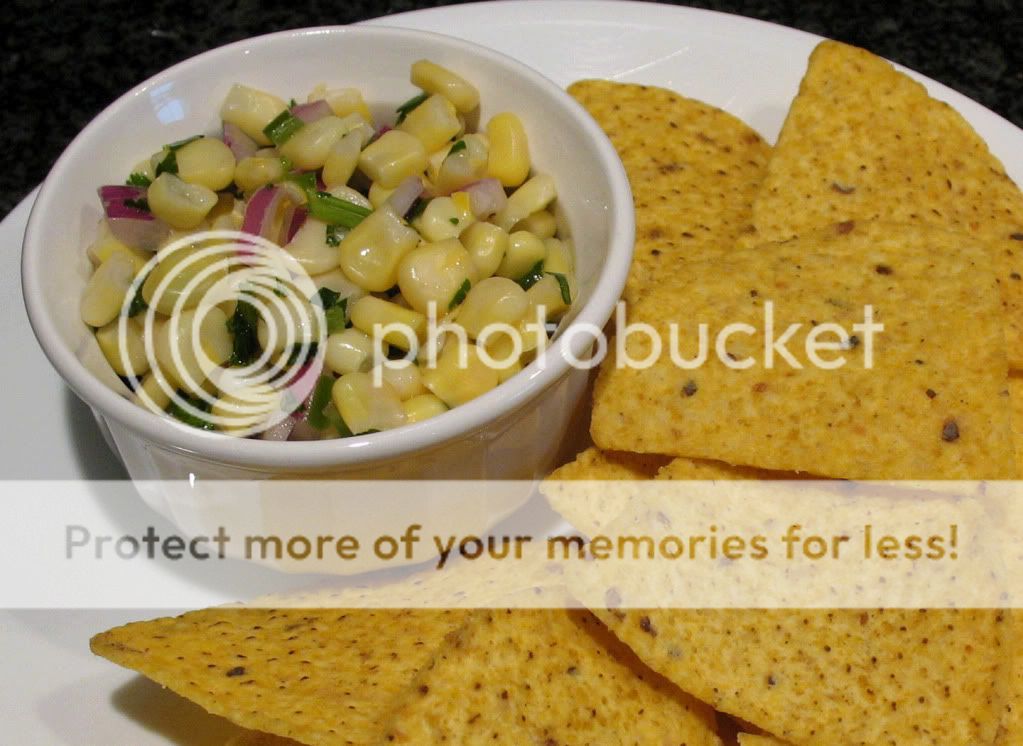
I do not like tomatoes. While I love the taste of tomatoes, I won’t touch anything that resembles a fresh tomato. As you might imagine, this limits my options for fresh salsas. Enter corn salsa. When I tried it at Chipotle, it was love at first bite. It’s crisp, fresh, flavorful and contains no trace of tomato.

Inspired by my love of Chipotle’s corn salsa, I set out to create a reasonable approximation at home. When I first started making the salsa, I used this recipe from About.com as my guide, but now I just eyeball all of the ingredients. This is a non-particular recipe that can be easily adjusted to suit individual preference. I can safely say that I use more jalapeno, cilantro and onion than called for in the original recipe.

You can certainly use frozen corn to make this salsa, but it tastes even better with fresh, native corn stripped from the cob. When I use fresh corn, I boil a few ears as if I were going to serve it and then slice the kernels from the cob. The fresh corn lends a crisp sweetness to the salsa.

I’m growing jalapeno peppers this year, as well as cilantro. The starter pepper plants look good, as long as the squirrels leave the tiny peppers alone! I started the cilantro from seed, and it just sprouted a few days ago. Every few weeks, I plan to sow a new batch of cilantro so I will have a continuous supply. By the time my favorite farm stand is selling their native corn, I hope to have jalapenos and cilantro from my garden to use in this salsa!

Since it’s so easy to put together, this salsa has become a summer staple in my household. It’s delicious as an accompaniment to corn chips, or grilled meats. In face, it complements tequila lime chicken beautifully. However you sever it, this corn salsa is simple, fresh and flavorful.

Corn Salsa

2 cups frozen corn kernels, thawed (2-3 medium ears of fresh corn)
1/3 cup chopped red onion
3 tablespoons chopped fresh cilantro
2 tablespoons fresh lime juice (juice of one lime)
1 to 2 tablespoons finely chopped jalapeno pepper
1/2 teaspoon salt

1. Combine all ingredients in a small bowl.
2. Cover and refrigerate for 2 to 4 hours.
3. Can be served cold or at room temperature.

Subscribe
Email Registration  Email
  RSS
Recipe Sites
  • All Recipes
  • Cooking Light
  • Epicurious
  • Food Network
Archives
Sitemeter
Blog Directories
Add to Technorati Favorites