Authors
Beth
Kathleen
Lisa
Contact
domesticpursuits [at] gmail.com
Categories

Archive for the ‘Cookies’ Category

Black and White Cookies

Saturday, March 12th, 2011

Black & White Cookies are amazing - there’s the soft, cakey cookie part and the rich smooth frostings – the combination makes me pick them up as often as I can.  As I never thought about baking them before, I thought they would be the perfect addition to my list of things to make while I’m 30!  It’s just over halfway for me to 31 now, and I’ve been slacking off a bit on my list in favor of other things that have come to mind, like homemade (wal)nutella and buffalo chicken dip, which is I suppose the peril of making a list of things you plan to make over the course of the next 365 days.  Of course when I made the list, I didn’t really think that I should probably keep my pastry intake to a minimum – but, well, one has to do what one has to do when it comes to making all 30 things on my list.  So here I am, catching up and baking Black and White Cookies.  The recipe I made was adapted from a few places – but primarily from Smitten Kitchen, and from David Lebowitz’s latest cookbook, Ready for Dessert.  I wasn’t sure about the recipe for the frosting from the Smitten Kitchen one – it just seemed like it would be too liquidy to me – and my frostings usually tend to err on the liquidy side to begin with.  I opted instead for the Lebowitz frostings, using the Smitten Kitchen cookie.  These cookies were fantastic: soft and chewy with creamy frosting – I can’t get enough of them!

Black and White Cookies

adapted from Smitten Kitchen and Ready for Dessert, by David Lebowitz

For the cookies:

  • 1 scant cup granulated sugar
  • 1 stick unsalted butter, at room temperature
  • 2 large eggs
  • 3/4 cups milk
  • 1/4 teaspoon vanilla extract
  • 1/8 teaspoon lemon extract
  • 1 and 1/4 cups cake flour
  • 1 and 1/4 cups all-purpose flour
  • 1/4 teaspoon baking powder
  • 1/4 teaspoon salt

For the frosting:

  • 2 cups, plus 2 tbsp powdered sugar or more if needed
  • 2 tsp, plus 2 tsp light corn syrup
  • 1/4 tsp lemon extract
  • 1 tsp vanilla extract
  • 3 tbsp water, plus more if needed
  • 3 tbsp Dutch process cocoa powder

Preheat your oven to 375 degrees, and line 2 cookie sheets with parchment paper.  In a stand mixer cream together butter and granulated sugar until fluffy and light.  Add in eggs, milk and extracts, mixing thoroughly.  In a separate bowl, sift together the flours, baking powder, and salt.  Gradually stir the dry ingredients into the wet ones, until the dough is formed.  (Be careful not to overmix, so the cookies don’t become tough.)  Drop by the tablespoon onto the parchment lined pans – these will bake into approximately 2 inch cookies.  Bake for 18-20 minutes in the preheated oven, or until cookies are lightly golden at the edges.  Cool completely on a wire rack.

For the frostings – mix together 2 cups of powdered sugar, 2 tsp of the corn syrup, extracts, and 3 tbsp of water until smooth.  Divide this mixture into two portions.  In one of the portions, stir in the cocoa powder until smooth – if this is too dry, add water in very small increments (1/2 teaspoon at a time) stirring after each addition until smooth.  To the other portion of frosting, stir in the remaining 2 tbsp of powdered sugar.  Spread chocolate frosting on one half of the cookie, and the white frosting on the other half.  Enjoy!

Frozen Cookie Dough: Freshly Baked Cookies in Minutes

Monday, February 21st, 2011

Frozen Cookie Dough

I’ve been baking quite a bit lately, but I haven’t gone through nearly as much work as it may appear.  I’ll let you in on a little secret:  I mixed the dough for the Doubly Chocolate Cookies and the Fresh Mint Chocolate Chip Cookies at the end of December.  Seriously.  If you peruse my freezer, you’ll find frozen balls of dough, a handful of baked cookies and well-wrapped brownies (also already baked) alongside the standard bags of frozen vegetables and frozen meats one expects to find in the freezer.

Why do I do this?  My motives are mixed: 1)  Freezing desserts, both baked and unbaked, assists greatly in portion control.  Let’s face it, a plate of cookies sitting on the counter is going to get consumed in short order and 2) Sometimes you want a cookie or two just out of the oven, but you don’t want to go through all the trouble to make the dough and clean up.  This is fantastic when you just have to have cookies and tea at 9:30 on a Wednesday night.

If you want to freeze dough, portion it out onto a cookie sheet and pop it in the freezer for 30-60 minutes to allow the dough to firm up.  You can place them close together, because they’re not going to spread.  I like to line my cookie sheet with foil or wax paper to make clean up easier.  One the dough balls are firm, pack them in a freezer bag, squeeze out as much air as possible and seal.  The dough will stay fresh for a few months – I’ve gone up to three months with no problems.  When you want a few cookies, heat the oven according to the original recipe instructions, place the frozen dough on a cookie sheet and pop it in the oven.  There’s no need to thaw – just bake for 1-2 minutes longer and enjoy!

Hershey’s Doubly Chocolate Cookies

Thursday, February 17th, 2011

I’ve been told that my family has the chocolate gene.  The women in my family simply adore it.  Most desserts at family gatherings are chocolate and for years a birthday cake that wasn’t chocolate may as well have been considered blasphemy.  I had to chuckle when my cousin’s 8 year old son surveyed the dessert table at our last  family Christmas party with dismay and queried “Is there anything that isn’t chocolate?”  There were oreo truffles, chocolate cookies, doubly chocolate cookies and a host of other chocolate-containing cookies.  I think he settled on some sugar cookies, and possibly relented on Pumpkin Chocolate Chip Cookies.  Poor kid.

I can relate to my little cousin.  For years, I didn’t get what all the fuss was about.  Vanilla, fruit and mint flavors piqued my interest and tantalized my taste buds far more than chocolate ever could.  My family probably wondered what was wrong with me. :)  However, I can assure you that my chocolate gene has kicked on and my love of chocolate has shifted into high gear in recent years.  Hershey’s Perfectly Chocolate Cake is my absolute favorite cake recipe, and I keep a supply of Ghirardelli squares and Lindt truffles on hand for chocolate emergencies.

Even in my vanilla-loving hey-day, I adored these Hershey’s Doubly Chocolate Cookies.   They’re simply perfect:  soft and chewy, chocolaty and rich, but not overly so.  Each bite is full of chocolate flavor from the mellow cocoa and the perfectly sweet chocolate chips.  I’ve been baking these for years – first with my mother and then on my own.  They’re always part of my Christmas baking rotation and make numerous appearances throughout the year.  With two kinds of chocolate rolled up into one little cookie, you just can’t go wrong.  The only way to make them better would be to add more chocolate!

Hershey’s Doubly Chocolate Cookies
Yields approximately 4 1/2 dozen cookies

2 cups all-purpose flour
2/3 cup cocoa
3/4 tsp baking soda
1/4 tsp salt
1 cup butter, softened
1 1/2 cup sugar
2 eggs
2 tsp vanilla
2 cups (12 oz. package) semi-sweet chocolate chips

1. Pre-heat oven to 350 F
2. In a small bowl, stir together flour, cocoa, baking soda and salt.
3. In a large bowl, beat together butter, sugar, eggs and vanilla until light and fluffy.
4. Gradually add flour mixture, beating well.
5. Stir in chocolate chips.
6. Drop by rounded teaspoons onto ungreased cookie sheet.
7. Bake for 8-10 minutes or until just set. Cool for 1-2 minutes on cookie sheet before transferring to wire rack to cool completely.

Fresh Mint Chocolate Chip Cookies

Tuesday, February 15th, 2011

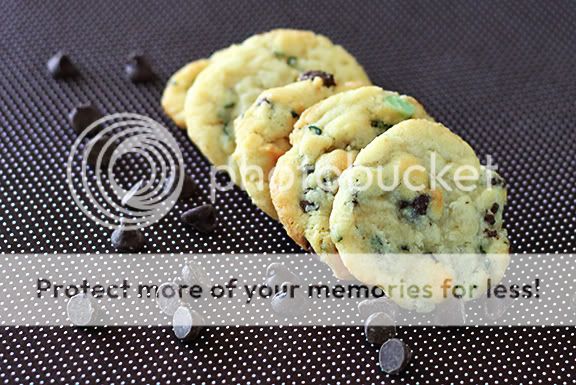
When I first made these cookies, it was bright, sunny and warm.  My little container garden was in bloom and my mint plant was out of control.  I had been hesitant to bake, because I didn’t want to make the house any warmer than it already was!  I lounged on the deck in a sun-dress and flip-flops, enjoying my mint chocolate chip cookies with a cool glass of iced tea.

These days, my container garden is a distant memory and the extra heat from a warm oven is a welcome addition.  Freshly-baked cookies are best enjoyed with a piping hot cup of tea, a cozy blanked and a roaring fire.

Whenever you make these cookies, they are fantastic!  Buttery, sweet and minty, these cookies are studded with dark and mint chocolate chips and dotted with slivers of fresh mint leaves.

The original recipe from Betty Crocker Cookies calls for semi-sweet chocolate chips, but I opted to use the seasonal Nestle Dark Chocolate & Mint Morsels.  Now that I’ve run out, I’m using Guittard Mint Chips mixed with Ghirardelli 60% Cacao Bittersweet Baking Chips.  Availability for the Mint Chips seems pretty limited, but Amazon has the best price.  The Ghirardelli chips can be found in many grocery stores and also on Amazon.  Feel free to experiment with different combinations and kind of baking chips – you really can’t go wrong!

Fresh Mint Chocolate Chip Cookies
Yields about 3 1/2 dozen cookies

1 1/3 cups sugar
3/4 cup butter, softened
1 tbsp finely chopped fresh mint leaves
1 egg
2 cups flour
1 tsp baking soda
1/2 tsp salt
3/4 cup mint chips
3/4 chocolate chips (semi-sweet or dark chocolate)

1. Pre-heat oven to 350 F
2. In a large bowl, beat sugar, butter mint and eggs on medium speed until well-combined.
3. Mix in four, baking soda and salt.
4. Stir in baking chips.
5. Drop dough by rounded tablespoons onto an ungreased cookie sheet, leaving two inches between the cookies.
6. Bake 11-13 minutes or until golden brown. Let cool on baking sheet for a few minutes before transferring to wire rack to cool completely.

Oreo Cheesecake Cookies

Friday, February 11th, 2011

An open bag of Oreos is an incredibly dangerous thing.  I’m usually very well-behaved around sweets, but Oreos are a striking exception to the rule.  It starts off innocously enough: a single serving of 3 cookies.  But then I just grab just one more, and then another, and then another… you get the picture.  Open bags of Oreos don’t last very long in my house.

When I saw this recipe for Oreo Cheesecake Cookies in December, I knew I had to make them.  Oreos?  Cream cheese?  I’m there!  The problem was that I had a large array of cookies already planned for Christmas gifts (and snacking!) and it just didn’t seem wise to add another variety to the mix.  So I tagged the recipe in my Google reader and waited until the perfect baking opportunity presented itself.

They were worth the wait!   The cookies are remarkably easy to make and taste outstanding.  The subtle sweet tanginess of the cheesecake cookie pairs beautifully with the rich, chocolate crunch of crushed Oreos.   Like Oreos, they’re just too easy to eat…it’s pretty much impossible to eat just one!

Oreo Cheesecake Cookies
Yields about 30 cookies

8 tablespoons  unsalted butter, softened
3 ounces cream cheese, softened
½ tsp salt
1 cup sugar
1 tsp vanilla extract
1 cup all-purpose flour
½ cup mini semi-sweet chocolate chips (normal size is fine too)
1 cup oreo cookie sandwich crumbs (about 8 oreos)

1. Pre-heat the oven to 375 degrees andline 2 baking sheets with parchment paper or silicone mats.
2. In a large bowl, beat the butter, cream cheese and salt on medium-low speed until smooth and creamy.
3. Gradually add the sugar, beating until the mixture is light and fluffy (1-2 minutes)
4. Beat in the vanilla and add the flour, mixing on low until just combined.
5.  Mix in the chocolate chips.
6.  Place Oreo crumbs in a shallow bowl.  Roll the dough into 1-inch balls and drop in the cookie crumbs, rolling to coat.  Place dough balls 2 inches apart on baking sheet.
7.  Bake for 8-10 minutes.  Cookies are done when the edges just start to brown and the tops are set.  Cool for a few minutes before transferring to wire racks to cool completely.

Raspberry Lemonade Sandwich Cookies

Sunday, January 30th, 2011

I don’t know about you, but I am getting a little tired of winter.  We easily have 2.5 feet of snow on our lawn, and it seems the stream of various manners of frozezn precipitation and shovelling has been endless.  When picking out a recipe to bring to Beth’s for dessert this week then, I wanted to find one that made me think of 80 degree days, flowers and trees in bloom, and fresh fruit to get me through the next few months until we’re nearing the spring.  This recipe combines two of my favorite flavors – sweet raspberries and tart lemons into a tasty little sandwich.  This was my first attempt at a sandwich cookie, and I think it went quite well!  I had picked up this linzer cookie cutter set during the holidays and though I never got to using it in my Christmas baking, I was dying to give it a whirl, and this was the perfect opportunity.  I just love all the little fruit cut-outs – and a fruity recipe is surely needed to use it!  Certainly if you do not happen to have a linzer cookie cutter, you can just use a round cookie cutter with a smaller cookie cutter to create the little window in the top of the cookie.

All in all, these were very easy to make – the dough is very easy to work with compared to some other cut-out cookies I have made.  (I may in fact use this as my go-to sugar cookie recipe from now on!)  I doubled the lemon zest in the original recipe to give this recipe even more summery taste – I think I could probably have gone even higher, as the lemon came through but was on the subtle side.  In addition, I somehow found myself out of powdered sugar for dusting – so I opted for a chocolate drizzle, which worked quite nicely.  

The cookies were a big hit on our relaxing evening with a nice spot of tea.  Even though the snow continued to fall on that chilly January evening, it made me feel like summer was right around the corner. 

Raspberry Lemonade Sandwich Cookies

Source: Better Homes & Gardens

Ingredients:

  • 1/3  cup  butter, softened
  • 1/3  cup  shortening
  • 3/4  cup  granulated sugar
  • 1-1/2  teaspoons  baking powder
  • 1/4  teaspoon  salt
  • 1/4  teaspoon  ground cinnamon
  • 1    egg
  • 1  tablespoon  milk
  • 1/2  teaspoon  vanilla
  • 1  teaspoon lemon zest
  • 2  cups  all-purpose flour
  • 1/3  to 1/2 cup raspberry preserves or jam (or flavor of your choice)
  • 1/4 - 1/3 cup chocolate chips
  • 1/2 tsp canola or other vegetable oil
  • Directions:

    Using your stand mixer, cream together the butter and shortening on high speed.  Add in sugar, baking powder, salt, and cinnamon, and mix on medium speed for 2 minutes.  Scrape down sides of bowl and mix for an additional 1-2 minutes.  Add in egg, milk, vanilla and lemon zest on low speed for about 1 minute.  Stop to scrape down the sides of the bowl and mix for an additional 1 minute or until smooth.  Gradually add flour to the bowl while mixing on low speed.  The mixture will form a somewhat dry dough.  Divide into two portions, and form the dough into 2 discs.  Wrap these in plastic wrap and chill for at least 1 hr in the refrigerator.  When ready to bake, remove dough from the refrigerator and roll dough on a lightly floured surface to 1/4-1/8 inch thickness.  Use your cookie cutters to cut out the cookie halves.  The top halves should have a center window cut in them so the jam filling can peak through later.  Preheat your oven to 375 degrees.  Bake on an ungreased cookie sheet for 8-10 minutes – the edges should be just faintly browned when they are fully baked.  Cool completely on a wire rack. 

    To assemble – spread a small amount of jam onto the base of the cookie, then press the cut-out top half of the cookie onto the base. 

    To make the chocolate drizzle – place chocolate chips into a small bowl and add canola oil, stirring to coat the chocolate chips.  Microwave on high at 10 second intervals, stirring between each, until the chocolate chips are melted and smooth.  Drizzle over the assembled cookies.  Enjoy!

Anisette Cookies

Tuesday, April 13th, 2010

My local grocery store’s bakery makes the most amazing Anisette Cookies – soft pillows of anisette goodness coated with a delicate sugar glaze.  They are especially tasty when consumed with a cup of piping hot Lady Grey tea.

On Sunday, I found myself planning a last-minute dinner with my parents and realized that I didn’t have anything to serve with tea after our meal.  With at 90 minutes to spare before our company arrived, I could have run to the store to pick up a pack of cookies, but I decided to bake my own.  A quick search on allrecipes.com yielded this fantastic recipe for Italian Anisette Cookies.

Since I didn’t want to have too many extra cookies lying around after dinner (if I bake them, I will eat them!), I halved the recipe and ended up with about 30 smaller cookies.  They were so easy to make – only 60 minutes elapsed from the time I started measuring my ingredients to when I dipped the last cookie.  I even had time to work on other food preparation while the cookies baked.

I followed the recipe exactly as written.  I did find that the icing required more water than noted in the recipe, so I just  kept adding a little at a time until I was able to achieve the desired consistency.    Some of the reviewer comments provided helpful information concerning how to tell that the cookies are done – it’s important to not let the cookies brown or even turn golden on the top.  I baked them for 8 minutes as directed and the resulting cookies were soft and fluffy, yet stable.

As expected, these cookies were delicious – the perfect complement to a relaxing cup of tea.  Some reviewers altered the recipe to use either almond extract or lemon extract in place of the anise… now I can’t wait to make tasty little lemon drops!


Anisette Cookies

Yields about 60 cookies

4 cups all-purpose flour
1 cup white sugar
1/2 cup milk
2 eggs
1 tbsp baking powder
3/4 cup vegetable oil
1 tbsp anise extract

1 cup confectioners’ sugar
2 tbsp hot water (at least)
1 tsp anise extract

1. Preheat oven to 375 degrees F.
2. In large bowl, whisk together flour, baking powder and white sugar.
3. Make a well in the center and add oil, milk, 1 tablespoon anise extract, and eggs. Mix together until dough is sticky.
4. Shape dough into 1-inch balls and place on a lightly greased cookie sheet, 1 inch apart. Flatten top slightly.
5. Bake for 8 minutes.
6. Dip cookies in icing while warm.

To Make Icing: Blend in 1 teaspoon anise extract and enough hot water to 1 cup confectioner’s sugar to form a smooth icing.

Snowed In!!!

Sunday, December 20th, 2009

Well, we got 24 inches of snow in our neck of the woods this weekend – since my husband and I had no place to go, we stayed in and “let it snow!” While everyone else in the city stocked up on bread, milk and eggs (presumably to make french toast?) I opted for butter, flour, sugar and other baking implements – I figured we can always live off of cookies for a few days! I made four different varieties yesterday, and one more today!! Here are the first couple – the rest will follow soon!

Batch #1 – Gingerbread Cookies

I just love these little ginger-colored treats with frosting-piped faces. Although in my typical fashion I wanted a “healthier” cookie recipe if possible, these came out very moist and delicious – my husband didn’t even realize they were from Cooking Light. They were surprisingly easy to cut and the dough didn’t crumble on me like the last few batches of gingerbread cookies I made.

Cookies:

  • 10.1 ounces all-purpose flour (about 2 1/4 cups)
  • 1 teaspoon ground ginger
  • 1 teaspoon ground cinnamon
  • 1/2 teaspoon baking powder
  • 1/4 teaspoon baking soda
  • 1/4 teaspoon salt
  • 1/4 teaspoon ground nutmeg
  • 1/2 cup packed brown sugar
  • 1/2 cup butter, softened
  • 3 tablespoons molasses
  • 1 large egg
  • Cooking spray
  • Icing:

  • 1 cup sifted powdered sugar
  • 1 tablespoon water
  • Combine flour, ginger, cinnamon, baking powder, baking soda, salt, & nutmeg with a whisk. In a separate bowl, combine the brown sugar, butter, & molasses and beat for 2 minutes. Add the egg and beat well to combine. Add the flour mixture to the wet ingredients – I used a heavy duty stand mixer as the dough became quite thick and sticky. Divide the dough in half, flattening each half into a disc and wrapping tightly in plastic wrap. Chill the dough for at least 90 minutes. Preheat oven to 350 degrees. Roll out the dough to 1/8 – 1/4 inch thickness and cut with the desired cookie cutter. Place 1 inch apart on a parchment-lined baking sheet. Bake at 350 degrees for 8 minutes and then cool completely on a wire rack.

    For decorating: Mix powdered sugar and water – if too thick, add drops of water – I ended up using closer to 1.5 tablespoons in the end. Spoon the icing into a plastic bag with a tiny hole cut in the corner and decorate away!

    Batch #2 – Chocolate Peanut Butter Pinwheels

    My husband loves anything that combines chocolate and peanut butter – so in my baking extravaganza I wanted to make sure I included some cookies he would really enjoy! This recipe I found was great, although I made a couple minor substitutions – I didn’t have baking chocolate on hand, and as there was a blizzard outside I opted to substitute in some cocoa powder. They came out great – although the dough softened very fast when out of the fridge. Cut them speedily!

    Ingredients:

    1/2 cup sugar

    1 stick of butter (softened)

    1 egg

    1 tsp vanilla

    1 1/2 cups flour

    1/2 tsp baking powder

    1/4 tsp salt

    3 tbsp cocoa powder

    1 tbsp vegetable oil

    1/4 cup creamy peanut butter

    Beat sugar, butter, egg and vanilla together in a large bowl – scrape the bowl often to make sure everything is well mixed! Add flour, baking powder and salt and mix together well. Divide dough into two even portions. To the first portion, add the cocoa powder and the vegetable oil and mix well. To the second portion, add the peanut butter and mix well. Shape the two doughs into rectangles and wrap tightly in saran wrap. Refrigerate for at least 1 hr. Roll each dough out between 2 pieces of floured wax paper – Make sure the doughs are approximately the same size! Then peel away one sheet of wax paper from each dough. Press the two doughs together, and roll (jelly-roll style) into a log. Wrap the log in saran wrap and place the dough into the freezer for 20 minutes. Preheat oven to 375 degrees. Remove dough and quickly slice into 1/4 inch thick discs. Place 1 inch apart on a parchment-lined cookie pan and bake at 375 degrees for 8 minutes.

Toll House Cookies

Tuesday, June 9th, 2009

I love having a well-stocked freezer. A double batch of vegetarian black bean chili and multiple portions of Mexican rice have saved the day on multiple occasions. I freeze leftover sauce, broth, black beans and shredded chicken to prevent leftovers from spoiling and to save for future use. However, the most enjoyable part of my freezer stash has to be cookie dough.

Freezing cookie dough serves multiple purposes: 1) It prevents my husband and I from eating too many cookies in a short period of time. Sometimes you just want a few cookies, and it’s not always easy to figure out what to do with the remaining four dozen! 2) It allows me to whip up freshly-baked cookies with no mess in a very short amount of time!

Pumpkin Chocolate Chip cookies were my bite-sized dessert of choice for most of the fall, but the classic Toll House cookie became my go-to dessert during the latter part of the winter and into the spring. There are countless variations of the classic chocolate chip cookie, but this is my favorite. They come out chewy on the inside with a hint of crunch on the outside.

I made a few minor changes to the original recipe, based upon recommendations from a friend. I use half butter and have shortening, and I adjusted the amounts of brown sugar and granulated sugar.

If you want to freeze your cookie dough and bake at a later date, drop the cookie dough onto a cookie sheet lined with parchment or wax paper (for easy clean up) and place the sheet in the freezer for about a half hour. Remove the firm balls of dough from the sheet and place in a freezer bag, removing as much air as possible. When you want to bake the frozen dough, there’s no need to defrost! Preheat the oven to 375 and place the frozen balls of dough on a cookie sheet. You’ll probably need to bake the cookies 2-3 minutes longer than usual, but keep and eye on them so that they don’t burn.

Toll House Cookies

Yields 60 cookies

2 1/4 cups all-purpose flour
1 teaspoon baking soda
1 teaspoon salt
1/2 cup butter, softened
1/2 cup vegetable shortening
1/2 cup granulated sugar
1 cup packed brown sugar
1 teaspoon vanilla extract
2 large eggs
2 cups (12-oz. pkg.) semi-sweet chocolate chips

1. Whisk together flour, baking soda and salt in a small bowl.
2. In a large mixing bowl, beat butter, granulated sugar and brown sugar until creamy.
3. Add eggs, one at a time, beating well. Beat in vanilla extract.
4. Beat in flour mixture gradually.
5. Stir in chocolate chips.
6. Drop dough by rounded tablespoon onto ungreased cookie sheets.
7. Bake for 9-11 minutes or until golden brown.
8. Cool on cookie sheets for at least two minutes, then remove to a wire rack to cool completely.

BAKE at 375 for 9 to 11 minutes or until golden brown. Cool on baking sheets for 2 minutes; remove to wire racks to cool completely.

Banana Chip Biscotti

Friday, April 10th, 2009

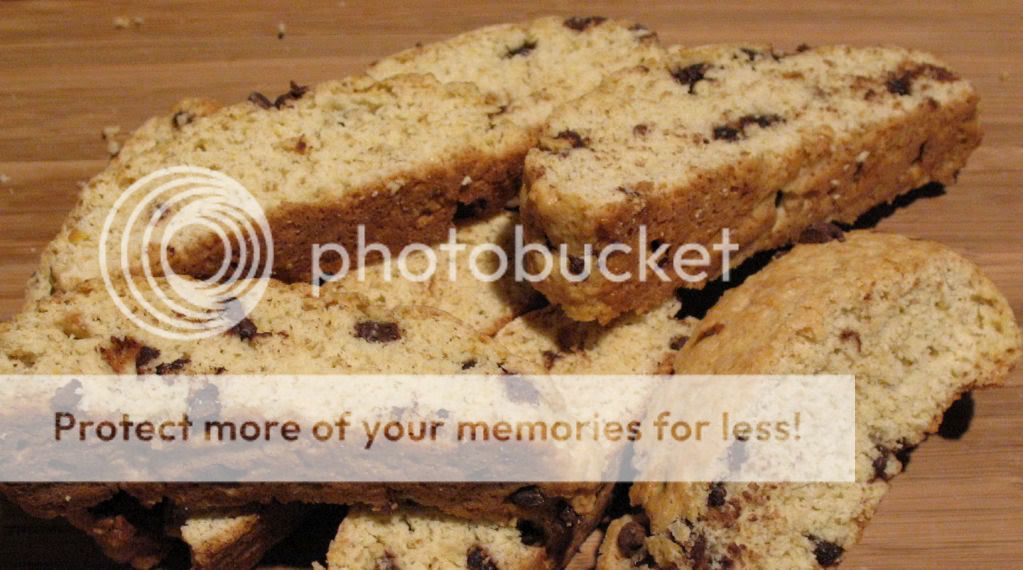
I spotted this recipe for Banana Nut Biscotti on the blog Gaga In the Kitchen (originally from Cooking Light). I’ve been meaning to try my hand at biscotti for a while, and this recipe looked like a fun departure from the usual biscotti flavors. I absolutely love banana bread, but since I am not a fan of nuts, I decided to use mini chocolate chips instead.

This was my first attempt at biscotti, so I don’t know exactly how the dough is supposed to feel. When I combined the wet and dry ingredients, the resulting dough was quite crumbly and did not hold together well. Since I may not have added enough mashed banana, I threw in an additional tablespoon of canola oil and a little more mashed banana. After these additions, the dough was soft, moist and workable.

I was quite happy to find that making biscotti is very easy, and the resulting cookies are delicious! These biscotti have a nice subtle banana flavor, and the chocolate chips work well. I will be making these again, and look forward to trying other biscotti recipes. Any recommendations on what I should try next?

Banana Chip Biscotti

Yields 24 cookies

1 3/4 cups all-purpose flour
1/2 cup sugar
1 tsp baking powder
1/4 tsp salt
1/3 cup mashed very ripe banana (about 1 banana)
1 tbsp vegetable oil
1 tsp vanilla extract
1 large egg
1/3 cup chopped pecans, toasted
Cooking spray

1. Preheat oven to 350?.
2. In a small bowl, combine the flour, sugar, baking powder, and salt.
3. In a medium bowl, combine banana, oil, vanilla, and egg.
4. Stir in flour mixture. The dough should be sticky. If it is not moist enough, add additional mashed banana or vegetable oil.
5. Stir in chocolate chips.
6. Turn dough out onto a lightly floured surface. With floured hands, shape dough into 2 (8-inch-long) rolls.
7. Coat baking sheet with cooking spray or parchment paper.
8. Place rolls on prepared baking sheet and flatten to 1/2-inch thickness.
9. Bake for 23-25 minutes or until tops are golden and firm.
10. Remove rolls from baking sheet and cool 10 minutes on a wire rack.
11. Cut both rolls diagonally into 1/2 inch slices. You should get 12 slices per roll.
12. Place slices, cut side down, on baking sheet.
13. Reduce oven temperature to 250 and bake for 15 minutes.
14. Turn the cookies over and bake for an additional 15 minutes.
15. Remove the cookies from the baking sheet and cool completely on a wire rack. The cookie centers may be slightly soft, but will harden as they cool.

Subscribe
Email Registration  Email
  RSS
Recipe Sites
  • All Recipes
  • Cooking Light
  • Epicurious
  • Food Network
Archives
Sitemeter
Blog Directories
Add to Technorati Favorites