Authors
Beth
Kathleen
Lisa
Contact
domesticpursuits [at] gmail.com
Categories

Archive for the ‘Candy’ Category

Homemade Marshmallows

Saturday, December 24th, 2011

I always wondered how marshmallows were made – the puffy soft sugary goodness seemed like it would be elusively difficult to replicate in my own kitchen, so I always just bought whatever I could find at the local market whenever we wanted to make S’mores, or have a few in my hot cooca.  As my husband reminded me when I told him of my plan to make marshmallows last week, the first time I saw Alton Brown make them on TV one night, I incredulously stated it seemed pointless to put so much work into making something as simple as  marshmallows.  Turns out, homemade marshmallows really are THAT much better than the store-bought product.  And, they are actually incredibly easy.  Really easy.  Like, 15 minutes start-to-finish make-on-a-weeknight-after-a-long-day-of-work easy.  Bonus, they also use mostly things you already have stashed away in your pantry.  The most time-intensive part is preparing the pans, so your homemade marshmallows don’t stick.  They take very little cooking, and I’m pretty sure they are fool proof.

This year instead of making cookies for family and friends, I opted to make homemade hot cocoa mix and homemade marshmallows for gifts.  The best part is you can flavor them however you want – I chose to make candy cane marshmallows, and vanilla bean marshmallows.  They came out beautiful, and they are super tasty.
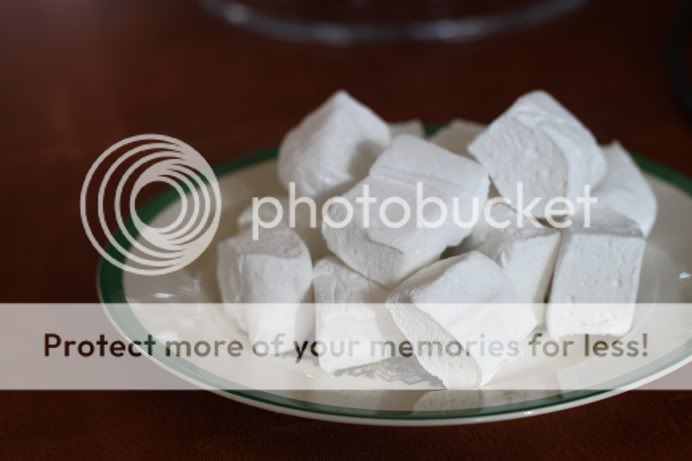
Maybe Santa would appreciate some homemade marshmallows tonight instead?

Homemade Marshmallows – from MarthaStewart.com

  • Nonstick cooking spray
  • 3 (1/4-ounce) packages unflavored gelatin
  • 1/2 cup cold water
  • 2 cups granulated sugar
  • 2/3 cup light corn syrup
  • 1/4 cup water
  • 1/4 teaspoon coarse salt
  • 1 tsp vanilla extract
  • 1 vanilla bean, scraped
  • Confectioners’ sugar, sifted (to coat)

Prepare 2 9×9 square baking dishes by coating with cooking spray.  Line each with plastic wrap, and then spray the plastic wrap with cooking spray as well.

In the bowl of your stand mixer fitted with the whisk attachment (or a large bowl, with a hand mixer nearby), place 1/2 cup cold water and the gelatin.  Let soften for about 10 minutes.  In the meantime, in a medium saucepan over medium-high heat, place sugar, corn syrup, water, and salt.  Bring to a full boil, stirring occasionally.  Boil for about 1 minute.  Remove from the heat.  With your stand mixer on high (or hand-mixer on high), slowly drizzle the hot sugar syrup down the side of the bowl.  Add the vanilla extract and the vanilla bean seeds.  Mix on high for 10-12 minutes.  Spray a rubber spatula with cooking spray, and working quickly use the spatula to transfer the warm marshmallow to the baking dish.  Spread evenly in the pan.  Let sit for at least 2 hours (up to 24 hrs).

Remove marshmallows from the pan together with the plastic wrap to a cutting board lightly dusted with confectioners’ sugar.  Peel away the plastic wrap from the side.  Spray a pizza cutter with cooking spray.   Cut marshmallows into 1.5 inch wide strips.  Then cut each strip into 1.5 inch pieces, to form cubes.  Toss with sifted confectioners sugar, and keep in an airtight container.

Candy Cane Marshmallows – adapted from MarthaStewart.com

Follow recipe as above, omitting vanilla extract and vanilla bean.  Instead, add 3/4 tsp peppermint extract.  Transfer quickly to the prepared pans and spread evenly.  Add drops of food coloring (I used red and green) on top of the marshmallows.  Using a bamboo skewer, swirl the food coloring through the marshmallow.  Let sit as above, and then slice as above.  Enjoy!

Pumpkin Fudge

Saturday, October 29th, 2011

When I first saw Pumpkin Fudge, I have to admit – I was skeptical.  My husband and I bought a square when we were visiting the Jersey shore last month – fudge is a traditional Jersey shore treat, and I figured what better new flavor to try in October than Pumpkin!  It felt a little like the first time I tried pumpkin ice cream, or pumpkin coffee, or frankly even pumpkin beer (more on that tomorrow!)  Some of these things I like a lot, and some are just not worth it.  Turns out Pumpkin Fudge is pretty darn delicious, and so when we decided to make a whole week of pumpkin posts here on Domestic Pursuits, I went searching for a recipe. 

This recipe I found via Brown Eyed Baker is remarkably similar to the recipe one finds on the back of a very popular marshmallow creme jar here in New England – being that it ‘never fails,’ I figured this was a good place to start – as I have never made fudge before in my life.   I have heard harrowing stories of people ending up with pots full of solidified gooey messy sugar, or fudges that sit for days and still don’t set up, and so fudge was always one of those treats I left for the professionals.  But, now that I’m 31 and have taught myself to cook a whole bunch of things that require precision temperature control (ie, pasteurizing my homemade ice creams) I figured I could handle fudge now.

This actually was quite easy – although I think a candy thermometer definitely helped this recipe come out right.  You can always use the method where you drop a small amount of whatever candy you’re cooking into cold water and figure out if it is a hard ball, or a soft ball, but I personally find that a bit cumbersome.   It also requires standing at your stove for about a half an hour – but that literally is all that’s required for the prep.  The only substitution I made really was to use slightly less brown sugar as all I had in my pantry was the dark brown variety, and I also used cinnamon and nutmeg rather than pumpkin pie spice, because I just have a thing against buying premade spice blends.  I also don’t really like nuts in fudge, so left those out.

Pumpkin Fudge – adapted via Brown Eyed Baker from Christmas Candy Recipes

  • 2 and 1/2 cups granulated sugar
  • 1/2 cup dark brown sugar
  • ¾ cup butter
  • 2/3 cup (or one 5-ounce can) evaporated milk
  • ½ cup pumpkin puree
  • 1 and 1/2 teaspoons cinnamon
  • 1/2 teaspoon nutmeg
  • 2 cups white chocolate chips
  • 1 (7.5 oz.) jar marshmallow creme
  • 1½ teaspoons vanilla extract

First, prepare a 9×13 baking dish by lining it with foil and spraying with cooking spray.  Combine sugars, butter, evaporated milk, pumpkin and spices in a medium saucepan.  Over medium heat, stirring continuously, bring the mixture to a rolling boil.  Continue to boil for 12-14 minutes stirring continuously until the mixture reaches the ‘soft ball’ stage which is 234-240 degrees farenheit on a candy thermometer.  (Alternatively, can you drop a small quantity into a glass of cold water and see what kind of ball it forms.  I recommend the thermometer method.)  Working quickly, stir in the chocolate chips, marshmallow creme, and vanilla.  Pour mixture into prepared baking dish.  Cool on a wire rack for at least 2 hours.  Refrigerate overnight before slicing for best results.  Enjoy!

Subscribe
Email Registration  Email
  RSS
Recipe Sites
  • All Recipes
  • Cooking Light
  • Epicurious
  • Food Network
Archives
Sitemeter