Gourmet Burgers

April 30th, 2009 by Beth

Monday night marked our first grilled meal of the year! My husband was quite excited to pull the cover off and fire up the grill. With the unseasonable warm weather we’ve been having, it felt just like summer!

A local grocery store chain sells gourmet burger patties during the summer months. These consist of a relatively lean ground beef combine with various mix-ins. Standard burgers include ones with Italian spices, pepper, mushrooms and cheese? the list goes on. My husband and I planned to serve these for a birthday celebration last summer, but my jaw dropped when I saw the price. I figured that they couldn’t be too hard to make.

Since I hadn’t had much luck forming burgers by hand (mine crumbled too easily), I scoured local stores in search of a burger press. After striking out there, I sprung for a pricey one from Amazon, and still came out ahead. That thing paid for itself in one weekend! If you?re looking for a burger press, I am really happy with this one. I haven?t had any of the problems that other viewers refer to. I like that the press is non-stick (lined with silicone) and can be easily disassembled and thrown in the dishwasher for easy cleaning.
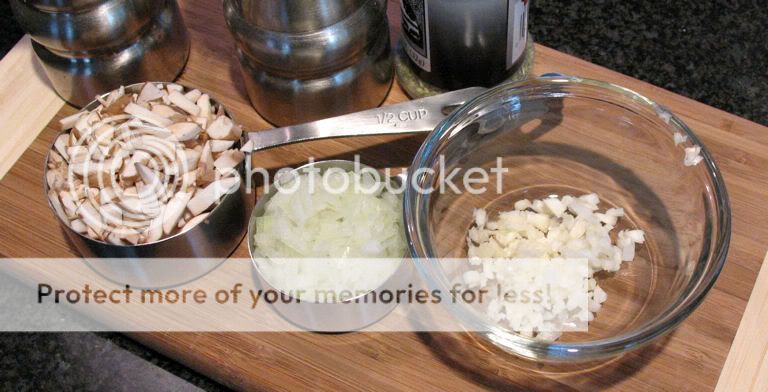
Mixing vegetables, spices and cheese into burgers add a fun kick to this summer staple. I use ground turkey and ground beef interchangeably, although this time I used 93% lean ground turkey. I typically just eyeball the mix-in ingredients, but I measured this time so that I could provide details here. In the past I have used garlic powder, but I found that the freshly minced garlic made quite a difference. I served these burgers topped with sharp cheddar cheese and sauteed mushrooms.

Making these burgers also gave me the opportunity to use my newest kitchen gadget: a digital food scale. While it?s not a necessity (I made burgers for a year without one), it does make it easier to divide the meat into uniform portions.

Since burger making is rather messy, I frequently make a large batch using two packages or meat and then freeze the extras. When freezing the burgers, I separate them with slices of wax paper, wrap in plastic wrap and place in a freezer bag

Gourmet Burgers

1 package (1.25-1.33 lbs) ground turkey – I used 93% lean
1/2 cup finely chopped mushrooms
1/4 cup finely chopped onion
2 garlic cloves, minced
1 tsp. dried oregano
2 tbsp bread crumbs
1/4 cup shredded sharp cheddar cheese
Salt
Freshly ground black pepper

1. Combine all ingredients in a medium bowl.
2. Mix well to combine.
3. Divide into 5-6 equal portions and shape into burger patties.
4. Grill or freeze.

Oreo Cupcakes

April 21st, 2009 by Beth

I have a major weakness for Oreos. I can easily demolish an entire bag in a few sittings, so I try to avoid buying them. I saw these Oreo cupcakes on the blog Proceed With Caution, and have been waiting for the right opportunity to make them.

The right opportunity presented itself in the form of dinner and 24 with our friends Carolyn and Rob. I had originally planned to make something simple and easy to eat neatly, since we would be eating dessert in front of the television. That plan didn’t last very long. :)

I used a Hershey’s recipe for ‘”Perfectly Chocolate” Chocolate Cake and was amazed at the number of cupcakes it produced. The recipe called for filling muffin cups 2/3 with batter, resulting in 30 cupcakes. I figured I could whittle that number down to 24 if I was generous in my batter allotment. Nope! I ended up with 31 Oreo cupcakes. I frosted half of them and will be freezing the rest for another occasion. It’s worth noting that the large number of cupcakes did cause a bit of a baking problem. I only have two muffin tins, so I had to bake 24 cupcakes first and then bake the remaining ones separately. The last 7 cupcakes did not rise as well as the first batch and ended up with a slightly concave appearance. However, they taste just fine!

I used a double batch of my grandmother’s frosting recipe and augmented it with crushed Oreos for the cookies and cream icing. The Oreos must be finely ground so that the frosting will spread easily.

Be careful when splitting the cookies to top these delicious Oreo cupcakes, as the Oreos tend to crumble quite easily. I followed suggestions found on Proceed With Caution and split the Oreos by placing the blade of my knife evenly across the cookie and pressing straight down. With a few exceptions, this method worked quite well. I certainly didn’t mind eating the Oreos that didn’t look pretty enough!

I am thrilled with the way that these came out. The Perfectly Chocolate cupcake is rich, but not too sweet. They complement the sweet cookies and cream icing quite nicely. Not only are these oreo cupcakes delicious, but I think they’re really cute! The frosting and Oreo garnish are fun and festive. This was the first time that I piped my cupcakes using a decorator bag, and I was happy to see that it’s not too hard. I’m looking forward to sharing my latest creation with friends and family!

Oreo Cupcakes

Yields 30 cupcakes

For the cupcakes:
30 Oreos, 1 side twisted off and reserved for frosting *
2 cups sugar
1 3/4 cups all-purpose flour
3/4 cup HERSHEY’S Cocoa
1 1/2 tsp baking powder
1 1/2 tsp baking soda
1 tsp salt
2 eggs
1 cup milk
1/2 cup vegetable oil
2 tsp vanilla extract
1 cup boiling water

1. Heat oven to 350?F. Line muffin pans with paper liners and place 1 Oreo (cream side up) in each liner.
2. Stir together  flour, cocoa, baking powder, baking soda and salt in medium bowl.
3. In a large bowl, combine sugar, eggs, milk, oil and vanilla. Stir until well blended.
4. Add flour mixture to large bowl and beat on medium speed of mixer 2 minutes.
5. Stir in boiling water (batter will be thin). Pour batter into prepared pans.
6. Fill muffin cups 3/4 full with batter (about 1/4 cup).
7. Bake 22 to 25 minutes. Cool completely

For the frosting:
2 1-lb packages of confectioner’s sugar
1 cup vegetable shortening
1/2 cup warm water
2 tsp vanilla extract
1 cup Oreo crumbs, made from reserved sides (used above) and additional cookies

1. Beat shortening and water together.
2. Gradually beat in confectioner’s sugar and beat until creamy.
3. Add vanilla and beat in well.
4. If needed, add more water, 1 tbsp at a time, to attain desired consistency.
5. Beat in Oreo crumbs.
6. If frosting will not be used right away, store in an airtight container.

Optional Garnish:
15 Oreos, split in half and placed atop the frosted cupcakes

* You’ll probably need more than 1 bag for the cupcakes, frosting and garnish

Lemon Bars

April 14th, 2009 by Beth

I’ve always been a fan of lemon-flavored treats. When I was growing up, my family would often pick up doughnuts at the local Honey Dew Donuts after Sunday mass. My favorites changed from year to year, but I always loved the lemon filled powdered sugar doughnut. Since powdered sugar + lemon filling = delicious, it certainly makes sense that I would love lemon bars!

I finally took the plunge and made my own bars this past weekend. They were the perfect Easter dessert – sweet, fruity and light-tasting. With the flaky crust and light, tart filling, it’s easy to forget that these bars aren’t exactly good for you. :)

I searched high and low for the perfect recipe, and ended up using one from my classic Better Homes and Gardens cookbook. The crust and filling were quite easy to make. Since I like my lemon bars to taste quite lemony, I doubled the amount of lemon zest. This recipe also gave me the opportunity to try out my nifty new Wilton pastry blender. I made the mistake of sifting powdered sugar over the bars several hours before serving them. The sugar pretty much melted away, and I had to re-sift right before dessert.

These bars were a hit, both at Easter dessert and at my husband’s office. The bars disappeared quickly and garnered rave reviews.


Lemon Bars

Yields 24 bars

2 cups all-purpose flour
1/2 cup powdered sugar
2 tbsp cornstarch
1/4 tsp salt
3/4 cup butter
4 eggs, lightly beaten
1 1/2 cups granulated sugar
3 tbsp all-purpose flour
1-2 tsp lemon zest
3/4 cup lemon juice
1/4 cup half and half, light cream or milk
powdered sugar

1. Preheat oven to 350. Grease a 13×9x2 baking pan and set aside.
2. In a medium bowl, whisk together 2 cups of flour, 1/2 cup powdered sugar, 2 tbsp cornstarch and salt.
3. Using a pastry blender, cut in butter until mixture resembles coarse crumbs.
4. Press mixture into baking pan and bake 18-20 minutes, or until edges are golden.
5. Meanwhile, whisk together egss, granulated sugar, 3 tbsp flour, zest, lemon juice and half and half.
6. Pour filling over hot crust and bake for 15-20 minutes more, or until center is set.
7. Cool completely in pan on wire rack.
8. Sift with powdered sugar and cut into bars.
9. Cover and store in the refrigerator.

Banana Chip Biscotti

April 10th, 2009 by Beth

I spotted this recipe for Banana Nut Biscotti on the blog Gaga In the Kitchen (originally from Cooking Light). I’ve been meaning to try my hand at biscotti for a while, and this recipe looked like a fun departure from the usual biscotti flavors. I absolutely love banana bread, but since I am not a fan of nuts, I decided to use mini chocolate chips instead.

This was my first attempt at biscotti, so I don’t know exactly how the dough is supposed to feel. When I combined the wet and dry ingredients, the resulting dough was quite crumbly and did not hold together well. Since I may not have added enough mashed banana, I threw in an additional tablespoon of canola oil and a little more mashed banana. After these additions, the dough was soft, moist and workable.

I was quite happy to find that making biscotti is very easy, and the resulting cookies are delicious! These biscotti have a nice subtle banana flavor, and the chocolate chips work well. I will be making these again, and look forward to trying other biscotti recipes. Any recommendations on what I should try next?

Banana Chip Biscotti

Yields 24 cookies

1 3/4 cups all-purpose flour
1/2 cup sugar
1 tsp baking powder
1/4 tsp salt
1/3 cup mashed very ripe banana (about 1 banana)
1 tbsp vegetable oil
1 tsp vanilla extract
1 large egg
1/3 cup chopped pecans, toasted
Cooking spray

1. Preheat oven to 350?.
2. In a small bowl, combine the flour, sugar, baking powder, and salt.
3. In a medium bowl, combine banana, oil, vanilla, and egg.
4. Stir in flour mixture. The dough should be sticky. If it is not moist enough, add additional mashed banana or vegetable oil.
5. Stir in chocolate chips.
6. Turn dough out onto a lightly floured surface. With floured hands, shape dough into 2 (8-inch-long) rolls.
7. Coat baking sheet with cooking spray or parchment paper.
8. Place rolls on prepared baking sheet and flatten to 1/2-inch thickness.
9. Bake for 23-25 minutes or until tops are golden and firm.
10. Remove rolls from baking sheet and cool 10 minutes on a wire rack.
11. Cut both rolls diagonally into 1/2 inch slices. You should get 12 slices per roll.
12. Place slices, cut side down, on baking sheet.
13. Reduce oven temperature to 250 and bake for 15 minutes.
14. Turn the cookies over and bake for an additional 15 minutes.
15. Remove the cookies from the baking sheet and cool completely on a wire rack. The cookie centers may be slightly soft, but will harden as they cool.

Chicken Cordon Bleu

April 3rd, 2009 by Lisa

When I think of classic chicken dishes, Chicken Cordon Bleu usually comes to mind – although I remember the one my mother used to make being dried out, and the ones I get in restaurants being very greasy. I found this chicken cordon bleu recipe a while back and decided to give it a whirl because it came out of one of my favorite cooking publications (Cooking Light) and because I was trying to shake up my recipe roster a bit. It was really great – the center stayed moist and tender, and much like any other Cooking Light recipe it’s not (that) bad for you. It’s fancy enough to serve to company, and easy enough to make for dinner just because it’s Tuesday. Plus, my husband loved it – what guy wouldn’t love meat wrapped in meat?! The only modification I made was to use pre-seasoned bread crumbs, because that’s what I happened to have on hand.

Ingredients

  • 1/4 cup fat-free, less-sodium chicken broth
  • 5 teaspoons butter, melted
  • 1 large garlic clove, minced
  • 1/2 cup dry Italian seasoned breadcrumbs
  • 1 tablespoon grated fresh Parmigiano-Reggiano cheese
  • 1 teaspoon paprika
  • 4 (6-ounce) skinless, boneless chicken breast halves
  • 1/4 teaspoon salt
  • 1/4 teaspoon dried oregano
  • 1/4 teaspoon freshly ground black pepper
  • 4 thin slices prosciutto (about 2 ounces)
  • 1/4 cup (1 ounce) shredded part-skim mozzarella cheese
  • Cooking spray

Preparation

Preheat oven to 350?.

Place broth in a small microwave-safe bowl; microwave at high 15 seconds or until warm. Stir in butter and garlic. Combine breadcrumbs, Parmigiano-Reggiano, and paprika in a medium shallow bowl; set aside.

Place each chicken breast half between 2 sheets of heavy-duty plastic wrap, and pound each to 1/4-inch thickness using a meat mallet or rolling pin. Sprinkle both sides of chicken with salt, oregano, and pepper. Top each breast half with 1 slice of prosciutto and 1 tablespoon mozzarella. Roll up each breast half jelly-roll fashion. Dip each roll in chicken broth mixture; dredge in breadcrumb mixture. Place rolls, seam side down, in an 8-inch square baking dish coated with cooking spray. Pour remaining broth mixture over chicken. Bake at 350? for 28 minutes or until juices run clear and tops are golden.

No-Knead French Baguette

April 2nd, 2009 by Beth

I love thumbing through cookbooks at bookstores and libraries. While the internet is a fantastic resource for recipes and cooking information, there’s something about the actual act of reading a book that I find enjoyable. During my last trip to the library, Suzanne Dunaway’s No Need to Knead caught my eye. The idea behind this book is that it’s possible to make bakery-style bread at home with simple ingredients, basic kitchen equipment and minimal time commitment.

I decided to give the French Baguette a whirl. Since the original recipe produces two full-size baguettes, I opted to halve the recipe and make two smaller baguettes. I have included the full recipe below. I use my stand mixer to speed up the process, despite the fact that this bread can easily be prepared by hand. Most recipes, including this one, have both same-day and overnight methods. Which one you use depends on how quickly you want to bake the bread and how much time you want to dedicate to preparation. I have tried both methods and was equally pleased with each one.

Using the overnight method required minimal hands-on time. I mixed the dough on Saturday night, threw it in the refrigerator and pulled it out the following morning. A few hours later I shaped and baked the loaves. The same-day method requires more intervention, but it’s minimal. The dough is easy to handle, and it only takes a few seconds to fold the dough over on itself.

The bread is delicious! It has a slight tang to it, but isn’t as strong as sourdough. The crust is crisp and crackled, while the crumb is soft and moist. Stored in a paper bag, it keeps well for a few days.

This is my new favorite bread recipe and will be making it on a regular basis. I couldn’t believe how easy it was to make an absolutely amazing French baguette.

No-Knead French Baguettes

Yields 2 full-size loaves, or 3-4 small loaves

2 cups lukewarm water
2 tbsp active dry yeast
5 cups all=purpose or unbleached bread flour
2-3 tsp salt

Mix the Dough
1. Pour water into large bowl.
2. Sprinkle yeast onto water and stir until dissolved,
3. Add two cups of flour and stir until smooth, about two minutes.
4. Add the remaining 3 cups of flour and salt. Stir until the dough pulls away from the bowl and the flour is completely incorporated – about five minutes. If the dough is too wet, stir in an additional 1/4 to 1/2 cup of flour.

Same-Day Method
1. Cover the bowl with plastic wrap and let the dough rise until doubled in volume – about 30-40 minutes.
2. Fold the dough over on itself 3 or 4 times and let the dough rise a second time until doubled in volume.
3. Fold the dough over on itself 3 or 4 times and let the dough rise a third time until doubled in volume.
4. Proceed with the shaping instructions

Overnight Method
1. Cover bowl and refrigerate over night.
2. Remove the bowl from the refrigerator at least two hours prior to shaping. Leave it covered and allow it to rise for the second time.
3. Proceed with the shaping instructions.

Shape the Baguettes
1. Preheat the oven to 450. Place a broiler pan or baking pan on the bottom rack of the oven. Cover baking sheet with parchement paper or spray with cooking spray.
2. Turn the dough onto a lightly floured surface.
3. Divide the dough into multiple 2-4 pieces (depends how many loaves you want to make) and let it rest for 15 minutes.
4. With the palms of your hand, roll each piece into a long cylinder and place it on the baking sheet.
5. Let the loaves rise until doubled in volume – about 30 minutes.
6. Use a sharp serrated knife to cut several slashes in each loaf. Spritz with water (or smooth on with hands)
7. Place bread in preheated oven and turn temperature down to 400. Pour 1 cup of warm water into broiler pan before quickly shutting oven.
8. Bake for 30-35 minutes or until the baguettes are nicely browned.
9. Cool on wire rack before serving.

Orange Blueberry Muffins

March 29th, 2009 by Beth

I had wanted to make blueberry muffins for quite awhile. About a month ago, my grocery store advertised what seemed to be an excellent sale on fresh blueberries, blackberries and strawberries. I was thrilled about the prospect of making luscious blueberry muffins, but disappointed when I laid eyes upon the tiniest carton of fresh berries I had ever seen! Since the quantity didn’t seem worth the price, I walked away. After finishing up at the grocery store, I hit the Target next door to complete my grocery shopping. While wandering the frozen food section, I saw that frozen berries were on sale. On a whim, I picked up a bag of blueberries… and promptly forgot about it.

I finally used the frozen berries when my mother joined me for tea on a recent afternoon. I wanted a something freshly-baked to serve with our Lady Grey tea, so I scoured my Google Reader for a fun recipe. I initially saw these muffins on Dinner & Dessert, but found the actual recipe text here. This recipe comes from Dorie Greenspan’s Baking: From My Home to Yours. I’m looking forward to checking out other recipes from this cookbook.

I made the recipes during my lunch break (on of the benefits of working from home!) and was pleased at how quickly they came together. Since the butter had to cool after being heated, I melted it before I started working on juicing and zesting the orange. The juice and zest add a lovely citrus punch. It’s a fun change from your typical blueberry muffin. The muffins themselves are soft, buttery and moist.

Apparently, my husband really liked these muffins! :) First thing Saturday morning, Mike I had a conversation that went like this:

Mike: So, what’s for breakfast today?

Beth: Toast…eggs…something like that. The usual.

Mike: We’re not having those orange blueberry muffins? I thought you said you were making them.

Beth: <puzzled look>

Mike: Oh, I must have dreamed that.

Here’s the muffin that’s good enough to dream about:

Orange Blueberry Muffins

Yields 12 muffins

Grated zest and juice of 1 orange
About 3/4 cup buttermilk*
2 large eggs
3 tablespoons honey
1 stick (8 tablespoons) unsalted butter, melted and cooled
1/3 cup sugar
2 cups all-purpose flour
2 1/2 teaspoons baking powder
1/4 teaspoon baking soda
1/4 teaspoon salt
1 cup blueberries – fresh, preferably, or frozen (not thawed)

Decorating sugar, for topping (optional)

Center a rack in the oven and preheat the oven to 400 degrees F. Butter or spray the 12 molds in a regular-size muffin pan or fit the molds with paper muffin cups. Alternatively, use a silicone muffin pan, which needs neither greasing nor paper cups. Place the muffin pan on a baking sheet.

Pour the orange juice into a large glass measuring cup or a bowl and pour in enough buttermilk to make 1 cup. Whisk in the eggs, honey and melted butter.

In a large bowl, rub the sugar and orange zest together with your fingertips until the sugar is moist and the fragrance of orange strong. Whisk in the flour, baking powder, baking soda and salt. Pour the liquid ingredients over the dry ingredients and, with the whisk or a rubber spatula, gently but quickly stir to blend. Don?t worry about being thorough – the batter will be lumpy and bubbly, and that?s just the way it should be. Stir in the blueberries. Divide the batter evenly among the muffin cups.

Bake for 22 to 25 minutes. If you want to top the muffins with decorating sugar, sprinkle on the sugar after the muffins have baked for 10 minutes. When fully baked, the tops of the muffins will be golden and springy to the touch and a thin knife inserted into the center of the muffins will come out clean. Transfer the pan to a rack and cool for 5 minutes before carefully removing each muffin from its mold.

*I did 1 tbsp vinegar then fill up to the 1 cup line with milk. Then I used this mixture for the required buttermilk.

Slow-Cooker Chicken Tortilla Soup

March 24th, 2009 by Beth

This was my first foray into slow-cooker meal preparation. Just about everyone I know received one or more when they got married. I didn’t register for one because I couldn’t see the need. I still don’t think that it falls in the “can’t live without it category”, but I can tell that I’m really going to enjoy this “set and forget” form of meal preparation.

While I was chopping vegetables, defrosting chicken and measuring ingredients this morning I thought to myself “What’s the point? I have to do all this prep work when I make dinner on the stove top.” But then I loaded everything in the slow cooker, set the temperature and walked away. It was at that moment that I realized I was really going to like not having to babysit the stove.

I consider myself very fortunate, in that I work from home most days. Since I save time by not commuting, I often have ample time to prepare dinner. Just because I have time to hang out in the kitchen in front of the stove, doesn’t mean that I need to!

I picked up a 5.5 quart Rival Crock Pot at Target using a gift card from Christmas. This is the gift that will keep on giving. My model is very basic, but manual controls make sense because I am home all day. This is only my first recipe, but I think the size is just about right. Even though I only cook dinner for two people, I like to have leftovers.

My friend Carolyn sent me this recipe for Chicken Tortilla Soup after she tried it and loved it. I followed her recommendations of adding a can of drained and rinsed black beans, and adding 2 raw chicken breasts to the pot and allowing them to cook in the soup. I shredded the chicken shortly before serving. Since I didn’t have a can of whole peeled tomatoes or enchilada sauce in the house, I made my own substitution. I mixed a 28 oz can of crushed tomatoes with some honey, garlic powder, cumin, cilantro and poultry seasoning and use this blend in place of the tomatoes and enchilada sauce. I also used half chicken broth and half vegetable broth so I could try some of my home made stock.

This soup was SO good! I served it with crushed tortilla chips and a sprinkling of Mexican blend cheese. My husband said that it reminded him of Panera’s Chicken Tortilla Soup. It was warm and hearty with a nice kick. The original recipe states that it yields 8 servings, and I think that’s pretty accurate. We’ll probably have this again for dinner and lunch and then freeze the remaining portions.

Slow-Cooker Chicken Tortilla Soup
Yields 8 servings

1 pound shredded, cooked chicken
1 (15 ounce) can whole peeled tomatoes, mashed *
1 (10 ounce) can enchilada sauce *
1 medium onion, finely chopped
1 (4 ounce) can chopped green chile peppers
2 cloves garlic, minced
4 cups chicken broth
1 tsp cumin
1 tsp chili powder
1 tsp salt
1/4 tsp black pepper
1 bay leaf
2 cups frozen corn
1 tbsp chopped cilantro

* can substitute 28 oz. crushed tomatoes (seasoned with chili powder, cumin, garlic powder etc.) for tomatoes and enchilada sauce

1. Place raw chicken, tomatoes, enchilada sauce, onion, green chiles, and garlic into a slow cooker.
2. Pour in chicken broth, and season with cumin, chili powder, salt, pepper, and bay leaf.
3. Stir in corn and cilantro.
4. Cover, and cook on Low setting for 6 to 8 hours or on High setting for 3 to 4 hours.
5. Before serving, remove chicken breasts and shred. Return shredded chicken to pot and allow to heat through before serving.

Homemade Vegetable Stock

March 24th, 2009 by Beth

I usually don’t use vegetable stock. Chicken broth is an excellent substitute, and it usually costs much less. For some reason, our grocery stores don’t carry generic or reduced-sodium vegetable stock. Now that it’s Lent, I have needed vegetable stock for several recipes. It seemed foolish to pay $1 or more for vegetable-flavored water, when I could just make it myself. Really, how hard could it be?

I did a little searching online and found that it’s just as easy as I thought it would be. Over the course of about two weeks, I stashed bits of vegetables in a zip-top bag in my freezer. Once it looked like I had enough vegetable scraps, I followed the instructions on this website. Most vegetables can be used in stock, but cabbage, broccoli, cauliflower, asparagus and tomato can be overwhelming.

Among other things, I accumulated bits of onion and zucchini, scraps and ribs of peppers and green leek tops. For good measure, I added a little bit of frozen corn, 2 bay leaves, whole peppercorn, a chopped up garlic clove and a several shakes of dried spices. Some cilantro was starting to look wilted, so I threw a small amount of that in too.

While the site listed above recommends a 1:1 ratio of solids to liquid, I found other sites that went with a 2:1 solid to liquid ratio. Wanting to get more bang for my buck, I tried the latter. The vegetable scraps filled about 6 cups, so I added 12 cups of water. After simmering for nearly and hour and straining out the solids, I was left with 8 cups of dark, flavorful vegetable stock. Not only did I save a few dollars, but I think my homemade stock tastes better than the store-bought variety and is sodium-free.

Orange Creamsicle Ice Cream

March 23rd, 2009 by Beth

So may flavors, so little time.

I had heard that David Lebovitz’s book The Perfect Scoop was a good ice cream resource, so I checked it out of the library. I now have a list of nearly two dozen homemade ice creams, sorbets and sherbets that I want to try. I was pleased to find that Lebovitz goes into great detail explaining how to make the perfect ice cream custard and offering suggestions for ingredients and mix-ins. I’m definitely adding this book to my kitchen wish-list.

After perusing the grocery store circulars and seeing that strawberries, oranges and Oreos were on sale, I narrowed my potential recipes down to the following: Strawberry Frozen Yogurt, Strawberry Sorbet, Orange Popsicle and Cookies & Cream. With the start of spring, something fruity and light sounded really good. My husband was particularly intrigued by Orange Popsicle, so I set out to buy a bag of oranges (on sale!). Check back in the future, as I plan to try the other recipes over the next few months.

Zesting the oranges gave me the opportunity to use one of my new favorite kitchen tools: my rasp-style Microplane Grater. I used to zest citrus with a box grater, but that was rather difficult and messy. I always ended up with irregular size chunks of zest, and so much of it would stick to the grater. Lebovitz actually addresses these two tools stating that rasp-style graters (like the Microplane) will extract almost twice as much zest as a box grater! Good to know. Squeezing the oranges was interesting, as the only citrus squeezer I have is sized for a lemon. After three oranges, I gave up and augmented with some orange juice from a carton of Tropicana. I think a manual juicer like this may be in my future.

Since this recipe does not use egg yolks, it doesn’t need to be heated. Once I finished the arduous task of squeezing oranges without the proper tools, the rest of the prep work was completed by my blender.

I only modified the recipe slightly. As mentioned above I used some carton orange juice. I also ignored Lebovitz’s warning and used fat free half and half. Finally, I added an additional tablespoon of sugar and an extra teaspoon of triple sec to the ice cream base. Once the base was mixed, it had a yellow-y cream color. For aesthetic purposes, I added a few drops of food coloring and colored the base a light orange.

After refrigerating the base, running it through my ice cream maker and freezing for several hours, the ice cream was as delicious and refreshing as it looked! It has a smooth, creamy orange-y flavor – a more decadent, grown-up version of the classic creamsicle. This homemade ice cream has the consistency of a sherbet, and the addition of triple sec makes it easy to scoop right out of the freezer. It tastes fantastic on it’s own, or sprinkled with miniature chocolate chips. I’m also looking forward to serving it as a summer dessert, garnished with fresh fruit.


Orange Creamsicle Ice Cream

Yields about 1 Quart

2/3 cup sugar
Grated zest of 3 oranges
1 1/4 cups freshly squeezed orange juice (from 4 or 5 large oranges)
1 cup sour cream
1/2 cup half and half
2 tsp orange liqueur

1. Pulverize sugar and orange zest in blender.
2. Add orange juice, sour cream, half and half and liqueur. Blend until the sugar is completely dissolved.
3. Chill the mixture in the refrigerator for several house and then process in ice cream maker according to manufacturer’s instructions.