Low-Fat Oatmeal Raisin Cookies

February 6th, 2009 by Lisa

Thanks for the kind introduction Beth!

I first made these cookies a few years ago when I was in the middle of a health-kick and wanted something sweet after dinner. I found the recipe for low-fat oatmeal raisin cookies on allrecipes.com - they contain no oil and no eggs, but the addition of applesauce keeps them moist all the same! They come out a little more cakey than traditional oatmeal-raisin cookies, and make a very hearty snack while still keeping fat to a minimum. In the past, I’ve made them larger and called them Oatmeal Raisin Breakfast Bars – a great grab-and-go breakfast. The original recipe calls for plain applesauce, but I usually use cinnamon applesauce because that’s what we usually have on hand. If you choose to add walnuts, I suggest toasting them first – 10 minutes in the oven at 350 degrees will bring out some extra nutty taste.

Low-Fat Oatmeal Raisin Cookies

INGREDIENTS
1/4 cup packed brown sugar
1/4 cup granulated sugar
3/4 cup cinnamon applesauce
1 cup all-purpose flour
1 teaspoon baking powder
1/2 teaspoon salt
1/2 teaspoon ground cinnamon
1 cup rolled oats
1/2 cup raisins
1/2 cup chopped walnuts (optional)

DIRECTIONS
Preheat oven to 350 degrees F ( 175 degrees C ). Grease a cookie sheet.
In a medium bowl, stir together the brown sugar, white sugar, and applesauce. Sift together the flour, baking powder, salt, and cinnamon; stir into the applesauce mixture. Add the rolled oats, raisins and chopped nuts (if desired); stir until combined.
Drop by rounded teaspoonfuls onto the prepared cookie sheet. Bake for 10 minutes in the preheated oven. Allow cookies to cool slightly before removing from the baking sheet.
Welcome Lisa!

February 5th, 2009 by Beth

I’d like to take the opportunity to welcome my dear friend Lisa to Domestic Pursuits. We’ve known each other for more than twenty years. Lisa will be a regular contributor to the blog, sharing her experiences with cooking, baking, household projects and other domestic endeavors.

I’m impressed that in the midst of her crazy schedule, she not only finds time to prepare meals, but make many interesting food items from scratch. Some of her creations include bread, butter, ice cream, sorbet, sushi and various types of pasta. I’ve sampled her delicious cooking on numerous occasions and I’m looking forward to trying out her recipes myself!

Zucchini Sticks

February 5th, 2009 by Beth

I spotted this recipe on the cooking blog A Year in the Kitchen. It looked like a fun, different way to serve zucchini. When I saw some nice-looking fresh zucchini at the store (not an easy feat in New England during the winter!), I knew I had to try the recipe.

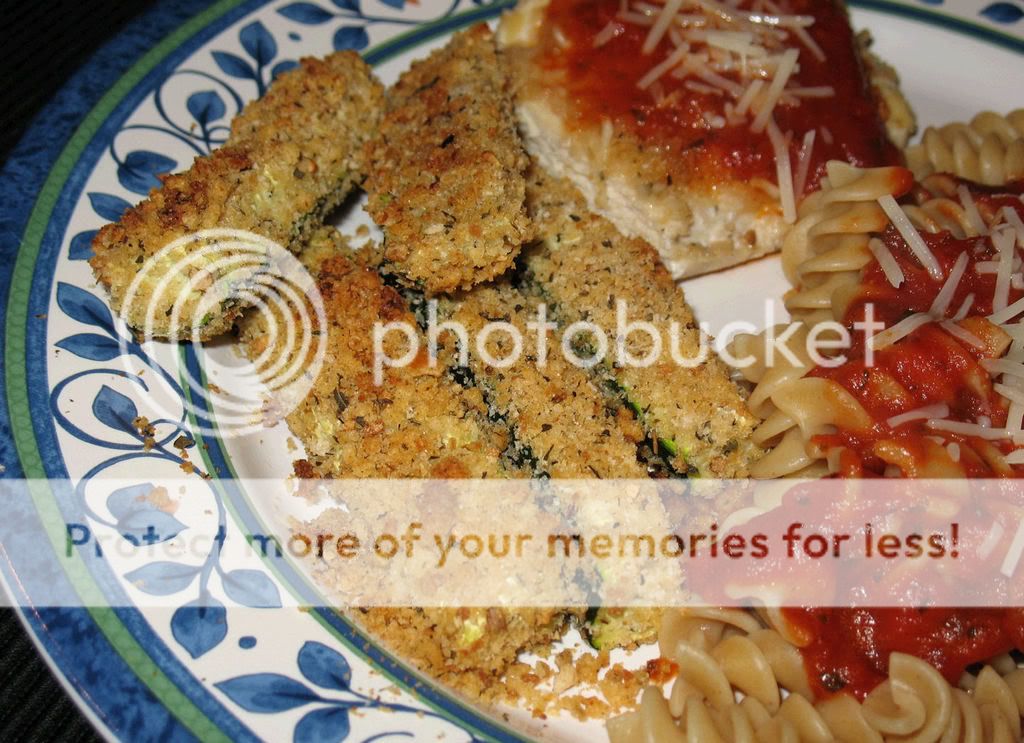
I served the zucchini sticks with baked chicken parm and whole wheat pasta. They were a nice change from the salad that I usually serve with pasta dishes.

I followed the recipe exactly as written, and was very happy with the results. The breading turned out crispy and flavorful, while the zucchini was moist and tender.

Zucchini Sticks

2 egg whites, whipped to a foam
1 cup panko bread crumbs
1/4 cup Italian style bread crumbs
1/2 tsp. salt
1/4 tsp pepper
1 tsp. Italian seasoning
2 zucchini, chopped into 1/2 inch wide sticks

1. Preheat oven to 450.
2. Combine zucchini breading ingredients in a shallow dish.
3. Whip egg whites in a bowl until they foam.
4. Toss zucchini in the egg whites, then toss in the bread crumbs. 5. Transfer to a baking sheet.
6. Bake for about 20 minutes, until crispy and brown.

Whoopie Pies

February 4th, 2009 by Beth

This past full, I stumbled across a Martha Stewart recipe for Mini Pumpkin Whoopie Pies. I love whoopie pies and was interested in trying to make them, but I wasn’t interested in her pumpkin filling. After searching several sites, I decided to use Martha Stewart’s recipe for the cookie and a traditional filling recipe from Epicurious.

I was so anxious to try these that I started preparing them at 9:30 on a weeknight. My husband was two hours into what was supposed to be a 20 minute conference call and I was bored, so baking seemed like the perfect remedy. My efforts were rewarded with a fun, delicious dessert.

For the cookie part, I barely diverted from the published recipe. I only make the cookies a little larger than proscribed size. The original recipe results in 20 mini whoopie pies (40 individual cookies), while I usually end up with 12 moderately sized whoopie pies (24 individual cookies).

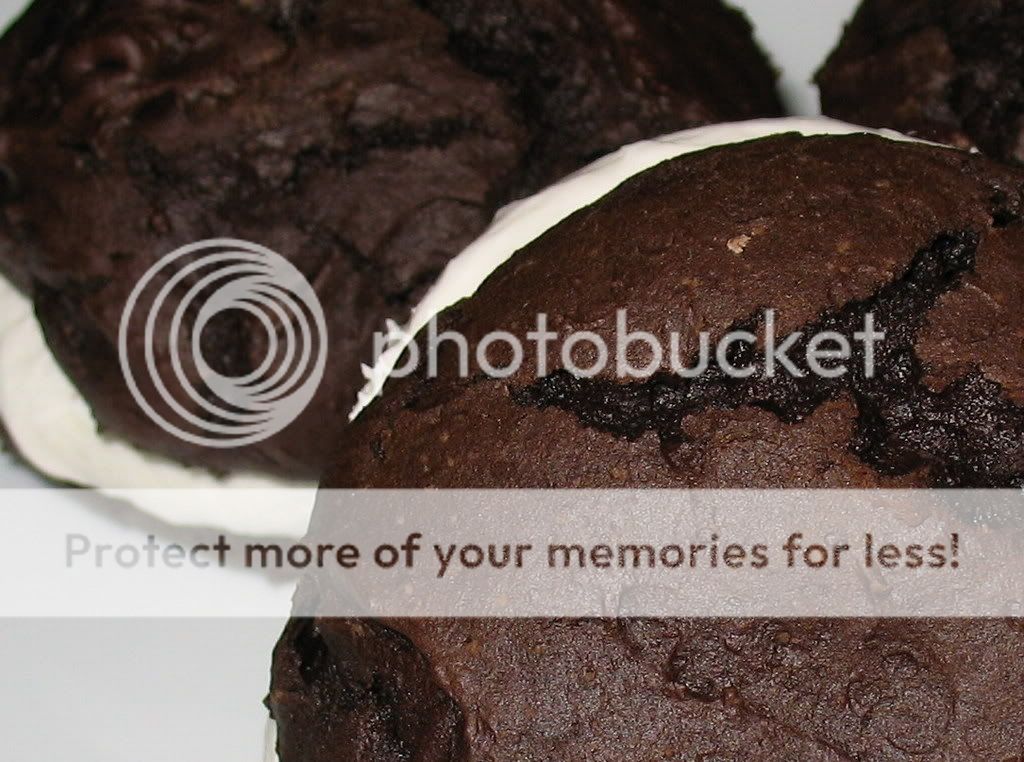
This time, I made my cookies a little too large and ended up with 18 individual cookies. The dough didn’t spread well and the tops of the cookies crackled quite a bit. This usually doesn’t happen. Despite the cracked appearance, they tasted great!

My filling differs slightly from the original recipe at Epicurious, in that I use a little bit more butter than called for.

The resulting whoopie pies are delicious! The cookies are have a rich cocoa flavor and a springy, cake-like texture. The filling is sweet and smooth. On it’s own (you have to lick the beaters when you’re done!) it can seem a little too sweet, but it’s just right when paired with the cocoa cookies.

I would imagine that these cookies would freeze well, but they’ve never lasted long enough for me to test that theory! Enjoy!

Whoopie Pies

Yields 24 cookies (enough for 12 pies)

For the cookies:
1 3/4 cups all-purpose flour
3/4 cup unsweetened cocoa powder (not Dutch-process)
1 1/2 tsp baking soda
1/2 tsp coarse salt
1 tbsp butter, softened
1/4 cup vegetable shortening
1/2 cup granulated sugar
1/2 cup packed dark-brown sugar
1 large egg
1 cup milk
1 teaspoon pure vanilla extract

For the filling:
5 tbsp butter, softened
1/4 cup vegetable shortening
1 1/4 cups confectioners sugar
2 cups marshmallow cream such as Marshmallow Fluff
1 teaspoon vanilla

1. Preheat oven to 375 degrees.
2. Sift together flour, cocoa powder, baking soda, and salt into a medium bowl; set aside.
3. Place butter, shortening, and sugars into the bowl of an electric mixer fitted with the paddle attachment. Mix on high speed until smooth, about 3 minutes.
4. Add egg; mix until pale and fluffy, about 2 minutes.
5. Mix in half the flour mixture, then the milk and vanilla.
6. Mix in remaining flour mixture.
7. Drop about 1 tablespoon of dough onto baking sheets lined with parchment paper, spacing 2 inches apart.
8. Bake until cookies spring back when lightly touched, 12 to 14 minutes.
9. Transfer baking sheets to wire racks and let cool 10 minutes. Remove cookies from baking sheets and transfer to wire racks using a spatula; let cool completely.
10. Make the filling: Beat together butter, confectioners sugar, marshmallow, and vanilla in a bowl with electric mixer at medium speed until smooth, about 3 minutes.
11. Once cookies have completely cooled, spread filling on flat side of one cookie and top with a second cookie.

Parmesan Bread

February 1st, 2009 by Beth

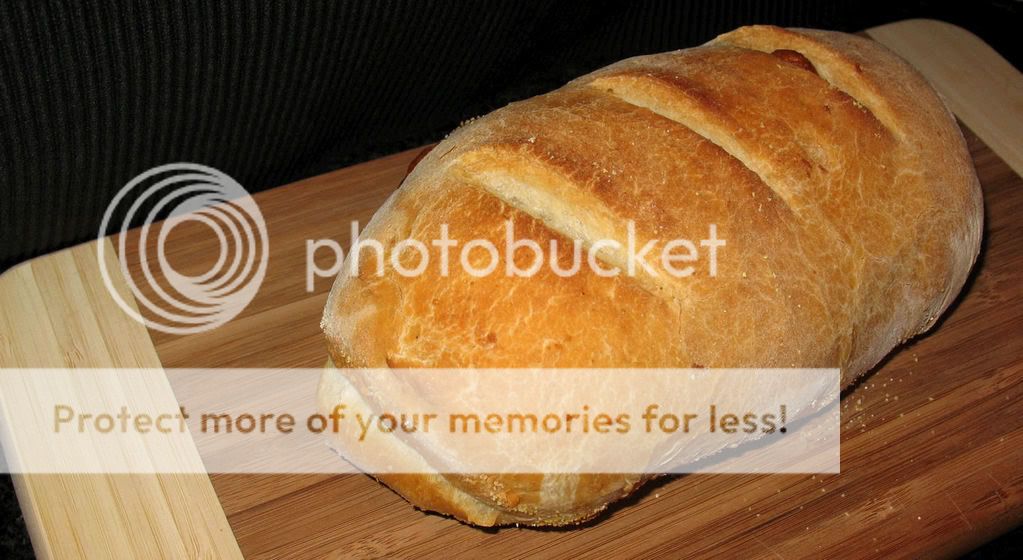
I’ve been making the basic boule from Artisan Bread in Five Minutes a Day for nearly a year now. My husband spotted this Sun-Dried Tomato and Parmesan Bread recipe while thumbing through the book the other day. Since we had company coming for dinner on Saturday night, I decided to give it a try.

The central idea behind Artisan Bread in Five Minutes a Day is that “Pre-mixed, pre-risen, high moisture dough keeps well in the refrigerator.” Initially mixing the dough takes about 10 minutes or less and shaping/baking a loaf only requires 5 minutes of attended preparation time. Additionally, this dough can be mixed using only a spoon and a mixing bowl. No kneading is required.

The book contains a number of base dough recipes that can be modified, resulting in dozens of different kinds of bread and bread products.

This recipe uses 1 pound of the Master Bread recipe, which I’ve detailed in a previous post. I omitted the sun-dried tomatoes, making this a Parmesan bread. The cheese added a nice tang to the bread and brushing the crust with olive oil resulted in a nicely browned, crisp crust.

Parmesan Bread

Yields a single 1-pound loaf

1 pound (grapefruit-sized portion) of dough
Olive oil for brushing the loaf
1/2 cup grated Parmesan cheese (or other Italian-style grating cheese)
Cornmeal pizza peel

1. Dust the surface of the refrigerated dough with flour and cut off a 1-pound piece. Dust the piece with more flour and quickly shape it into a ball by stretching the surface of the dough around the bottom on all four sides, rotating the ball a quarter turn as you go.
2. Roll out the ball into a 1/4-inch-thick rectangle. As you roll out the dough, use enough flour to prevent it from sticking to the work surface, but not so much as to make the dough dry.

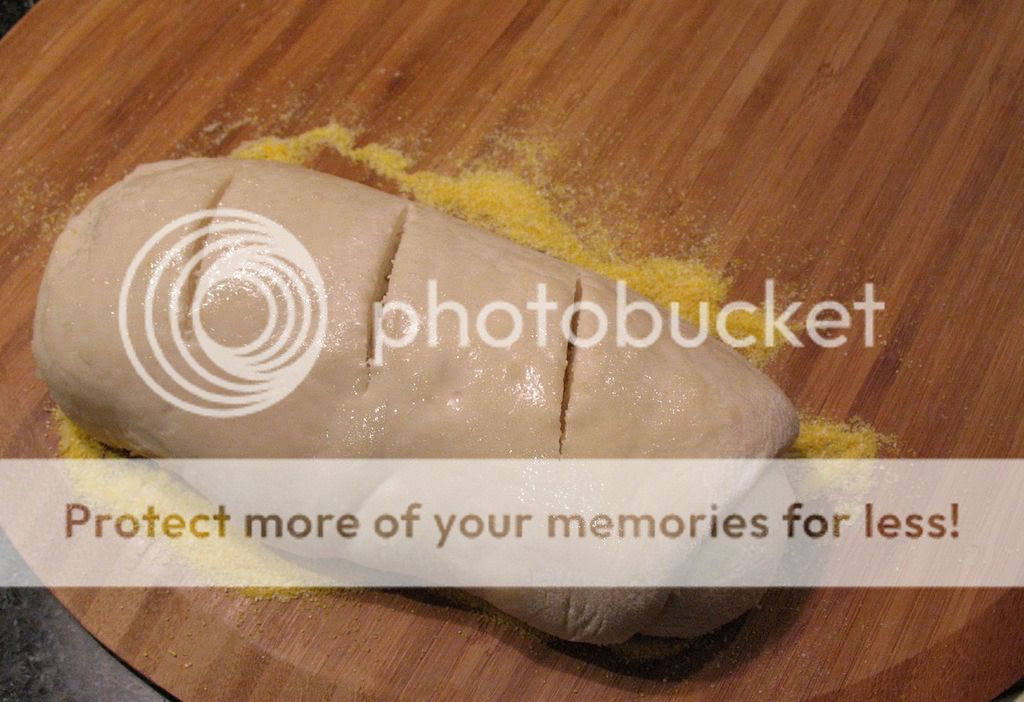
3. Brush the dough with olive oil and sprinkle with cheese. Starting from the short end, roll the dough into a log and gently tuck the ends under to form an oval loaf. Allow to rest and rise on a cornmeal-covered pizza peel for 1 hour (or just 40 minutes if you’re using fresh, unrefrigerated dough).

4. Twenty minutes before baking tiem, preheat the oven to 450, with baking stone placed on the middle rack. Place an empty broiler tray on any other shelf that won’t interfere with the rising bread.

5. Brush the top of the dough lightly with olive oil and slash parallel cuts across the loaf, using a serrated bread knife.

6. Slide the loaf directly onto the hot stone. Pour 1 cup of tap water into the broiler tray, and quickly close the oven door. Bake for 30 to 35 minutes, or until deeply browned and firm.

7. Allow to cool before slicing and eating.

Asparagus and Ravioli with Dijon Alfredo Sauce

February 1st, 2009 by Beth

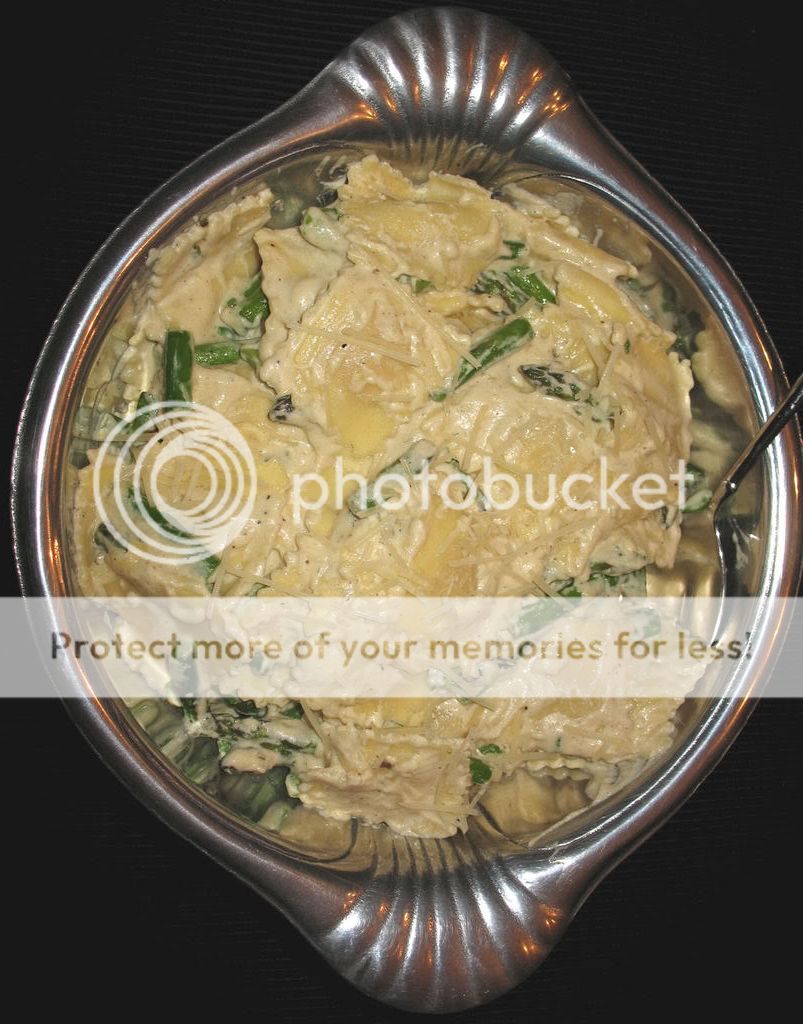
I’ve been making this recipe for Dijon Alfredo Sauce for years. My husband and I stumbled across this on allrecipes.com when we were searching for a cream sauce to go along with a bottle of Gew?rztraminer that we had picked up.

The Dijon mustard adds an interesting bite to the creamy Alfredo sauce and complements the asparagus quite nicely. In fact, this dish made me fall in love with asparagus. The sauce is rather rich, but it’s a fun treat. This dish has always gotten rave reviews from guests.

I love making this dish for company because of its’ unique flavor combinations and impressive presentation. It does require around 30 minutes of hands-on preparation, but the steps aren’t too complicated. I typically work on dinner while casually visiting with guests in the kitchen.

Based upon reader reviews, I have lightened up a the recipe by reducing the amount of butter and using light cream in place of whipping cream. I also use far less mustard than the original recipe. The resulting sauce is rich, smooth and flavorful.


Asparagus and Ravioli with Dijon Alfredo Sauce

Yields 4 servings

2 (9 ounce) packages refrigerated chicken- or cheese-filled ravioli
1 pound fresh asparagus
6 tbsp butter, divided
2 cloves garlic, pressed
1-2 tbsp Dijon mustard
1 1/2 cups light cream
1/2 cup grated Parmesan cheese
1/2 teaspoon pepper

1. Cook ravioli in a large saucepan according to package directions; drain and keep warm.
2. Snap off tough ends of asparagus; cut asparagus into 2-inch-long pieces.
3. Melt 1 tablespoon butter in a large skillet over medium-high heat; add asparagus, and saute 2 minutes or until crisp-tender. Spoon over ravioli.
4. Melt remaining 5 tablespoons butter in skillet over medium heat; add garlic, and saute 1 minute. Whisk in mustard. Gradually whisk in light cream until smooth.
5. Bring cream mixture to a boil; reduce heat, and cook, stirring often, 5 minutes. Stir in cheese and remaining ingredients. Cook, stirring constantly, until cheese melts. Pour over asparagus and ravioli, and toss. Serve immediately.

2009 Super Bowl Appetizer Extravaganza

January 28th, 2009 by Beth

Looking for some new appetizers for your Super Bowl party? Here’s a list of tried and true appetizer favorites that are sure to be a big hit this Sunday! I’ve included recipes submitted by friends, as well as my own go-to appetizers. Whatever you’re tuning in for – the game, the commercials, the half-time show – enjoy!

Black Bean Nachos

Mexican Confetti Pinwheels

Cheesy Nacho Dip

Black Bean and Corn Quesadillas

Crab Rangoon

Pesto Pinwheels

Bacon and Cheese Log

Chocolate Chip Cheese Ball

Spinach and Artichoke Dip

Stuffed Mushrooms


Black Bean Nachos

January 28th, 2009 by Beth

This is a quick appetizer that’s easy to throw together. It scales well for two people or for a crowd. If you want a more elaborate nacho plate, you could easily added ground beef, onions, peppers etc.

I like to prepare this nacho plate on a rimless cookie sheet because it makes transferring to a serving dish a breeze.

Black Bean Nachos

Tortilla chips
Cooking spray
1 can black beans, drained and rinsed
Cumin
Salsa
Shredded Mexican-blend cheese or cheddar jack

1. Preheat oven to 350
2. Spray cookie sheet with cooking spray
3. Cover cookie sheet with desired amount of tortilla chips.
4. Layer chips with desired amount of black beans. Sprinkle with cumin.
5. Cover black beans with salsa.
6. Sprinkle cheese over top.
7. Bake for 8-10 minutes, until cheese is melted and starting to brown lightly. Serve immediately.

Mexican Confetti Pinwheels

January 28th, 2009 by Beth
Photo courtesy of www.Pillsbury.com

These bite-sized appetizers are flaky, spicy and easy to make! They always disappeared quickly when I brought them to Superbowl parties. Like the pesto pinwheels, it’s easier to slice these if you chill the rolled dough for at least an hour. The Mexican pinwheels can be make in advance and reheated prior to serving.

I clipped this recipe a few years ago, and it differs slightly from the one found on Pillsbury’s website.

Mexican Confetti Pinwheels

Yields 24 pieces

1 can (8 oz) refrigerated crescent rolls
1/4 cup nacho cheese dip
1/4 cup finely chopped red bell pepper
1/4 cup chopped green onions

1. Unroll dough and separate into 4 rectangles; firmly press perforations to seal.
2. Spread dip on rectangles to within 1/4 inch of edges.
3. Sprinkle with bell pepper and onions.
4. Starting with short side, roll up each rectangle; press to seal.
5. If desired, wrap rolled dough in plastic wrap and refrigerate for at least an hour.
6. Preheat oven to 375.
7. Using a serrated knife, cut each roll into 6 slices; place on ungreased cookie sheet.
8. Bake 11-15 minutes or until edges are golden brown. Remove immediately and serve warm.

Cheesy Nacho Dip

January 28th, 2009 by Beth

Meaghan sent me the recipe for her quick and easy Cheesy Nacho Dip. The creaminess of the cream cheese blends quite nicely with the spice of the salsa. It’s a breeze to put together and is quite the crowd-pleaser. This dip can be assembled in advance and heated immediately before serving. Serve warm with tortilla chips.

Cheesy Nacho Dip

8 oz. block of cream cheese
8 oz. bag of shredded cheese
one jar of salsa.

1. Spread the cream cheese across the bottom of a glass pie plate.
2. Spread your desired amount of salsa on top of the cream cheese.
3. Sprinkle the shredded cheese on top of the salsa.
4. Microwave on high for 3-5 minutes, until the cheese is melted.