Authors
Beth
Kathleen
Lisa
Contact
domesticpursuits [at] gmail.com
Categories

Gingerbread

January 24th, 2011 by Beth

It may be the end of January, but that doesn’t mean that I’m giving up on all of the fun flavors associated with Christmas.  Sure, the holidays have come and gone, but it’s still winter.  It’s still cold, and who doesn’t need some cheer in the form of a delectable dessert at the end of a frigid January day?

I added gingerbread to my 30 While 30 list fully expecting to make it during the Christmas season.  Life (and 28 dozen cookies) got in the way, but an impromptu dinner with my mother-in-law presented the perfect opportunity to give this recipe a whirl.

This cake is just perfect.  The crumb is moist and dense – leaning more towards the consistency of a quick bread than a standard cake.   It has all of the hallmark gingerbread flavors – rich molasses, warm cinnamon and spicy ginger and cloves.  Serve it with a dollop of whipped cream and a sprinkling of cinnamon alongside your favorite hot beverage for the perfect winter day finale.

Gingerbread

1/2 cup shortening
1/2 cup white sugar
1 egg
1/2 cup light molasses
1 1/2 cups all-purpose flour
3/4 tsp salt
3/4 tsp baking soda
heaping 1/2 tsp ground ginger
heaping 1/2 tsp ground cinnamon
scant 2/4 tsp ground cloves
1/2 cup boiling water

1. Preheat oven to 350 degrees. Grease and lightly flour one 8 inch square baking pan. (I prefer to line a pan with foil and use cooking spray…easier clean-up!)
2. Cream shortening and sugar until light and fluffy.
3. Add the egg and molasses, beating until well-combined.
4. In a separate bowl, sift together the flour, salt, baking soda, ground ginger, ground cinnamon and ground cloves.
5. Once water has come to a boil, alternately add the water and flour mixture to the creamed mixture. Beat well after each addition.
6. Pour batter into prepared pan and bake for 35-40 minutes.

Homemade Pancake Mix

January 20th, 2011 by Beth

Pancakes have recently become a favorite meal in our household.  Thankfully we’re only cooking for two, because making pancakes with our medium-sized frying pan on an electric stove-top was a slow process and sometimes disastrous process.  While I loved the idea of an electric griddle, I was concerned about storage space.  My husband was pretty gung-ho about the whole thing, but understood my hesitation.  As Christmas approached and I brainstormed ideas for my husband, I thought of his desire for a griddle and mentioned it to my parents.  They picked one out for him.  Imagine my surprise when I opened a rather large, oblong box on Christmas morning and found an electric griddle inside.  My husband opened his a few hours later when my parents came for dinner.  What can I say, great minds think alike? :)  Oh, and our griddle goes quite nicely with my husband’s Darth Vadar spatula (a great stocking stuffer!)

Now, we’re happily griddling away and pancakes seem to have become a Sunday night tradition.  We whip up a batch of pancakes and lounge in front of the fireplace for the evening.  Alton Brown’s recipe for “Instant” Pancake Mix makes it easy to throw together a tasty batch of pancakes in no time.   After mixing a large batch of dry ingredients ahead of time (keeps for about 3 months), all you have to do is add butter, eggs and buttermilk and you’re good to do.  The resulting pancakes are far superior and far cheaper than any mix you can buy at the store.

If you don’t have buttermilk on hand, never faear,  you can still make these pancakes by using an easy substitution (details below).  They’re delicious either way, but wow, real buttermilk really takes them to the next level!

Homemade Pancake Mix

6 cups all-purpose flour
1 1/2 tsp baking soda
3 tsp baking powder
1 tbsp kosher salt
2 tbsp sugar

Combine all of the ingredients in a lidded container. Shake to mix.

Use the mix within 3 months.

Make the Pancakes
Yields 12 pancakes

2 eggs, separated
2 cups buttermilk *
4 tbsp melted butter
2 cups homemade pancake mix, recipe above
1 stick butter, for greasing the pan
2 cups fresh fruit such as blueberries, if desired

1. Heat an electric griddle or frying pan to 350 degrees F.
2.  In a small bowl, whisk together the eggwhites and buttermilk. **
3. In large mixing bowl, whisk the egg yolks with the melted butter.
4. Add the buttermilk mixture to the large bowl and whisk until thoroughly combined.
5. Add pancake mix to the large bowl and mix the batter until just combined. Don’t try to work out all of the lumps.
6. Once the griddle is heated, butter it lightly and wipe off with a paper towel. No butter should be visible.
7. Ladle the batter onto the griddle and sprinkle with fruit, if desired.
8. Flip the pancake once the bubbles around the edges of the pancake begin to set, and the griddle-side of the pancake is golden.
9. Continue to cook until the pancake has set completely.

* Don’t have any buttermilk? Make your own! Add one tablespoon of lemon juice or white vinegar to one cup of milk and let sit for a few minutes. Mix well and use in any recipe that calls for buttermilk.

** Looking to cut down on dishes? Measure the buttermilk into a liquid measuring cup. Melt the butter in a microwave safe mixing bowl that’s large enough for your dry ingredients. When you crack the eggs, separate them directly into the liquid measuring cup and large mixing bowl.

Crumpets

January 20th, 2011 by Lisa

This year for Christmas, I got a fantastic cookbook for any Harry Potter-phile who knows their way around the kitchen - The Unofficial Harry Potter Cookbook.  It’s got plenty of great recipes for the treats found on the Hogwarts Express, dishes prepared in the kitchen by house elves, and all kinds of other tasty bites popular ‘across the pond.’  Coincidentally, on my list of 30 things to make while I’m 30, I happened to include the popular British tea-time snack the crumpet which expectedly is included in this book filled with British recipes. 

When I told my husband I was going to be making crumpets, he said…”what’s a crumpet?”   Crumpets are, in fact, a very tender and delicate cake similar to an English muffin in shape, but decidedly different in flavor and texture.  They are light and tender, as well as both sweet and savory.  My first crumpets were bought from a grocery store, wrapped in plastic and with a shelf life that probably rivals Twinkies.  I had always enjoyed them even if they were mass-manufactured, but I figured they couldn’t be that hard to make and sure enough, that’s true.  The most challenging part is that they require a circular mold to ensure they have the perfect circle shape – certainly you can go purchase a set of English Muffin rings like I did, but if you have a 3 or 4 inch round cookie cutter, or even a (well washed) tuna can with both ends cut off, these would work just fine.   Enjoy your crumpets toasted with butter and jam alongside a hot cup of tea – like Harry did, with the Minister of Magic.

Crumpets – from ‘The Unofficial Harry Potter Cookbook’ by Dinah Bucholz

Ingredients:

  • 1 cup flour
  • 1 teaspoon yeast
  • 1 tablespoon sugar
  • 1 teaspoon salt
  • 1 cup milk
  • 2 tablespoons of melted butter

Whisk together dry ingredients.  Slowly mix in milk and butter until the mixture is smooth.  Let sit in a warm place for about 90 minutes, or until the mixture becomes bubbly and increased in size.  Grease English Muffin rings, and a griddle.  Preheat over low heat.  Scoop 1/3 of a cup of crumpet batter into each ring.  Cook for about 5 minutes, or until the top appears bubbly.  At this point remove the rings (They will be hot, so be careful!  Use tongs or an oven mitt.)  Flip the crumpets, and cook for another 4-5 minutes.  Cool completely on a baking rack, and store in an airtight container.

Chicken Pot Pie Soup

January 16th, 2011 by Beth

Looking for the perfect bowl of soup to combat that winter chill?  Look no further than this Chicken Pot Pie Soup.  It’s the ultimate comfort food – a tasty, healthy dish that’s warm, filling and chock full of familiar flavors.  With the thickened broth, variety of vegetables and chunks of chicken and potato, it is indeed chicken pot pie in a bowl.  You get all of these flavors and warmth with minimal preparation time and far fewer calories than your typical pot pie.  As an added bonus, this recipe yields 6-7 hearty portions.  It heats up beautifully and tastes even better on the second and third day!  I simply can’t say enough good things about it.

As we plunge into the depths of winter I can assure that I’m adding this soup to my regular menu rotation, and I recommend you do the same.  You won’t regret it!

Chicken Pot Pie Soup
Yields 6-7 1 1/2 cup servings

1/4 cup flour
4 cups chicken broth
2 cups fat free milk
1 large celery stalk, chopped
1/2 medium chopped onion
8 oz sliced baby portabella mushrooms
fresh ground pepper
pinch of thyme
10 oz frozen classic mixed vegetables (peas, carrots, green beans, corn)
2 potatoes, peeled and cubed small
16 oz cooked chicken breast, diced small
salt

1.  In a medium bowl, combine 1/2 cup of the chicken broth with the flour and whisk until well blended.  Set aside.
2. Heat a stock-pot coated with a small amount of olive oil over medium-high heat. Add celery, onion and mushrooms to the pan and cook for several minutes until vegetables have softened. Add frozen vegetables and allow to heat through – about 3-5 minutes.
3. Add remaining broth and milk to the pot, increase heat and bring to a boil.
4. Bring to a simmer and add potatoes cooking until soft (about 5 minutes).
5. Slowly whisk in broth and flour mixture, mixing well to combine.
6. Add chicken, cooking for another 2-3 minutes. Allow the mixture to thicken slightly. Add salt and pepper to taste.

Buffalo Chicken Dip

January 16th, 2011 by Lisa

Today in honor of week 2 of the football playoffs, I am adding another dip recipe to add to my January collection.   I personally love anything buffalo flavored these days – something about the spicy tomato-ey flavor combined with creamy cool cheese that has got me hooked.  I therefore obviously had to include a buffalo chicken dip in my dip montage.  I found this recipe which I ended up modifying from the original a bit  – first, I try not to buy canned chicken, as I find it too salty and too dry - instead, I used one leftover medium-sized cooked chicken breast made the day before.  Second, as with most of my recipes, I made some substitutions to reduce the fat content – namely, used light cream cheese and fat free ranch dressing.  Third, I don’t know about you – but 5 cups of dip as this recipe claims to make is a LOT of dip to make for one party, no matter how awesome the dip (or the party) – so I changed the proportions to make a much more reasonable 2.5 cups. Lastly, I made it at a friend’s house – so instead of dirtying a skillet, I used the microwave to heat it!  This version came out great – it has just the right amount of kick to be enjoyed by all.  For a different flavor, try add blue cheese dressing instead of ranch!

Buffalo Chicken Dip – adapted from allrecipes.com, Nunpunch

Ingredients

  • 1 medium-sized chicken breast, cooked and shredded
  • 8oz package light cream cheese, softened
  • 1/2 cup fat free Ranch dressing
  • 1/3 cup hot sauce (such as Frank’s)
  • 3/4 cup shredded cheese (I used a combination of swiss and cheddar)
  • 1 bunch of celery, cleaned and cut into 4 inch pieces
  • crackers

Directions:

Stir together chicken, cream cheese, ranch dressing, cheese, and pepper sauce in a microwave-safe container.  Place into microwave.  Microwave for 1 minute at a time, stirring in between, until the dip reaches your desired temperature and consistency.  Enjoy with celery and crackers.  And football, if you are so inclined.

Spinach Artichoke Dip

January 11th, 2011 by Lisa

New year, new house, new recipes!  My husband and I moved last month – as an aside, I now know why so few people opt to move in December – between the closing, the packing, the moving out and the moving in, and the holidays, I needed a few weeks to recover!  We’re now settled comfortably into our new home, and I finally have time to cook again. 

Now that football playoffs are upon us, it’s that time of year where one needs an arsenal of appetizer recipes to have on hand for the boys.  Frankly, even if you’re not going to be watching the playoffs (sorry to the Eagles, Colts, Saints & Chiefs fans out there), winter is a great season to find a warm afternoon snack to have around for entertaining.  My January series of posts will involve a number of tasty, easy & economical hot appetizer dips to prepare for your upcoming football festivities…or any other upcoming events you may have that are not related to sports. 

In my opinion, there are few appetizers more enjoyed than a nice warm Spinach & Artichoke dip, accompanied by some crispy crostini.  A few years ago, my co-blogger Beth posted a similar recipe as part of her homage to Superbowl Snacks - I made this slightly different recipe during the holidays this year, and it was both so easy and received such rave reviews that I promptly decided it is a definite keeper.  I served this with homemade crostini (really just a fancy word for toast) which I made myself by toasting thin slices of sourdough baguette.  It also is fantastic with tortilla chips or potato chips…and if you’re feeling especially healthy for your New Year’s resolution, it would also taste good with fresh vegetables too.  Like Beth’s, it has the distinct advantage that you can prepare it in advance – right through the final step of topping with mozarella and baking – which may make your Sunday afternoons more fun over the next few weeks if you are going to be watching the boys party for a few weeks, like me. 

PS – it also involves the ever useful frozen spinach

Hot Spinach & Artichoke Dip – from Tiffany Brennan via allrecipes.com

Ingredients

  • 1 (8 ounce) package light cream cheese, softened
  • 1/4 cup light mayonnaise
  • 1/2 cup grated Parmesan cheese
  • 1 clove garlic, peeled and minced
  • 1/2 teaspoon dried basil
  • 1/4 teaspoon garlic salt
  • salt and pepper to taste
  • 1 (14 ounce) can artichoke hearts, drained, rinsed, and chopped
  • 1/2 cup frozen chopped spinach, thawed and drained
  • 1/4 cup shredded mozzarella cheese

Directions

Preheat oven to 350. (Unless you are making it in advance – then no need right now!)  Blend together the cream cheese, mayo, parmesan cheese, garlic, basil and salt.  Stir until well combined.  Gently fold in the artichoke hearts and spinach.  (If preparing in advance – stop here!)  Place into an oven-safe small baking dish.  Top with mozarella cheese, and bake at 350 degrees for 30 minutes.

To make crostini:  Slice a baguette (I used a sourdough baguette) into 1/4 inch thick slices.  Place slices in a single layer on a cookie sheet.  Toast at 350 degrees for 12 minutes.  Call them crostini, and everyone will think you are about to win the next Iron Chef.

Conquering the deep freeze- 5 foods to heat up any dish

January 9th, 2011 by Kathleen

A well-stocked freezer is a thing of beauty

A trip to the warehouse club can be a dangerous thing if you own a chest freezer.  One moment you’re innocently walking down an aisle buying a package of toilet paper, and the next thing you know– you have a 48-pack of mini quiche sitting in your deep freezer.  How long has it been there? When did you even buy it?!?! And who will take the blame when it’s sitting there taking up space two years from now? It’s time to shape up that freezer and ship out what you know you’ll never eat.

I’m proud to say that our deep freezer was one of the most exciting purchases during my foray into domesticity.  Visions of well-labeled canisters of homemade soup, packets of meat, and frozen vegetables danced in my head. Never again would I need to worry about what to make for dinner– it would all be sitting in my freezer just waiting to be defrosted. However, in order to have dinner at your fingertips, you’ve gotta have the basics and a little something exciting to make you actually WANT to cook dinner.

To kick things off in this season of snow and ice, I present to you Kathleen’s list of Top Five Items to Get in your Freezer Right Now! If you have these on hand, you’ll never end up reaching for that take-out menu.  I swear by all five of the following items, and for the record– they’re all sitting in my chest freezer at this very moment.

5.  Spinach

We all know the story– the dark greens are good for us. If you don’t have it right now, get yourself one of those frozen spinach blocks (or two) and plop them into your freezer. Why? Aside from the nutritional benefits, spinach will liven up and make a one-note dish more colorful. Just defrost for a few minutes, squeeze out as much water as possible, and add it to soups, jarred pasta sauce, and dips. Mix it with ricotta and bam! You’ve got the filling for stuffed shells or cannelloni.  Mix with sour cream and mayo for a great dip. You could even just serve it warm as a side dish (but we know you’re not going to do that).

*Extra Credit:  Make some room in your freezer for those frozen basil cubes and pesto you made at the end of this summer.

4. Frozen cheese-filled tortellini

If you’re feeling ambitious, you could sit down one evening and crank out some handmade filled pasta. Or you could be like me– wanting to boil water and be done with it.  For as simple as it is, frozen tortellini is a grand staple. Sauted lightly with olive oil and that frozen spinach (#5), it’s a simple and satisfying dinner. Thrown into a soup or broth, and you’ve got something that will easily stave off a winter chill. Marinate some overnight in salad dressing and skewer with tomato and mozzarella cubes– and you have a simple and elegant appetizer. As an added bonus, you’ll always have something on hand to whip up for that surprise vegetarian dinner guest or picky nephew. If you’re feeling really experimental, try topping a salad with chilled, cooked tortellini instead of croutons.  I’m a fan.

*Extra credit:  If you can find frozen pumpkin ravioli, stock up. It’s one of those “impress your friends with an easy entree” items.  Saute with brown butter and sage, add a little crumbled Italian sausage (#2), and you’re good to go.

3. Frozen Peas or Corn

Don’t laugh.  It’s a sad day indeed when I realize that we’re out of frozen peas.  I’ll let you check out Beth’s amazing corn salsa if you need extra reason to stock up on some kernels.  Aside from instant faux ice packs when you’ve got a splitting headache, these two veggies are incredibly versatile when you’re looking to spice up your dinner. Just thaw (no need to boil) and add to your dinner salad when all you have is a head of iceberg. Add peas to alfredo or to my incredible artery-clogging, bacon-tastic carbonara (coming soon to DP!) for a splash of color.  Puree with some salt and pepper for an easy dip.

*Extra credit:  We also keep a stock of frozen edamame (soybeans), both shelled and unshelled.  The shelled ones just need a little hot water and salt to make a great appetizer or pea replacement.

2. Italian sausage

Everyone has frozen ground beef in their freezer– I think it might even be issued with the purchase of a chest freezer.  But how inspiring are those little balls of freezer-burned beef? Not very.  I like to purchase Italian sausage (still in casings) and freeze portioned packets of two links each. Once defrosted, it’s easy to pull the casing off, and you’ve got a great way to spice up your dinner. Try mixing in Italian sausage with ground beef for burgers or meatballs. Brown some and add to your frozen tortellini (#4).  Or just keep in the casing and fire up the grill.  I normally have both mild and spicy links on hand for variety.

*Extra credit: This might sound a little lame coming from someone who likes to cook, but do yourself a favor and buy frozen mini meatballs (I like the ground turkey ones, myself). Yes, it’s lazy. However, knowing all you have to do is heat them and serve gives you a lot of options in the kitchen. Add to pasta for an easy dinner. Add to a broth with a few noodles for a soup. Add some sauce and you’ve got a sandwich, or throw into a slow cooker for an easy party appetizer.

and for my absolute staple in the freezer….. (drumroll, please)

1. Bacon!

To know bacon is to love bacon– at least when it comes to adding flavor and variety to your cooking repertoire.  Perhaps you already have the beloved breakfast meat in your freezer, so I’ll be a little more specific. During your next grocery trip, pick up a package or two and immediately slice each 1lb slab into four chunks (each which conveniently fit well in a quart freezer bag).  The next time you’re looking for a bit of extra flavor, pull out a bag. This amount of bacon easily defrosts right in the pan, and you’re already on your way to a fancy mac ‘n’ cheese or rich carbonara.  I’ll often pull out a package just for an easy breakfast addition or something extra to throw into a dip. My personal favorite is to fry up a little bacon, and use some of the drippings to saute fresh brussel sprouts.  I’ve even used it to infuse vodka and create a surprising brownie– but those are recipes for sharing on another day.

*Extra credit: If you’re feeling really adventurous, pick up a small package of pork belly.  This can be just as easily diced up and added to give a little more heft to a pasta or really liven up a salad. And contrary to popular belief, you don’t have to be on a competitive cooking show in order to cook with this luscious ingredient.

What food items do you lean on when it comes to heating up dinner ideas? We want to hear! In the meantime, happy defrosting!

Happy New Year!

January 8th, 2011 by Kathleen

Greetings and a Happy New Year to all of you!

I don’t know about you, but I love the month of January.  The days get a little longer, the spring planting catalogs begin to fill my mailbox, and weekend advertisements focus on getting in shape and more organized.  I find myself making promises and resolutions to cook more, organize better, and worry less.

Unfortunately, by the third week of January or so, I find myself overwhelmed with potential projects and new recipes to try. The siren song of the local chain restaurant calls to me far too often on weekday nights. So what’s a food-loving lady with limited time to do at 7 pm on a Tuesday?

Worry not. In the next few weeks, Domestic Pursuits will present to you the absolute essentials for your pantry, parties, and cookware to help you flambe the winter doldrums without breaking the bank. We’re thrifty ladies who love good food, good wine, and good value. Are you with us?

Pumpkin Pancakes

November 15th, 2010 by Beth

Between September and January, pumpkin puree does not last long in my house.  Here in New England, we’ve been fortunate enough to miss the canned pumpkin shortage that has plagued parts of the country for the past two baking seasons.  Last year, I was so concerned that we’d encounter a shortage that I bought multiple cans each time I went to the grocery store, resulting in quite a stockpile!  I’m not worried this year, but that hasn’t stopped me from stocking up.

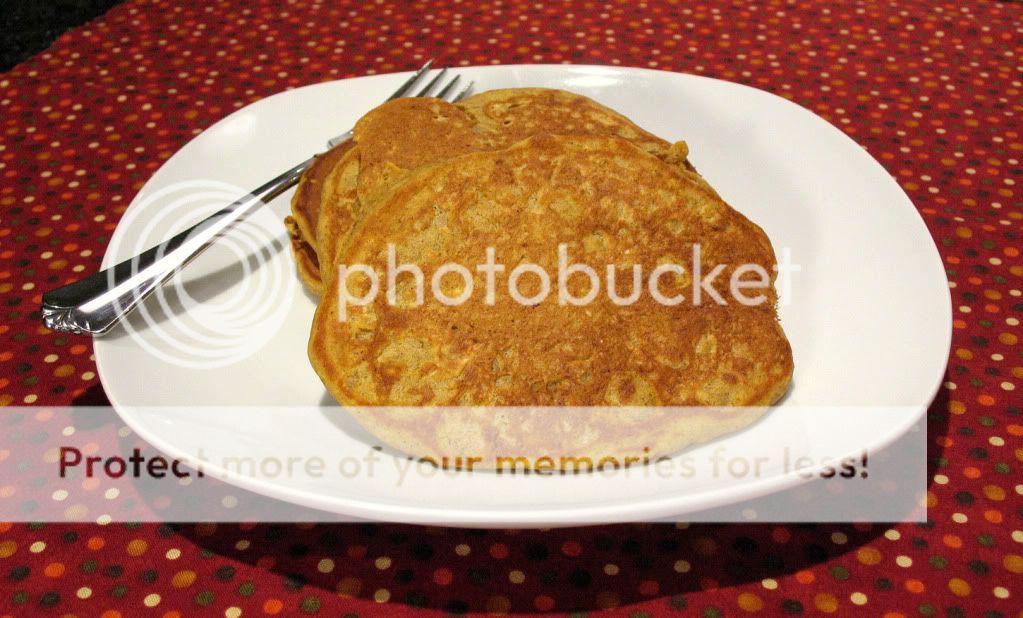
These pumpkin pancakes are an excellent use for any pumpkin you may have lying around.  Fluffy and flavorful, they add a tantalizing taste of fall to your breakfast table.  A generous serving of maple syrup makes them extra heavenly.

The original recipe yields a large amount of pancakes, so I halved it and ended up with a good amount for just my husband and I.   The only complaints I noticed in the original recipe was that the pancakes didn’t cook well.  Since the batter was thick, it didn’t spread as much as pancake batter usually does.  I remedied this problem by gently spreading the batter with a rubber spatula until I reached the desired thickness.  The pancakes cooked up beautifully – light, fluffy and fully-cooked.

Pumpkin Pancakes
Yields 8-10 medium-sized pancakes

1 cup all-purpose flour
1.5 tbsp brown sugar
1 tsp baking powder
1/2 tsp baking soda
1/2 tsp ground allspice
1/2 tsp ground cinnamon
1/4 tsp ground ginger
1/4 tsp salt
3/4 cup milk
1/2 cup pumpkin puree
1/2 egg * (see below)
1 tbsp vegetable oil
1 tbsp vinegar

1.  In a large bowl, mix the milk, pumpkin, egg, oil and vinegar.
2. Whisk in brown sugar.
3. In a separate bowl, combine the flour, baking powder, baking soda, allspice, cinnamon, ginger and salt.
4. Stir the dry ingredients into the pumpkin mixture until just combined. Do not over-mix.
5. Heat a lightly oiled griddle or frying pan over medium high heat. Pour or scoop the batter onto the griddle, using approximately 1/4 cup for each pancake. Brown on both sides and serve hot.

* Q:  How do I add 1/2 of an egg?  A:  Crack the egg into liquid measuring cup and beat with a fork.  Note the measurement on your measuring cup and add half of that to your recipe.

Boston Cream Pie Cupcakes

November 5th, 2010 by Lisa

Recently, after a long day of furniture shopping, my husband and I were meandering through the grocery store pondering what we would be having for dinner.  As we were picking up some fresh produce to make dinner, my husband strayed over towards the bakery case and took a very long look at the desserts.  It’s been a while since I’ve baked, as we’re currently between houses and staying with my parents and hence most of my kitchen is packed up and awaiting transplant to our new place…which we sadly don’t close on for another 31 days…not that anyone’s counting.  The poor guy really wanted a Boston Cream Pie.  Well, I figured after a long day of patiently deciding exactly which sofa arms were just the right shape (instead of watching Sunday afternoon football) he deserved a treat.  I had put Boston Cream Pie on my list of things to make while I’m 30 (after all, it is the official dessert of Massachusetts, partly thanks to my esteemed friend and co-blogger Beth) so figured I would give it a go tonight.  I was thinking about making the ‘real deal’ full sized pie here, but there is something that psychologically makes me feel better when I eat a cupcake rather than eating a slice of cake, so I opted to go the cupcake route with this one.

The recipe I located sounded fairly accessible for a recipe that requires homemade custard and ganache, and as Martha can do little wrong when it comes to cupcake recipes in my book, I figured they would be great.  Indeed, these little treats are absolutely delicious - although we were so excited for a bite as the vanilla cake smell filled the house, I just couldn’t wait long enough to get through the 40 minutes recommended to let my custard fully set, and as a result mine were a little bit wobbly.  Also, I had about twice as much ganache as I needed – unless you plan to REALLY REALLY cover your cupcakes in glaze, or you want to eat half a cup of ganache on its own, you can probably get by with about half a batch.  This recipe made a perfect 18 cupcakes for me otherwise.  It was rather odd not using paper liners for my cupcake pans, but because you slice the cakes in two in order to put the filling inside liners really aren’t practical.  I think this would also come out well if the cupcakes were hollowed out and filled with the vanilla cream, which would allow for liners and more stability – but would make them look less like real Boston Cream Pies.

Boston Cream Pie Cupcakes – from Martha Stewart Recipes

For the Cupcakes:

  • 1 1/2 cups all-purpose flour, plus more for tins
  • 1 1/2 teaspoons baking powder
  • 1/2 teaspoon salt
  • 1/2 cup whole milk
  • 3 ounces (6 tablespoons) unsalted butter, softened, plus more for tins
  • 3 large eggs
  • 1 cup sugar
  • 1 teaspoon pure vanilla extract
  • Grease your cupcake pans (enough to make 18 cupcakes) and dust with flour.  Set aside.  Preheat your oven to 350 degrees.  Mix together the flour, baking powder and salt in a large bowl.  In a saucepan, melt the butter into the milk over medium heat.  While this is heating, in the bowl of your trusty stand mixer, beat together the eggs and sugar on medium for about 5 minutes or until light yellow and smooth.  Beat in dry ingredients until well incorporated.  In a slow steady stream, add the milk mixture to the bowl.  Spoon the batter into the prepared cupcake pans – fill them only about half way.  Bake for 15 minutes, or until the tops appear lightly browned.  Let the cupcakes cool for 10 minutes in the pans, then remove them and cool completely on a wire rack.

    For the cream filling:

    • 2 large egg yolks
    • 1/4 cup sugar
    • 2 tablespoons plus 1/2 teaspoon cornstarch
    • Pinch of salt
    • 1 cup whole milk
    • 1/2 teaspoon pure vanilla extract
    • Whisk egg yolks until smooth, and set aside for later use.  In a small saucepan, mix together the sugar, cornstarch and salt.  Place this over medium heat and pour in the milk in a slow stream.  Cook milk mixture until it begins to bubble and thicken.  Then whisk about a third of the hot milk mixture into the egg yolks, whisking continuously to make sure the eggs don’t scramble.  Return the egg yolk mixture to the pan and continue to heat for about 4 minutes, or until the mixture firms up into a custard.  Stir in vanilla.  Pass the cream through a sieve to remove any bits of cooked eggs.  Place in a bowl with plastic wrap in contact with the surface so it does not form a skin, and set aside until cool.

    To make the ganache:
    • 2/3 cup heavy cream
    • 6 ounces semisweet chocolate chips
    • 1 tablespoon light corn syrup
    • Bring cream to a boil, then remove from heat.  Add the chocolate chips and corn syrup.  Let stand for 5 minutes, then whisk until the mixture is smooth. 

    To assemble:
    On a level surface, slice each completely cooled cupcake into two layers.  Place 1-2 tablespoons of vanilla cream onto the bottom half of the cupcake.  Let set for 4-5 minutes.  Place the other half of the cupcake on top of the cream.  Spread the warm ganache on top of the cupcake.  Enjoy!

Subscribe
Email Registration  Email
  RSS
Recipe Sites
  • All Recipes
  • Cooking Light
  • Epicurious
  • Food Network
Archives
Sitemeter
Blog Directories
Add to Technorati Favorites