Toll House Cookies

June 9th, 2009 by Beth

I love having a well-stocked freezer. A double batch of vegetarian black bean chili and multiple portions of Mexican rice have saved the day on multiple occasions. I freeze leftover sauce, broth, black beans and shredded chicken to prevent leftovers from spoiling and to save for future use. However, the most enjoyable part of my freezer stash has to be cookie dough.

Freezing cookie dough serves multiple purposes: 1) It prevents my husband and I from eating too many cookies in a short period of time. Sometimes you just want a few cookies, and it’s not always easy to figure out what to do with the remaining four dozen! 2) It allows me to whip up freshly-baked cookies with no mess in a very short amount of time!

Pumpkin Chocolate Chip cookies were my bite-sized dessert of choice for most of the fall, but the classic Toll House cookie became my go-to dessert during the latter part of the winter and into the spring. There are countless variations of the classic chocolate chip cookie, but this is my favorite. They come out chewy on the inside with a hint of crunch on the outside.

I made a few minor changes to the original recipe, based upon recommendations from a friend. I use half butter and have shortening, and I adjusted the amounts of brown sugar and granulated sugar.

If you want to freeze your cookie dough and bake at a later date, drop the cookie dough onto a cookie sheet lined with parchment or wax paper (for easy clean up) and place the sheet in the freezer for about a half hour. Remove the firm balls of dough from the sheet and place in a freezer bag, removing as much air as possible. When you want to bake the frozen dough, there’s no need to defrost! Preheat the oven to 375 and place the frozen balls of dough on a cookie sheet. You’ll probably need to bake the cookies 2-3 minutes longer than usual, but keep and eye on them so that they don’t burn.

Toll House Cookies

Yields 60 cookies

2 1/4 cups all-purpose flour
1 teaspoon baking soda
1 teaspoon salt
1/2 cup butter, softened
1/2 cup vegetable shortening
1/2 cup granulated sugar
1 cup packed brown sugar
1 teaspoon vanilla extract
2 large eggs
2 cups (12-oz. pkg.) semi-sweet chocolate chips

1. Whisk together flour, baking soda and salt in a small bowl.
2. In a large mixing bowl, beat butter, granulated sugar and brown sugar until creamy.
3. Add eggs, one at a time, beating well. Beat in vanilla extract.
4. Beat in flour mixture gradually.
5. Stir in chocolate chips.
6. Drop dough by rounded tablespoon onto ungreased cookie sheets.
7. Bake for 9-11 minutes or until golden brown.
8. Cool on cookie sheets for at least two minutes, then remove to a wire rack to cool completely.

BAKE at 375 for 9 to 11 minutes or until golden brown. Cool on baking sheets for 2 minutes; remove to wire racks to cool completely.

Irish Scones

June 9th, 2009 by Lisa

Sorry for the long long hiatus in between my posts – between hectic work schedules and fabulous vacations to Ireland, I’ve barely had time to do any cooking! Anyway, I have returned and am ready to blog again. After a week of fabulous Irish breakfasts, I was inspired to make some homemade scones. Every morning at our B&B’s, my husband and I were greeted with a huge breakfast ? rashers, bangers, eggs, puddings, and of course soda bread and scones. Irish scones are amazing; they’re not too sweet ? they’re just right to set off all the salty meats they serve you in Ireland. They also go fabulously with coffee on a rainy morning. I found this recipe long before my trip, and have only modified it very slightly ? I added a tiny bit more sugar than the original recipe called for, and also I add a bit more buttermilk to make them slightly moister. As it turns out, they taste quite authentic! The recipe calls for brandy to soak the raisins in – I did this the first time I made them, but the second time I passed it up and they tasted wonderful all the same.

Ingredients:

3 cups flour

1/2 teaspoon baking soda

2 teaspoons cream of tartar

1/2 cup butter (1 stick), softened

4 tablespoons sugar

3/4 – 1 cup buttermilk

1 cup raisins

1/4 cup brandy or cognac (optional)

1 egg, beaten with 1 tablespoon of water

Sugar for sanding

Directions:

The night before you want your scones, mix the brandy with the raisins and let this soak overnight – it can be done for a few hours instead, but the longer the better (optional step).

Preheat oven to 400? F. Sift flour, baking soda, and cream of tartar into a large bowl. Add softened butter and sugar, mixing well. Stir in 3/4 cup milk and raisins (or other fruit), with brandy liquid drained. If mixture is dry, add a bit more milk. Dough should resemble pie pastry, pressing together forms a dough. Tear off pieces of dough, shape into triangles, and place on a baking sheet. Brush scones with egg wash for shine, and sprinkle with sanding sugar. Bake for 15-20 minutes or until golden brown. Enjoy!

Crock Pot Chicken Cacciatore

June 2nd, 2009 by Beth

It’s been quite awhile since I last posted. Over the last few weeks, I’ve been spending much of my spare time working in the yard. I’m thrilled with the way everything is turning out; the flowers are beautiful, my herbs and starter plants are doing well and my newly-decorated deck looks great. The yard definitely deserves its own post at some point.

Just as house projects change with the season, so does my cooking. With spring in full swing and summer on the way, I’ve been doing a lot of grilling lately. Since a few days last week felt more like March than May, I pulled out my Crock Pot to make an warm, easy dinner.

I used this recipe from Recipezaar as a guide, but modified the liquid content slightly. There’s a bit of chopping involved, but the recipe goes together quite quickly. The chicken is fall-apart tender and infused with so much flavor. Served atop whole grain pasta, this makes for a filling, comforting and healthy dinner.

Crock Pot Chicken Cacciatore

Yields 4 Servings

28 oz. crushed tomatoes
2 cloves garlic, minced
2 tsp dried oregano
1 tsp dried basil
1/2 tsp celery powder
1 tsp salt
1/4 tsp black pepper

2 large chicken breasts
1 large onion, thinly sliced
10 oz. fresh mushrooms, sliced
1 pepper, finely chopped

1. Pour tomatoes into Crock Pot.
2. Season with garlic, oregano, basil, celery powder, salt and black pepper. Stir to combine.
3. Add chicken breasts and cover with sauce.
4. Add onion, mushrooms and pepper. Stir to combine with sauce. Ensure that the chicken is covered with sauce and vegetables.
5. Cook on low for 7-9 hours or high for 3-4 hours.

Tequila Lime Chicken

May 14th, 2009 by Beth

The last time we grilled, I wanted to do something other than the usual BBQ sauce. A Mexican inspired marinade sounded good: tequila, lime, cilantro… something along those lines. A quick search of allrecipes.com produced this recipe for Tequila Lime Chicken.

The original recipe includes instructions for baking the chicken, and for an accompanying Mexi-Ranch dressing. I was only interested in the marinade. Based upon recommendations of reviewers and my personal tastes, I changed a few of the proportions. Since it is Tequila Lime Chicken, I increased the amount of tequila to 1 teaspoon, and will probably add more next time. The recipe produced an ample amount of marinade and would easily work for more than the suggested four chicken breast halves.

The chicken was delicious and tender! It had a tangy, smokey flavor that went very well with the cilantro lime rice I made that night. The leftover chicken was delicious on it’s own and on grilled pizza. This marinade will be added to our regular grilling rotation this summer!

Tequila Lime Chicken

1 cup water
1/3 cup Teriyaki sauce
2 tbsp lime juice (juice of 1 lime)
2 garlic cloves, minced
1/4 tsp liquid smoke flavoring
1/4 tsp salt
1/4 tsp ground ginger
1 tsp tequila
4 skinless, boneless chicken breast halves

1. Combine all ingredients, except chicken, in non-reactive bowl. Mix well.
2. Add chicken and turn to coat.
3. Cover and refrigerate for 2 to 3 hours.
4. Grill chicken.

Cilantro Lime Rice

May 14th, 2009 by Beth

I was searching for a Chipotle-inspired rice to serve with tequila lime chicken when found this recipe for Cilantro Lime Rice on allrecipes.com. Sadly, it’s not the same as Chipotle’s rice. It’s still delicious.

This is an easy recipe that uses very few ingredients. The rice has a nice lime flavor, and I love the earthy cilantro. I used more than the two tablespoons of cilantro called for in the original recipe. I don’t know how much I used, as I just sprinkled in extra cilantro until it looked right.

After I made this rice, I found a Chipotle Fan site that provides copy-cat recipes that promise to emulate Chipotle staples. I will be trying their chicken marinade and rice soon.

Cilantro Lime Rice

Yields 6 Servings

1 cup long grain white rice
2 cups chicken broth
2 tbsp lime juice (juice of 1 lime)
2 tbsp chopped fresh cilantro
salt to taste

1. Bring rice and chicken broth to a boil in a saucepan over high heat.
2. Reduce heat to medium-low, cover and simmer for 20-25 minutes or until rice is tender.
3. Remove from heat and stir in lime juice, cilantro and salt. Fluff with fork and serve.

Mother’s Day 2009

May 11th, 2009 by Beth

I’m always looking for a reason to try out new recipes, and to share new favorites with friends and family. Mother’s Day presented the perfect opportunity for a little bit of both.

We celebrated Mother’s Day with my mother, father and brother on Saturday evening. After a delicious take-out meal from a local Italian restaurant, we had a gold cake frosted with Hershey’s “Perfectly Chocolate” Chocolate Frosting.

On Sunday, we hosted a brunch for my husband’s mother and sister. We served coffee, mimosas, fresh fruit with creamy dip, crustless quiche, orange blueberry muffins and strawberry banana muffins.

It was a lovely weekend, and I am so grateful for our wonderful moms!

***The photo above was taken by my Mom in her beautiful perennial garden.***

Hershey’s Chocolate Frosting

May 11th, 2009 by Beth

Gold cake with chocolate frosting is mother’s favorite cake combination. I’ve had my eye on Hershey’s “Perfectly Chocolate” Chocolate Frosting for awhile now, and Mother’s Day seemed like the perfect opportunity to try it out.

I had really hoped that it would be delicious, because I really wanted her to enjoy her Mother’s Day dessert. This recipe did not disappoint! The frosting is rich and chocolate-y with a fudge-like flavor. It’s a snap to make and spreads quite easily on the cake.

The recipe makes enoug frosting to frost and decorate a 9-inch round layer cake with some to spare. The extra frosting is fantastic by the spoonful. :)

Hershey’s “Perfectly Chocolate” Chocolate Frosting

Yields about 2 cups of frosting

1/2 cup (1 stick) butter
2/3 cup HERSHEY’S Cocoa
3 cups powdered sugar
1/3 cup milk
1 teaspoon vanilla extract

1. Melt butter.
2. Beat in cocoa.
3. Alternately add powdered sugar and milk, beating to spreading consistency. Add small amount additional milk, if needed.
4. Beat in vanilla.

Strawberry Banana Muffins

May 11th, 2009 by Beth

These Strawberry Banana Muffins were a last-minute addition to my Mother’s Day Brunch line-up. They were so last minute that I had my husband run to the store to pick up more strawberries about an hour before our company was due to arrive!

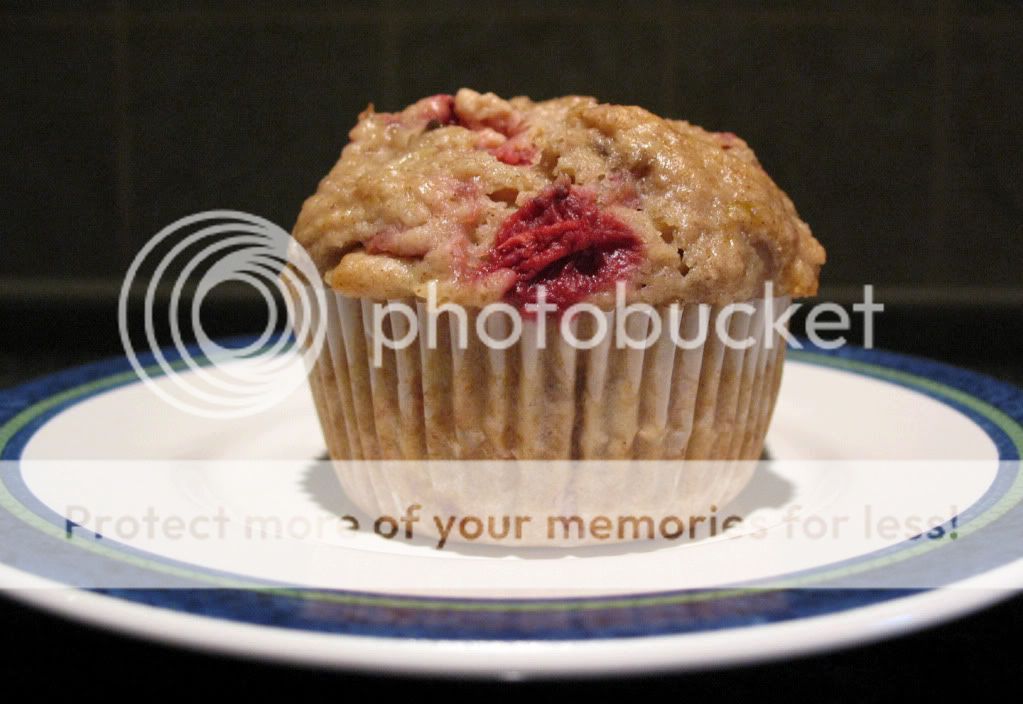
I spotted this recipe on Just2Good and followed it to a tee. Due to a limited produce selection, I ended up using frozen strawberries. Due to overzealous muffin-tin filling, I ended up with only 14 muffins instead of the suggested 18. I needed to bake them a bit longer, but they turned out beautifully! It’s worth noting that the muffin tops don’t brown when they are done, but they will spring back when lightly pressed.

The strawberry banana combination is delicious – something I had never thought to put in a muffin. The bananas lend a subtle sweetness and great moist consistancy to the muffin, while the strawberries provide bright bursts of flavor.

Strawberry Banana Muffins

Yields 18 muffins

2 1/4 Cup of flour
1/4 tsp baking soda
1 1/2 tsp baking powder
1/2 tsp salt
1 1/2 tsp cinnamon
1 1/2 Cup fresh strawberries, diced
3/4 Cup brown sugar
2 eggs
1 stick of butter, melted
2 large ripe bananas, mashed
1 tsp vanilla

1. Preheat oven to 350 degrees. Line muffin pan with 18 paper liners.
2. In a large bowl combine the flour, baking soda, baking powder, salt, and cinnamon.
3. After mixing, gently fold in the strawberries, making sure to coat them with flour.
4. In another bowl, combine the brown sugar, eggs, butter, bananas, and vanilla until mixed thoroughly.
5. Slowly combine the wet mixture with the dry mixture and stir until just combined. Overmixing will result in tough, dense muffins.
6. Divide batter evenly among the 18 muffin cups.
7. Bake for 22-25 minutes or until a toothpick inserted in the center of a muffin comes out clean.
8. Transfer to a wire rack to cool.

Crustless Quiche

May 11th, 2009 by Beth

I made my first quiche last November based upon this recipe for Easy Broccoli Quiche. Since I first made the quiche, I have changed the filling a bit and eliminated the crust.

I’m not a huge fan of pie crust, and removing the crust cut the calorie count in half. The filling in this new version is puffier, thanks to an additional egg and more milk. I probably add more than 1 cup of chopped broccoli, as broccoli, eggs and cheese has become one of my new favorite food combination. While it may sound fancy and indulgent, this is a healthy, filling meal.

We frequently have breakfast for dinner. Served with a slice of whole grain toast and some fruit, this quiche makes a delicious, filling meal. It also reheats well – perfect for a quick, mess-free breakfast or dinner leftovers the following night.

Crustless Broccoli Quiche

Yields 4 servings

1 tbsp olive oil
1/2 medium onion, finely chopped
1 garlic clove, minced
1 cup chopped broccoli (fresh or frozen)
1 cup shredded Cheddar Jack Cheese or Mozzarella Cheese
4 eggs, well beaten
1 cup skim milk
1 tsp salt
1/4 tsp black pepper

1. Preheat oven to 350 degrees F.
2. If using frozen broccoli, thaw before chopping.
3. Heat oil in large saute pan over medium-low heat.
4. Add onions, garlic and broccoli. Cook slowly, stirring occasionally until the vegetables are soft.
5. Whisk together beaten eggs and milk. Season with salt and pepper. Stir in vegetable mixture and cheese.
6. Spray 9-inch pie pan lightly with cooking spray.
7. Pour egg mixture into pie pan, and bake in preheated oven for 40-45 minutes, or until center has set.

Creamy Fruit Dip

May 11th, 2009 by Beth

This fruit dip was so easy to make! It was a fun, tasty addition to my simple fruit platter. The dip was a little thicker than I would have preferred, but that didn’t stop us from eating it all!

I found the original recipe on allrecipes.com, but made some modifications. I halved the original recipe and tweaked some measurements. Even with the reduced measurements, I still had more than enough dip for the four of us. I used more cream cheese that called for, and added some confectioner’s sugar to make the dip a little sweeter. Based upon reviewer information, I made the dip the night before and allowed it to chill overnight. As the dip chilled, the sweetness became more pronounced and the dip thickened up a bit.

Creamy Fruit Dip

4 oz. fat free cream cheese
4 oz. reduced fat whipped topping
4 oz. marshmallow cream
2 tbsp. confectioner’s sugar

1. Combine the first three ingredients in a mixing bowl and beat together until smooth.
2. Add confectioner’s sugar as desired to attain desired sweetness.
3. Refrigerate in a covered container.