Authors
Beth
Kathleen
Lisa
Contact
domesticpursuits [at] gmail.com
Categories

Posts Tagged ‘Candy Cane’

Peppermint Brownie Cake Pops

Monday, January 2nd, 2012

Ok so I recently found the Peppermint Brownie Cake Pops at Starbucks and my life has not been the same since.  They are that delicious.  And somehow, under 200 calories…I’m guessing that’s because they are so small, but really this sweet treat is all I really need to get me through my day.  I also, however, realized that they are sadly seasonal items – so probably sometime this month they will be trickling out of stores near you.  Obviously, I could not let this happen without figuring out a reasonable knock-off recipe prior to the inevitable end of the holiday season.

I have to say, this recipe is a pretty passable version of the deliciousness that is the Peppermint Brownie Cake Pop.  I made it for Christmas this year, and it was a big hit to say the least.  It also is very easy, even if you’ve never tried cake pops before.  Basically Cake Pops are what you make if your cake comes out all crumbly and fall-apart-y.  You combine the cooked and crumbled cake with frosting and form into balls, about 1.5 inches in diameter, then freeze until semi-solid.  For the finishing touch, you put a stick into the ball of crumbled cake (since it’s frozen, it won’t fall apart) and then dip into your choice of coating, which for me was melted white chocolate.  Finally, sprinkle with whatever cute/tasty decoration you wish to use.

We sincerely enjoyed making these, and also eating them...although I do not recommend licking the candy coating off of a butter knife as my sous chef is.


I used a store-bought brownie mix, seeing as I was going to be crumbling it all up and mixing it with frosting to make it even moister and more delicious.  A tip for melting white chocolate here -if you add about 1-2 tsp of vegetable oil, the white chocolate melts much more smoothly, and is about a million times easier to work with.  I suggest using a double boiler for this recipe, (rather than my go-to chocolate melting strategy – the microwave) as it takes a while to dip all of the cake balls into the chocolate, and this will keep your white chocolate good to go the whole time.  Lastly, I would strongly recommend having a block of unused floral foam on hand, so that you can place the sticks into it and have the cake pops harden without a flat side.  Makes them much more pretty.

Peppermint Brownie Cake Pops – a la Starbucks

  • 1 boxed brownie mix, prepared according to package instructions and cooled
  • 4oz cream cheese, softened  **you may use frosting instead of cream cheese if you prefer a sweeter finished product
  • 1 package white chocolate chips
  • 1-2 tsp vegetable oil
  • 1 bag starlight mints or 1 box candy canes, crushed
  • Candy sticks, found in the candy-making section of your local craft store

Place prepared brownies into the bowl of your stand mixer and turn it on.  Add softened cream cheese, and mix until the brownie crumbs are moistened.  Form into 1.5 inch balls and place on a parchment-lined cookie sheet.  Freeze for at least 1 hour.  Remove from freezer and insert a candy stick into each ball.  Place your white chocolate chips and vegetable oil into the bowl of a double boiler and place over a small amount of boiling water.  When the chips start to become glossy-looking, stir until they melt completely and are smooth.  Dip each cake pop into the melted white chocolate.  Immediately dip the cake pop into the crushed peppermint.  Finally, place the cake ball sticks into a waiting block of unused floral foam, so that your cake pops end up perfectly round.  Enjoy!

Homemade Marshmallows

Saturday, December 24th, 2011

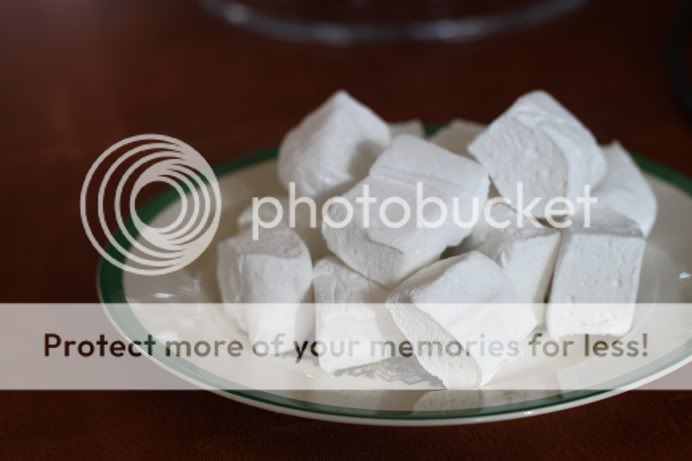
I always wondered how marshmallows were made – the puffy soft sugary goodness seemed like it would be elusively difficult to replicate in my own kitchen, so I always just bought whatever I could find at the local market whenever we wanted to make S’mores, or have a few in my hot cooca.  As my husband reminded me when I told him of my plan to make marshmallows last week, the first time I saw Alton Brown make them on TV one night, I incredulously stated it seemed pointless to put so much work into making something as simple as  marshmallows.  Turns out, homemade marshmallows really are THAT much better than the store-bought product.  And, they are actually incredibly easy.  Really easy.  Like, 15 minutes start-to-finish make-on-a-weeknight-after-a-long-day-of-work easy.  Bonus, they also use mostly things you already have stashed away in your pantry.  The most time-intensive part is preparing the pans, so your homemade marshmallows don’t stick.  They take very little cooking, and I’m pretty sure they are fool proof.

This year instead of making cookies for family and friends, I opted to make homemade hot cocoa mix and homemade marshmallows for gifts.  The best part is you can flavor them however you want – I chose to make candy cane marshmallows, and vanilla bean marshmallows.  They came out beautiful, and they are super tasty.

Maybe Santa would appreciate some homemade marshmallows tonight instead?

Homemade Marshmallows – from MarthaStewart.com

  • Nonstick cooking spray
  • 3 (1/4-ounce) packages unflavored gelatin
  • 1/2 cup cold water
  • 2 cups granulated sugar
  • 2/3 cup light corn syrup
  • 1/4 cup water
  • 1/4 teaspoon coarse salt
  • 1 tsp vanilla extract
  • 1 vanilla bean, scraped
  • Confectioners’ sugar, sifted (to coat)

Prepare 2 9×9 square baking dishes by coating with cooking spray.  Line each with plastic wrap, and then spray the plastic wrap with cooking spray as well.

In the bowl of your stand mixer fitted with the whisk attachment (or a large bowl, with a hand mixer nearby), place 1/2 cup cold water and the gelatin.  Let soften for about 10 minutes.  In the meantime, in a medium saucepan over medium-high heat, place sugar, corn syrup, water, and salt.  Bring to a full boil, stirring occasionally.  Boil for about 1 minute.  Remove from the heat.  With your stand mixer on high (or hand-mixer on high), slowly drizzle the hot sugar syrup down the side of the bowl.  Add the vanilla extract and the vanilla bean seeds.  Mix on high for 10-12 minutes.  Spray a rubber spatula with cooking spray, and working quickly use the spatula to transfer the warm marshmallow to the baking dish.  Spread evenly in the pan.  Let sit for at least 2 hours (up to 24 hrs).

Remove marshmallows from the pan together with the plastic wrap to a cutting board lightly dusted with confectioners’ sugar.  Peel away the plastic wrap from the side.  Spray a pizza cutter with cooking spray.   Cut marshmallows into 1.5 inch wide strips.  Then cut each strip into 1.5 inch pieces, to form cubes.  Toss with sifted confectioners sugar, and keep in an airtight container.

Candy Cane Marshmallows – adapted from MarthaStewart.com

Follow recipe as above, omitting vanilla extract and vanilla bean.  Instead, add 3/4 tsp peppermint extract.  Transfer quickly to the prepared pans and spread evenly.  Add drops of food coloring (I used red and green) on top of the marshmallows.  Using a bamboo skewer, swirl the food coloring through the marshmallow.  Let sit as above, and then slice as above.  Enjoy!

Subscribe
Email Registration  Email
  RSS
Recipe Sites
  • All Recipes
  • Cooking Light
  • Epicurious
  • Food Network
Archives
Sitemeter