Authors
Beth
Kathleen
Lisa
Contact
domesticpursuits [at] gmail.com
Categories

Posts Tagged ‘Cookies’

Black and White Cookies

Saturday, March 12th, 2011

Black & White Cookies are amazing - there’s the soft, cakey cookie part and the rich smooth frostings – the combination makes me pick them up as often as I can.  As I never thought about baking them before, I thought they would be the perfect addition to my list of things to make while I’m 30!  It’s just over halfway for me to 31 now, and I’ve been slacking off a bit on my list in favor of other things that have come to mind, like homemade (wal)nutella and buffalo chicken dip, which is I suppose the peril of making a list of things you plan to make over the course of the next 365 days.  Of course when I made the list, I didn’t really think that I should probably keep my pastry intake to a minimum – but, well, one has to do what one has to do when it comes to making all 30 things on my list.  So here I am, catching up and baking Black and White Cookies.  The recipe I made was adapted from a few places – but primarily from Smitten Kitchen, and from David Lebowitz’s latest cookbook, Ready for Dessert.  I wasn’t sure about the recipe for the frosting from the Smitten Kitchen one – it just seemed like it would be too liquidy to me – and my frostings usually tend to err on the liquidy side to begin with.  I opted instead for the Lebowitz frostings, using the Smitten Kitchen cookie.  These cookies were fantastic: soft and chewy with creamy frosting – I can’t get enough of them!

Black and White Cookies

adapted from Smitten Kitchen and Ready for Dessert, by David Lebowitz

For the cookies:

  • 1 scant cup granulated sugar
  • 1 stick unsalted butter, at room temperature
  • 2 large eggs
  • 3/4 cups milk
  • 1/4 teaspoon vanilla extract
  • 1/8 teaspoon lemon extract
  • 1 and 1/4 cups cake flour
  • 1 and 1/4 cups all-purpose flour
  • 1/4 teaspoon baking powder
  • 1/4 teaspoon salt

For the frosting:

  • 2 cups, plus 2 tbsp powdered sugar or more if needed
  • 2 tsp, plus 2 tsp light corn syrup
  • 1/4 tsp lemon extract
  • 1 tsp vanilla extract
  • 3 tbsp water, plus more if needed
  • 3 tbsp Dutch process cocoa powder

Preheat your oven to 375 degrees, and line 2 cookie sheets with parchment paper.  In a stand mixer cream together butter and granulated sugar until fluffy and light.  Add in eggs, milk and extracts, mixing thoroughly.  In a separate bowl, sift together the flours, baking powder, and salt.  Gradually stir the dry ingredients into the wet ones, until the dough is formed.  (Be careful not to overmix, so the cookies don’t become tough.)  Drop by the tablespoon onto the parchment lined pans – these will bake into approximately 2 inch cookies.  Bake for 18-20 minutes in the preheated oven, or until cookies are lightly golden at the edges.  Cool completely on a wire rack.

For the frostings – mix together 2 cups of powdered sugar, 2 tsp of the corn syrup, extracts, and 3 tbsp of water until smooth.  Divide this mixture into two portions.  In one of the portions, stir in the cocoa powder until smooth – if this is too dry, add water in very small increments (1/2 teaspoon at a time) stirring after each addition until smooth.  To the other portion of frosting, stir in the remaining 2 tbsp of powdered sugar.  Spread chocolate frosting on one half of the cookie, and the white frosting on the other half.  Enjoy!

Raspberry Lemonade Sandwich Cookies

Sunday, January 30th, 2011

I don’t know about you, but I am getting a little tired of winter.  We easily have 2.5 feet of snow on our lawn, and it seems the stream of various manners of frozezn precipitation and shovelling has been endless.  When picking out a recipe to bring to Beth’s for dessert this week then, I wanted to find one that made me think of 80 degree days, flowers and trees in bloom, and fresh fruit to get me through the next few months until we’re nearing the spring.  This recipe combines two of my favorite flavors – sweet raspberries and tart lemons into a tasty little sandwich.  This was my first attempt at a sandwich cookie, and I think it went quite well!  I had picked up this linzer cookie cutter set during the holidays and though I never got to using it in my Christmas baking, I was dying to give it a whirl, and this was the perfect opportunity.  I just love all the little fruit cut-outs – and a fruity recipe is surely needed to use it!  Certainly if you do not happen to have a linzer cookie cutter, you can just use a round cookie cutter with a smaller cookie cutter to create the little window in the top of the cookie.

All in all, these were very easy to make – the dough is very easy to work with compared to some other cut-out cookies I have made.  (I may in fact use this as my go-to sugar cookie recipe from now on!)  I doubled the lemon zest in the original recipe to give this recipe even more summery taste – I think I could probably have gone even higher, as the lemon came through but was on the subtle side.  In addition, I somehow found myself out of powdered sugar for dusting – so I opted for a chocolate drizzle, which worked quite nicely.  

The cookies were a big hit on our relaxing evening with a nice spot of tea.  Even though the snow continued to fall on that chilly January evening, it made me feel like summer was right around the corner. 

Raspberry Lemonade Sandwich Cookies

Source: Better Homes & Gardens

Ingredients:

  • 1/3  cup  butter, softened
  • 1/3  cup  shortening
  • 3/4  cup  granulated sugar
  • 1-1/2  teaspoons  baking powder
  • 1/4  teaspoon  salt
  • 1/4  teaspoon  ground cinnamon
  • 1    egg
  • 1  tablespoon  milk
  • 1/2  teaspoon  vanilla
  • 1  teaspoon lemon zest
  • 2  cups  all-purpose flour
  • 1/3  to 1/2 cup raspberry preserves or jam (or flavor of your choice)
  • 1/4 - 1/3 cup chocolate chips
  • 1/2 tsp canola or other vegetable oil
  • Directions:

    Using your stand mixer, cream together the butter and shortening on high speed.  Add in sugar, baking powder, salt, and cinnamon, and mix on medium speed for 2 minutes.  Scrape down sides of bowl and mix for an additional 1-2 minutes.  Add in egg, milk, vanilla and lemon zest on low speed for about 1 minute.  Stop to scrape down the sides of the bowl and mix for an additional 1 minute or until smooth.  Gradually add flour to the bowl while mixing on low speed.  The mixture will form a somewhat dry dough.  Divide into two portions, and form the dough into 2 discs.  Wrap these in plastic wrap and chill for at least 1 hr in the refrigerator.  When ready to bake, remove dough from the refrigerator and roll dough on a lightly floured surface to 1/4-1/8 inch thickness.  Use your cookie cutters to cut out the cookie halves.  The top halves should have a center window cut in them so the jam filling can peak through later.  Preheat your oven to 375 degrees.  Bake on an ungreased cookie sheet for 8-10 minutes – the edges should be just faintly browned when they are fully baked.  Cool completely on a wire rack. 

    To assemble – spread a small amount of jam onto the base of the cookie, then press the cut-out top half of the cookie onto the base. 

    To make the chocolate drizzle – place chocolate chips into a small bowl and add canola oil, stirring to coat the chocolate chips.  Microwave on high at 10 second intervals, stirring between each, until the chocolate chips are melted and smooth.  Drizzle over the assembled cookies.  Enjoy!

Cherry Lemonade Biscotti

Monday, February 9th, 2009

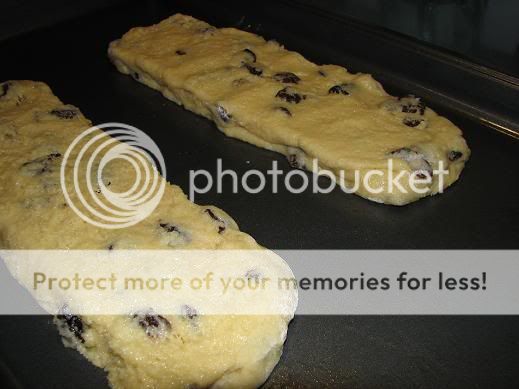
I started making Biscotti over the holidays because I found a recipe I liked, and I really love a tasty cookie along with my coffee in the morning. Between all the holiday parties and family functions we attended, I’ve tried a bunch of different recipes since – I find that this one has a great taste and texture without huge amounts of fat. It is modified from a Cooking Light recipe for plain lemon biscotti - my main modification includes adding dried cherries, which I personally like the best, but I have tried this recipe using chocolate chips, dried cranberries, and toasted walnuts as well. They supposedly freeze well (after baking but before the glazing step!) but I’ve never had enough left to try to freeze them.

Ingredients

  • 2 3/4 cups all-purpose flour
  • 1 cup sugar
  • 2 teaspoons baking powder
  • 1 tablespoon grated lemon rind
  • 2 tablespoons fresh lemon juice, divided
  • 1 tablespoon lemon extract
  • 1 tablespoon vegetable oil
  • 3 large eggs
  • 3/4 cup dried cherries (or cranberries, walnuts, chocolate chips)
  • Cooking spray
  • 2/3 cup powdered sugar

Preparation

Preheat oven to 350?.

Lightly spoon flour into dry measuring cups; level with a knife. Combine flour, sugar, and baking powder in a large bowl. Combine rind, 1 tablespoon lemon juice, extract, oil, and eggs, and add to flour mixture, stirring until well-blended (dough will be dry and crumbly). Mix cherries into the dough until well incorporated. Turn dough out onto a lightly floured surface; knead lightly 7 to 8 times. Divide dough in half. Shape each portion into an 8-inch-long roll. Place rolls 6 inches apart on a baking sheet coated with cooking spray; flatten each roll to 1-inch thickness.

Bake at 350? for 30 minutes. Remove the rolls from baking sheet; cool for 10 minutes on a wire rack. Cut each roll diagonally into 15 (1/2-inch) slices with a serrated knife using very little pressure so the cookies don’t crumble!

Place the slices, cut sides down, on baking sheet. Reduce oven temperature to 325?; bake for 10 minutes. Turn cookies over; bake an additional 10 minutes (the cookies will be slightly soft in center but will harden as they cool). Remove from baking sheet, and cool completely on wire rack.

Combine 1 tablespoon lemon juice and powdered sugar, and drizzle over the biscotti.

Pumpkin Chocolate Chip Cookies

Monday, November 17th, 2008

Pumpkin is the quintessential fall ingredient. This recently discovered pumpkin chocolate chip recipe has quickly become my go-to fall dessert and has received rave reviews from all who have tried it. I?ve noticed that the cookies seem to taste better the day after baking. They?re especially tasty with a cup of tea!

Having only recently discovered my love of pumpkin baked goods, I was somewhat taken aback by the appearance and smell of the canned pumpkin and was initially skeptical as to whether the cookies would be edible. The cookie dough has a distinct orangey cast, and only starts to smell like a cookie batter when the spice/flour mixture is added.

Don?t hesitate to add more pumpkin if the dough seems at all dry or not pumpkin-y enough for your liking. I?ve easily added up to an additional ? cup to a batch. Make sure you use pumpkin puree, not canned pumpkin pie filling. My recipe differs from the original only in that I added more cinnamon and more chocolate chips, in addition to the extra pumpkin.

It?s worth noting that these pumpkin chocolate chip cookies freeze well. Drop cookies on cookie sheets (line sheets with wax paper for easier removal) and freeze for about an hour. Remove the dough from the cookie sheet and store in freezer bag. When you want freshly-baked cookies, pop the frozen dough on a cookie sheet and bake in a preheated oven for 1-2 minutes more than your typical baking time.

Pumpkin Chocolate Chip Cookies
Adapted from the Boston Globe

Makes about 3-4 dozen

2 1/2 cups flour
1 teaspoon baking soda
1 teaspoon baking powder
1 1/2 teaspoon ground cinnamon
1 teaspoon ground nutmeg
1/2 teaspoon salt
1/2 cup (1 stick) butter, at room temperature
1 1/2 cups sugar
1 cup canned pumpkin puree (I add more if the batter seems dry)
1 egg, beaten
1 teaspoon vanilla extract
1 package (or a little less) semisweet chocolate chips or chunks

1. Set the oven to 350 degrees.
2. In a medium bowl, sift together the flour, baking soda, baking powder, cinnamon, nutmeg, and salt. Set aside.
3. In an electric mixer with the paddle attachment, cream the butter and sugar on medium speed until fluffy. Add the pumpkin, egg, and vanilla and beat just until blended.
4. Mix in the dry ingredients.
5. Remove the bowl from the mixer stand. With a rubber spatula, stir in the chocolate chips or chunks.
6. Drop the batter by heaping teaspoons 1 inch apart on the baking sheets.
7. Bake the cookies for 13 to 15 minutes or until lightly browned. Let the cookies cool on the sheets for a few minutes. Transfer to wire racks to cool completely.

Subscribe
Email Registration  Email
  RSS
Recipe Sites
  • All Recipes
  • Cooking Light
  • Epicurious
  • Food Network
Archives
Sitemeter
Blog Directories
Add to Technorati Favorites