Conquering Ugly, One Wallpaper at a Time
Saturday, July 17th, 2010And now for something completely different……another Domestic Pursuit – besides cooking!
My husband and I are big DIY’ers. We bought our house three years ago and have slowly fought back the ugly inside of our 1920’s townhouse previously decorated in 1970’s finest:

Yep, that’s right – Kermit the Frog green carpeting and pink striped wallpaper, complete with plastic-covered pink furniture and a light formica dining room table set. The dream house for all newly-wed homebuyers everywhere, right?? (Well, let’s just say it was better than some things we saw – for example, a 3 piece lavender ceramic bathroom) Pretty much every surface except the floors was covered in wallpaper. (Yep, that’s right - wallpaper on the CEILINGS!!) Anyway – many rooms and many moons later, our house looks great…except for that last little project we’ve always been meaning to get to. You know what I mean, right?

I write this post because over the past 3 years of DIY home redecorating, my husband and I have learned many a technique – from carpet removal to tiling to spackling – it’s easier than you think, and it has saved us tons. I hope I can help someone else out there in their weekend battles against the ugly.

This particular post is devoted to my passion for removing wallpaper. Yep, that’s right – removing wallpaper. Okay, maybe ‘passion’ is an overstatement – hard to imagine anyone finds this a rewarding activity, right? Well I personally hate wallpaper. Never liked it, not one bit. I’m sure there’s a time and a place where it looks nice, such as my in-laws, but it’s just not my thing. Not sure who ever thought glueing pink striped paper to a wall was a good idea, but they certainly need a good eye exam in my book. So any activity devoted to removing said wallpaper I find to be very, very rewarding.
Well, after 3 years of looking at peeling dingy blue flowered wallpaper, we are finally tackling the last ugly room in our house – the master bedroom. And, we are stripping the last few square feet of wallpaper off our 1920’s plaster walls.
Tools needed:

- Plastic scraper
- Wallpaper piercing tool, such as Zinsser PaperTiger Scoring Tool
- Clean spray bottle (we recycled an old window-cleaner bottle, well rinsed of course!)
- Cheap fabric softener
- Water
- Drop cloth
Before you start: lay your drop cloth on the floor where you plan to scrape wallpaper – you’ve been warned, this is a messy process. Make sure you remove all hardware (nails, switch plates, outlet covers, curtain brackets, etc) from the wall you intend to peel.
To start, locate any loose bits of wallpaper on the section you intend to peel. Start pulling! Maybe you’ll get lucky and a big piece will just pull right off! On our walls, the vinyl part of the wallpaper peeled off easily leaving the paper backing stuck to the wall.

If you are unable to find any loose bits (unlike me) or your luck has run out with pulling at the loose bits, then start with the scoring tool – using light pressure, rub it in circles on the wall.

After you have perforated the section you wish to peel, it’s time to use a loosening agent.
Now, there are many expensive, fancy, and debatably effective wallpaper removing solutions on the market – however after having trying multiple commercially available options, we found that a simple, homemade solution worked the best. Our secret is a 1:1 mix of fabric softener and water – doesn’t have to be anything fancy here, a carton of the dollar store variety works just fine and has the added perk of smelling real nice. Mix equal parts water and fabric softener into your spray bottle. Liberally spray this solution on the perforated wallpaper and let it sit…how long depends on your walls and wallpaper. For me, 5-10 minutes works just fine.
Time to scrape with the plastic scraper! Hopefully your wallpaper will now slide easily off the walls; should it not, you may need to add more solution and/or soak the wallpaper for longer.

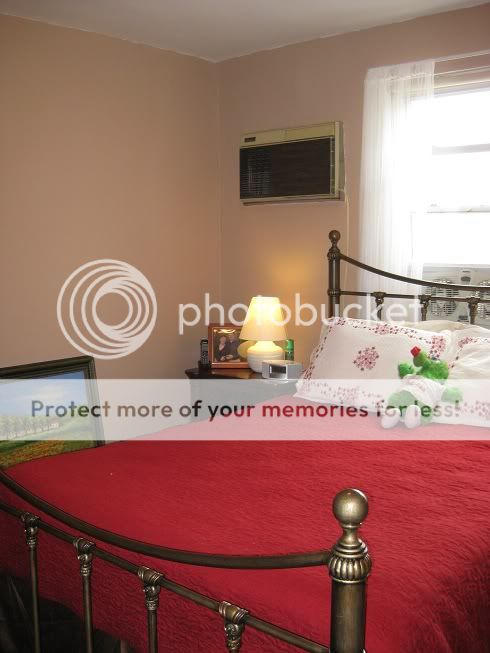
There you go! Score: Wallpaper, zero. Me, one. After several hours of wallpaper stripping, spackling, priming and painting – our room now looks like this:

Stay tuned for further home improvement posts as the husband and I are in the process of selling and moving out of our lovingly updated house (sniff, sniff) now completely free of ugly, and relocating to the fine New England area as I pursue my dream job. This may mean a transient decrease in my recipe blogging, while I will have most of my kitchen packed up into boxes…but I hope to have a more spacious kitchen to blog from in a short time.
